Difference between revisions of "Width Tool"
m (Text replace - ']]' to '}}') |
m (options from template ° nota section) |
||
| (7 intermediate revisions by 4 users not shown) | |||
| Line 1: | Line 1: | ||
| + | <!-- Page info --> | ||
| + | {{Title|Width Tool}} | ||
<!--Categories--> | <!--Categories--> | ||
| − | {{ | + | {{Category|Tools}} |
| + | {{NewTerminology}} | ||
| + | <!-- Page info end--> | ||
{{l|Image:Width_icon.png|64px}} <span style="font-size:150%">'''ALT-W'''</span> | {{l|Image:Width_icon.png|64px}} <span style="font-size:150%">'''ALT-W'''</span> | ||
| + | ==Introductions== | ||
| + | The Width Tool is designed for increasing or decreasing the width of a line much like you would with a pencil on paper. | ||
| + | ==Usage== | ||
| + | To change the width on a particular segment of a line, just select the {{l|Outline Layer}} you want, move your mouse over that line, press the left mouse button and move cursor back and forth along the line, like you're scratching something. The width of outline will be increased at the places where you moved the cursor. If you want to decrease the width, just hold {{Shortcut|Ctrl}} while scratching. | ||
| − | The Width Tool was designed for | + | The Width Tool was primarily designed for the "tablet" workflow, so you will get the best experience by using it with the tablet stylus. It is similar to making line thicker with a pencil or thinner with an eraser (when holding the {{Shortcut|Ctrl}}). |
| − | + | NOTE: The Width Tool is intended to fine-tune line width. If you want to heavily increase/decrease the line width it’s better | |
| + | to use the {{l|Transform Tool}} to directly manipulate the width {{l|Handle|handles}}. | ||
| − | + | ==Options== | |
| + | <!-- Use of Template|WidthToolOptions --> | ||
| + | {{WidthToolOptions}} | ||
| − | + | ==Nota== | |
| − | + | If you don't want the {{Literal|Width Handle}}s to be displayed, while using the Width Tool, just turn them off by pressing {{Shortcut|Alt|5}}. You can turn them on again with the same keybinding. | |
| − | + | ||
| − | + | ||
| − | + | ||
| − | + | ||
| − | + | ||
| − | + | ||
Latest revision as of 01:44, 8 March 2016
Contents
Introductions
The Width Tool is designed for increasing or decreasing the width of a line much like you would with a pencil on paper.
Usage
To change the width on a particular segment of a line, just select the Outline Layer you want, move your mouse over that line, press the left mouse button and move cursor back and forth along the line, like you're scratching something. The width of outline will be increased at the places where you moved the cursor. If you want to decrease the width, just hold Ctrl while scratching.
The Width Tool was primarily designed for the "tablet" workflow, so you will get the best experience by using it with the tablet stylus. It is similar to making line thicker with a pencil or thinner with an eraser (when holding the Ctrl).
 NOTE: The Width Tool is intended to fine-tune line width. If you want to heavily increase/decrease the line width it’s better
  to use the Transform Tool to directly manipulate the width handles.
Options
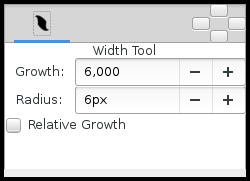
- Growth - Defines how much a single mouse move will affect the line width. It must be non-zero for this tool to have an effect on the spline.
- Radius - Defines the size of area around current cursor position in which a vertex will be affected. It is allows you to achieve a noticeable effect without having to follow the line precisely with the mouse. The Width Tool works fine on splines with lots of segments (such as those created with the Draw Tool), you will see it works on more than just the first vertex. It is a full circular area, other points may get in the way though.
- Relative Growth - Doesn't really work very well unless the "Radius" parameter is set to some huge value (like a million).
Nota
If you don't want the "Width Handle"s to be displayed, while using the Width Tool, just turn them off by pressing Alt5. You can turn them on again with the same keybinding.
