Difference between revisions of "Doc:Shiny Effects"
m |
(test) |
||
| (13 intermediate revisions by 5 users not shown) | |||
| Line 1: | Line 1: | ||
| − | <!-- | + | <!-- Page info --> |
| − | + | {{Title|Shiny Effects}} | |
| + | {{Category|Tutorials}} | ||
| + | {{Category|Tutorials Intermediate}} | ||
| + | {{NewTerminology}} | ||
| + | <!-- Page info end --> | ||
| + | Somes of the screenshots needs to be updated | ||
Shiny Effects #1 by Ceox | Shiny Effects #1 by Ceox | ||
| Line 10: | Line 15: | ||
'''Version of Synfig Studio:''' 0.61.07 | '''Version of Synfig Studio:''' 0.61.07 | ||
| − | In this tutorial we will make some shiny/glowy effects on your text. | + | In this tutorial we will make some shiny/glowy effects on your text. |
It might seem long to you because there is a lot of text, but when I | It might seem long to you because there is a lot of text, but when I | ||
| Line 22: | Line 27: | ||
We start by opening Synfig Studio and creating a new document with all | We start by opening Synfig Studio and creating a new document with all | ||
the default settings except these: | the default settings except these: | ||
| − | + | [[File:Shiny-tut_pic1.gif]] | |
| − | + | ||
=== Step 2: Create Text Layer === | === Step 2: Create Text Layer === | ||
| Line 31: | Line 35: | ||
do. Start by adding the text layer: | do. Start by adding the text layer: | ||
| − | + | [[File:Shiny-tut_pic2.gif]] | |
=== Step 3: Select Text Layer === | === Step 3: Select Text Layer === | ||
| Line 37: | Line 41: | ||
Now you should see a "Text Layer" text in the middle of your | Now you should see a "Text Layer" text in the middle of your | ||
project. Select the text layer in the layers list, so that it is | project. Select the text layer in the layers list, so that it is | ||
| − | highlighted, and you should see its parameters in the " | + | highlighted, and you should see its parameters in the "Parameters" window, |
which is on the bottom of your workspace if you haven't placed it | which is on the bottom of your workspace if you haven't placed it | ||
somewhere else. (Click on the image to enlarge it; it will open in a | somewhere else. (Click on the image to enlarge it; it will open in a | ||
new window). | new window). | ||
| − | + | [[File:Shiny-tut_pic3.gif]] | |
| − | + | ||
=== Step 4: Edit Text Layer === | === Step 4: Edit Text Layer === | ||
| − | Now we are going to modify the text in the " | + | Now we are going to modify the text in the "Parameters" window. First |
double-click on the color in the "Value" cell and choose the color you | double-click on the color in the "Value" cell and choose the color you | ||
want, with 100 "Alpha". I chose a darkish blue. Then double-click on | want, with 100 "Alpha". I chose a darkish blue. Then double-click on | ||
| Line 55: | Line 58: | ||
darkened all the values that should be good to go by default, but if | darkened all the values that should be good to go by default, but if | ||
you like you can check the others as well). | you like you can check the others as well). | ||
| − | + | [[File:Shiny-tut_pic4.gif]] | |
| − | + | ||
=== Step 5: (OPTIONAL) === | === Step 5: (OPTIONAL) === | ||
| Line 63: | Line 65: | ||
the text, like this step tells you. Right click on the text layer in | the text, like this step tells you. Right click on the text layer in | ||
the layers list and choose "Duplicate Layer": | the layers list and choose "Duplicate Layer": | ||
| − | + | [[File:Shiny-tut_pic5.gif]] | |
| − | + | ||
Now you should have two "Text" layers on top of each other. Choose | Now you should have two "Text" layers on top of each other. Choose | ||
| Line 74: | Line 75: | ||
perfectly around the text. You can fix this, my moving the lower layer | perfectly around the text. You can fix this, my moving the lower layer | ||
a bit. This is how my text looks like now: | a bit. This is how my text looks like now: | ||
| − | + | [[File:Shiny-tut_pic6.gif]] | |
=== Step 6: === | === Step 6: === | ||
| − | Now we create the | + | Now we create the first the shiny thing. Add a new layer just like we |
added the text layer, by clicking on the little black arrow in the | added the text layer, by clicking on the little black arrow in the | ||
| − | corner of our canvas and choosing " | + | corner of our canvas and choosing "Layer > New Layer > Gradients > Linear Gradient. |
| − | Gradients | + | Now your canvas should be filled with |
a some colored gradient. Don't worry, we will get your text back in | a some colored gradient. Don't worry, we will get your text back in | ||
the next step. Which actually comes now. Choose the "Linear Gradient" | the next step. Which actually comes now. Choose the "Linear Gradient" | ||
layer in the layers list and then double-click on the "Gradient" | layer in the layers list and then double-click on the "Gradient" | ||
| − | value in the " | + | value in the "Parameters" window, like we double-clicked in Step 4. Now |
you should see a window which calls itself the "Gradient Editor". At | you should see a window which calls itself the "Gradient Editor". At | ||
the bottom of this window you should see two black 'half-arrows', one | the bottom of this window you should see two black 'half-arrows', one | ||
| Line 92: | Line 93: | ||
selected.) Change the color to white and the "Alpha" value to 0. Now | selected.) Change the color to white and the "Alpha" value to 0. Now | ||
select the arrow on the right side and do the same thing. Now insert a | select the arrow on the right side and do the same thing. Now insert a | ||
| − | new arrow (or | + | new arrow (or Color Stop, what ever you want to call them) by clicking in |
the center of the area, which is over the half-arrows with your right | the center of the area, which is over the half-arrows with your right | ||
| − | mouse button and select "Insert | + | mouse button and select "Insert Color Stop". Notice that the menu will |
only appear when you keep the right mouse button pressed down. Now | only appear when you keep the right mouse button pressed down. Now | ||
select this arrow and change its color to white and its "Alpha" value | select this arrow and change its color to white and its "Alpha" value | ||
| Line 101: | Line 102: | ||
this: | this: | ||
| − | + | [[File:Shiny-tut_pic7.gif]] | |
and your canvas something like this: | and your canvas something like this: | ||
| − | + | [[File:Shiny-tut_pic8.gif]] | |
=== Step 7: === | === Step 7: === | ||
| Line 117: | Line 118: | ||
Select the "Linear Gradient" layer in the layers list and set its | Select the "Linear Gradient" layer in the layers list and set its | ||
| − | "Blend Method" to "Onto" in the " | + | "Blend Method" to "Onto" in the "Parameters" window. Now the Gradient |
layer is visible only on the layers below it. Your gradient should | layer is visible only on the layers below it. Your gradient should | ||
disappear if you placed like the video showed in the previous | disappear if you placed like the video showed in the previous | ||
step. (Not on top of the text) | step. (Not on top of the text) | ||
| − | + | [[File:Shiny-tut_pic9.gif]] | |
=== Step 9: === | === Step 9: === | ||
| Line 128: | Line 129: | ||
It's easier to do all the animations afterwards, so now we could make | It's easier to do all the animations afterwards, so now we could make | ||
the other shiny effect, which I prefer to call a 'shimmer'. We start | the other shiny effect, which I prefer to call a 'shimmer'. We start | ||
| − | by taking the | + | by taking the Spline tool ({{l|Image:draw-path_128sif.png}}) and zooming |
in 400% into our canvas. You can zoom in and out in the "Navigator": | in 400% into our canvas. You can zoom in and out in the "Navigator": | ||
| − | + | [[File:Shiny-tut_pic19.gif]] | |
| − | Â Now we have to draw a new object with the | + | Â Now we have to draw a new object with the Spline tool |
| − | ( | + | ({{l|Image:draw-path_128sif.png}}) in to some sharp corner of our |
text. I chose the corner of the X, because this effect looks good on | text. I chose the corner of the X, because this effect looks good on | ||
the last character(s). So now draw a shape like this one: | the last character(s). So now draw a shape like this one: | ||
| Line 139: | Line 140: | ||
(Insert a controller by pressing your left mouse button and close the | (Insert a controller by pressing your left mouse button and close the | ||
line by clicking on the first point with your right mouse button and | line by clicking on the first point with your right mouse button and | ||
| − | selecting "Loop | + | selecting "Loop Spline") |
| − | + | [[File:Shiny-tut_pic20.gif]] | |
=== Step 10: === | === Step 10: === | ||
| Line 146: | Line 147: | ||
Now zoom out to 100% again. You should now have a new layer in your | Now zoom out to 100% again. You should now have a new layer in your | ||
layers list: | layers list: | ||
| − | + | [[File:Shiny-tut_pic10.gif]] | |
| − | + | ||
Select it by clicking on it. Now we have its parameters in the | Select it by clicking on it. Now we have its parameters in the | ||
| − | " | + | "Parameters" window. Change its color to white, if it isn't it aleady. You |
also have to set its "Feather" to 1pt and the "Type of Feather" to | also have to set its "Feather" to 1pt and the "Type of Feather" to | ||
"Box Blur". We don't want it to be visible yet so we also have to set | "Box Blur". We don't want it to be visible yet so we also have to set | ||
the "Alpha" value to 0 in the color editor. Now everything is ready | the "Alpha" value to 0 in the color editor. Now everything is ready | ||
for the animation. | for the animation. | ||
| − | + | [[File:Shiny-tut_pic11.gif]] | |
== Part 2 - Animating == | == Part 2 - Animating == | ||
| Line 163: | Line 163: | ||
First we animate the "Linear Gradient" layer. Select it in the layers | First we animate the "Linear Gradient" layer. Select it in the layers | ||
list. Now you should have to have two green control points visible in | list. Now you should have to have two green control points visible in | ||
| − | your canvas. Choose the "Normal Tool" ( | + | your canvas. Choose the "Normal Tool" ({{l|Image:normal_icon-full.jpg}}) |
and select both of those points by drawing an rectangle over | and select both of those points by drawing an rectangle over | ||
them. Open the keyframe- window by clicking on its icon (a golden key) | them. Open the keyframe- window by clicking on its icon (a golden key) | ||
| − | in the same window where the " | + | in the same window where the "Parameters" are. Make sure your timeline |
indicator is at "0f" (the small orange line on a gray background) and | indicator is at "0f" (the small orange line on a gray background) and | ||
add a new keyframe by pressing on the blue icon. Move the timeline | add a new keyframe by pressing on the blue icon. Move the timeline | ||
| Line 172: | Line 172: | ||
like this: | like this: | ||
| − | + | [[File:Shiny-tut_pic12.gif]] | |
=== Step 2: === | === Step 2: === | ||
| Line 184: | Line 184: | ||
first animation has been created. You can move your timline indicator | first animation has been created. You can move your timline indicator | ||
around to see it. This should be your timeline and canvas now: | around to see it. This should be your timeline and canvas now: | ||
| − | + | [[File:Shiny-tut_pic13.gif]] | |
| − | + | ||
=== Step 3: === | === Step 3: === | ||
| − | Now let's | + | Now let's group our "Linear Gradient" layer and the two "Text" |
layers by selecting them all. (Select multiple layers by holding CTRL | layers by selecting them all. (Select multiple layers by holding CTRL | ||
down and selecting the layers). Then press on one of the selected | down and selecting the layers). Then press on one of the selected | ||
| − | layers and choose " | + | layers and choose "Group". The layers should now be grouped in |
| − | one layer with a box symbol and | + | one layer with a box symbol and labeled "Group". You can open |
all the layers by clicking on the small arrow on the left side of the | all the layers by clicking on the small arrow on the left side of the | ||
box- icon. | box- icon. | ||
| − | + | [[File:Shiny-tut_pic14.gif]] | |
=== Step 4: === | === Step 4: === | ||
| Line 206: | Line 205: | ||
window should pop up. Go to the "Time" tab and then set the "End Time" | window should pop up. Go to the "Time" tab and then set the "End Time" | ||
to 4s 2f. | to 4s 2f. | ||
| − | + | [[File:Shiny-tut_pic15.gif]] | |
| − | + | ||
=== Step 5: === | === Step 5: === | ||
| − | Select the " | + | Select the "NewSpline(some number) Region" layer, place the timeline |
indicator to "2s" and a add a keyframe, like in Step 2. Now repeat | indicator to "2s" and a add a keyframe, like in Step 2. Now repeat | ||
this by adding keyframes also to "3s" and "4s". Move your timeline | this by adding keyframes also to "3s" and "4s". Move your timeline | ||
indicator back to "2s" and press the green ball icon to get into the | indicator back to "2s" and press the green ball icon to get into the | ||
| − | animate editing mode. Now open the "Colors" window from the " | + | animate editing mode. Now open the "Colors" window from the "Parameters" |
window and set the "Alpha" value to 1. Close the window. Move the time | window and set the "Alpha" value to 1. Close the window. Move the time | ||
indicator to "3s" and set the "Alpha" value to 100 trough the | indicator to "3s" and set the "Alpha" value to 100 trough the | ||
| Line 223: | Line 221: | ||
this (without those texts, of course): | this (without those texts, of course): | ||
| − | + | [[File:Shiny-tut_pic16.gif]] | |
=== Step 6: === | === Step 6: === | ||
| − | Your animation is | + | Your animation is basically ready, but that shimmer needs some |
| − | + | enhancement. First add a new layer onto the "NewSpline(some number) | |
Region" layer, by left clicking on it and selecting "New Layer > | Region" layer, by left clicking on it and selecting "New Layer > | ||
Transform > Rotate". A new layer named "Rotate" should appear. Now | Transform > Rotate". A new layer named "Rotate" should appear. Now | ||
| − | lets | + | lets group the "Rotate" and "NewSpline..." layer like in Step 3, |
| − | but just selecting the "Rotate" and " | + | but just selecting the "Rotate" and "NewSpline..." layers this |
| − | time. If we wouldn't do this the | + | time. If we wouldn't do this the rotation effect would affect our |
| − | text too, but that's not what we want. Now you should have 2 | + | text too, but that's not what we want. Now you should have 2 Group layers. |
| − | + | Open the first one by pressing on the small | |
white arrow next to the [box]- icon. This is what your layers list | white arrow next to the [box]- icon. This is what your layers list | ||
should look like now: | should look like now: | ||
| − | + | [[File:Shiny-tut_pic17.gif]] | |
| − | + | ||
=== Step 7: === | === Step 7: === | ||
| Line 247: | Line 244: | ||
and a blue dot in both ends. Move the green dot to the center of your | and a blue dot in both ends. Move the green dot to the center of your | ||
shimmer like this: | shimmer like this: | ||
| − | + | [[File:Shiny-tut_pic18.gif]] | |
| − | + | ||
=== Step 8: === | === Step 8: === | ||
| Line 255: | Line 251: | ||
bottom left corner of your canvas is red, if you are), place your | bottom left corner of your canvas is red, if you are), place your | ||
timeline indicator to "2s" and select only the "Rotate" layer. Now | timeline indicator to "2s" and select only the "Rotate" layer. Now | ||
| − | you have to set the "Amount" value to 0.01 in the " | + | you have to set the "Amount" value to 0.01 in the "Parameters" window, |
just to set the waypoint. Move the timeline indicator to "3s" and set | just to set the waypoint. Move the timeline indicator to "3s" and set | ||
the "Amount" value to 180 (for 180 degrees) and then move the | the "Amount" value to 180 (for 180 degrees) and then move the | ||
| Line 262: | Line 258: | ||
Congratulations, you are done! | Congratulations, you are done! | ||
| − | + | Here's the Synfig Studio file: | |
| + | [[File:Shiny_Effects_Tutorial_1_by_Ceox.sif]] | ||
And here's the final result: | And here's the final result: | ||
| − | + | [[File:Shiny-tut_animation.gif]] | |
Hope this tutorial helped you with something :) | Hope this tutorial helped you with something :) | ||
Latest revision as of 17:22, 11 November 2018
Somes of the screenshots needs to be updated
Shiny Effects #1 by Ceox
Skill Level: Intermediate
Length: About 30 minutes
Version of Synfig Studio: 0.61.07
In this tutorial we will make some shiny/glowy effects on your text.
It might seem long to you because there is a lot of text, but when I first tried this out I did it in 5-10 minutes, so if you learn all the stuff you'll be able to do it that fast as well.
Contents
Part 1 - Designing
Step 1: Create New Document
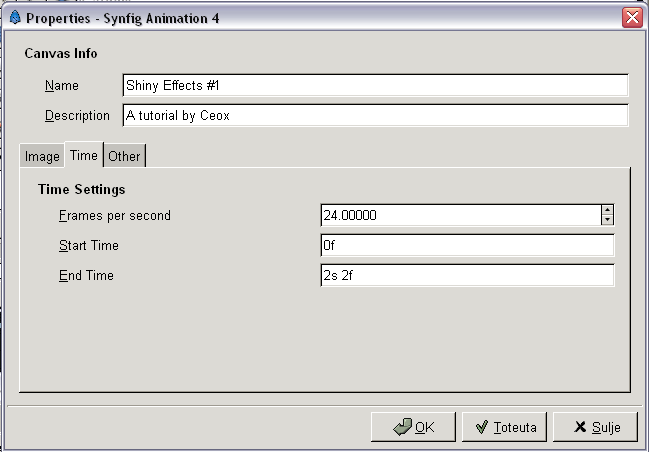
We start by opening Synfig Studio and creating a new document with all
the default settings except these:
Step 2: Create Text Layer
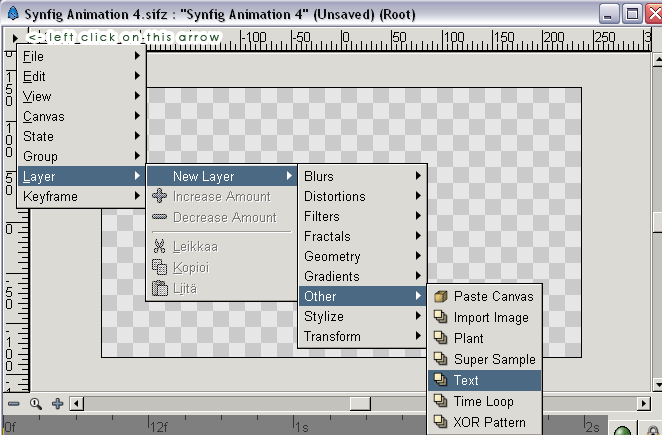
Now we create a new text layer. In this tutorial I'm going to use the text "Ceox". That's not my real name, but it will have to do. Start by adding the text layer:
Step 3: Select Text Layer
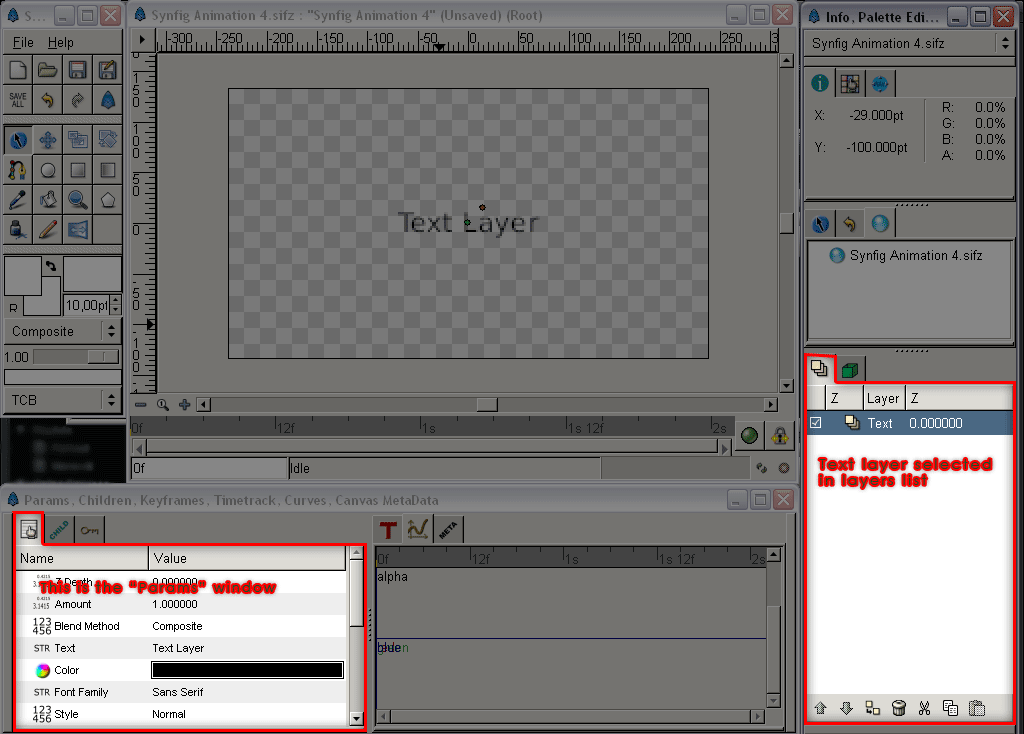
Now you should see a "Text Layer" text in the middle of your
project. Select the text layer in the layers list, so that it is
highlighted, and you should see its parameters in the "Parameters" window,
which is on the bottom of your workspace if you haven't placed it
somewhere else. (Click on the image to enlarge it; it will open in a
new window).
Step 4: Edit Text Layer
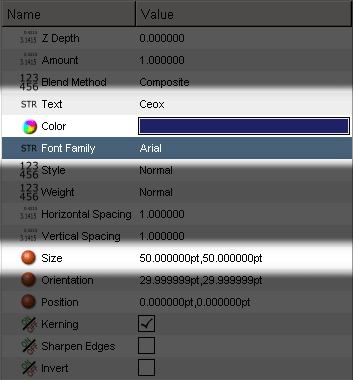
Now we are going to modify the text in the "Parameters" window. First
double-click on the color in the "Value" cell and choose the color you
want, with 100 "Alpha". I chose a darkish blue. Then double-click on
the "Text Layer" text, also in the "Value" cell and enter your name
into the pop-up window. After this, change the size to 50pt and the
font to Arial, both by double-clicking the field in the "Value"
cell. Here's a screenshot of all things need to be modified: (I have
darkened all the values that should be good to go by default, but if
you like you can check the others as well).
Step 5: (OPTIONAL)
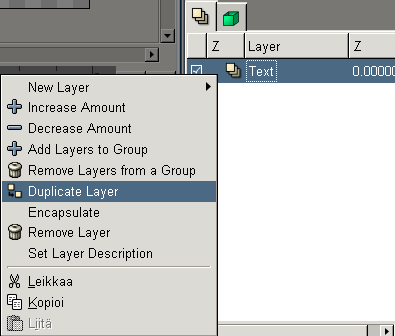
If you want some more "fancyness" on your text, create a stroke for
the text, like this step tells you. Right click on the text layer in
the layers list and choose "Duplicate Layer":
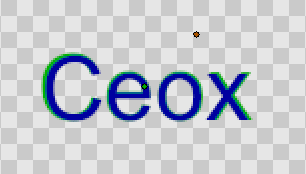
Now you should have two "Text" layers on top of each other. Choose
the lower "Text" layer and change the color to something else what
you have on the top "Text" layer. Im am going to choose a simple
green. Now change the size of this layer to about 2-3 pt bigger than
the layer on the top, in this case to 52pt. (50pt 2pt, if you didn't
get it). Now we have a stroke for our text, though it might not be
perfectly around the text. You can fix this, my moving the lower layer
a bit. This is how my text looks like now:
Step 6:
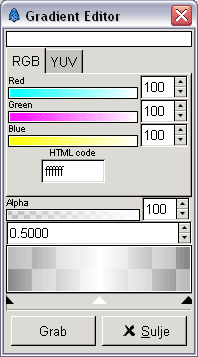
Now we create the first the shiny thing. Add a new layer just like we added the text layer, by clicking on the little black arrow in the corner of our canvas and choosing "Layer > New Layer > Gradients > Linear Gradient. Now your canvas should be filled with a some colored gradient. Don't worry, we will get your text back in the next step. Which actually comes now. Choose the "Linear Gradient" layer in the layers list and then double-click on the "Gradient" value in the "Parameters" window, like we double-clicked in Step 4. Now you should see a window which calls itself the "Gradient Editor". At the bottom of this window you should see two black 'half-arrows', one on the left side and one on the right side. Click on the one, which is on the left side. (When the color of it changes to white, it is selected.) Change the color to white and the "Alpha" value to 0. Now select the arrow on the right side and do the same thing. Now insert a new arrow (or Color Stop, what ever you want to call them) by clicking in the center of the area, which is over the half-arrows with your right mouse button and select "Insert Color Stop". Notice that the menu will only appear when you keep the right mouse button pressed down. Now select this arrow and change its color to white and its "Alpha" value to 50. As you may have noticed by now, the alpha amount controls the transparency of an object. Now your Gradient Editor should look like this:
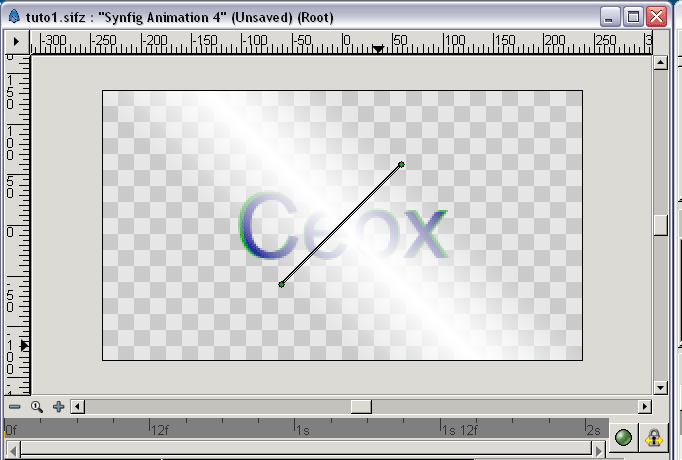
and your canvas something like this:
Step 7:
Rotate and scale the "Linear Gradient" layer with the "Normal Tool" using the control points like the video shows. [http://personal.inet.fi/musiikki/ceox/synfigtuto1/vid1.swf.html Click here to view video. Opens up in new window.]
Step 8:
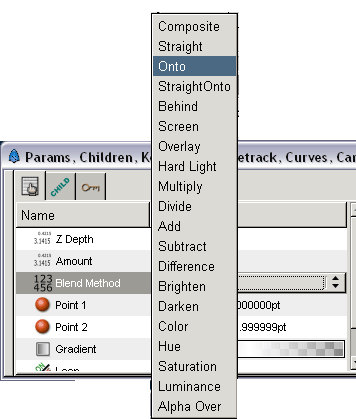
Select the "Linear Gradient" layer in the layers list and set its "Blend Method" to "Onto" in the "Parameters" window. Now the Gradient layer is visible only on the layers below it. Your gradient should disappear if you placed like the video showed in the previous step. (Not on top of the text)
Step 9:
It's easier to do all the animations afterwards, so now we could make
the other shiny effect, which I prefer to call a 'shimmer'. We start
by taking the Spline tool (Image:draw-path_128sif.png) and zooming
in 400% into our canvas. You can zoom in and out in the "Navigator":
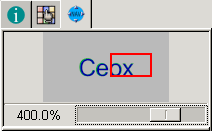
 Now we have to draw a new object with the Spline tool (Image:draw-path_128sif.png) in to some sharp corner of our text. I chose the corner of the X, because this effect looks good on the last character(s). So now draw a shape like this one:
(Insert a controller by pressing your left mouse button and close the
line by clicking on the first point with your right mouse button and
selecting "Loop Spline")
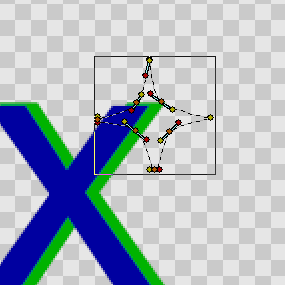
Step 10:
Now zoom out to 100% again. You should now have a new layer in your
layers list:
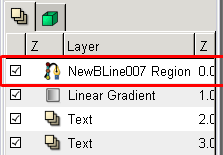
Select it by clicking on it. Now we have its parameters in the
"Parameters" window. Change its color to white, if it isn't it aleady. You
also have to set its "Feather" to 1pt and the "Type of Feather" to
"Box Blur". We don't want it to be visible yet so we also have to set
the "Alpha" value to 0 in the color editor. Now everything is ready
for the animation.
![]()
Part 2 - Animating
Step 1:
First we animate the "Linear Gradient" layer. Select it in the layers list. Now you should have to have two green control points visible in your canvas. Choose the "Normal Tool" (Image:normal_icon-full.jpg) and select both of those points by drawing an rectangle over them. Open the keyframe- window by clicking on its icon (a golden key) in the same window where the "Parameters" are. Make sure your timeline indicator is at "0f" (the small orange line on a gray background) and add a new keyframe by pressing on the blue icon. Move the timeline indicator to "2s" and add a new keyframe. Now your window should look like this:
Step 2:
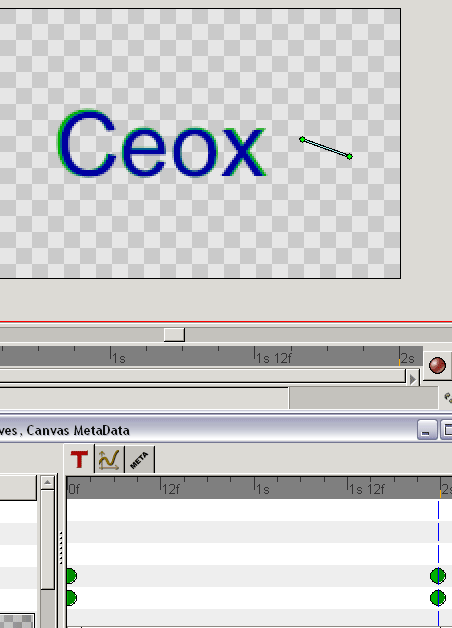
Move the time indicator to "0f" and press on the green ball in the
lower right corner of your canvas. After pressing on it, its color
changes to red, like it is in the screenshot. Now move the control
points up a bit (this doesn't affect the animation), just to create a
waypoint. Go back to "2s", where we inserted the second keyframe and
move the two green control points to the right side of your text. The
first animation has been created. You can move your timline indicator
around to see it. This should be your timeline and canvas now:
Step 3:
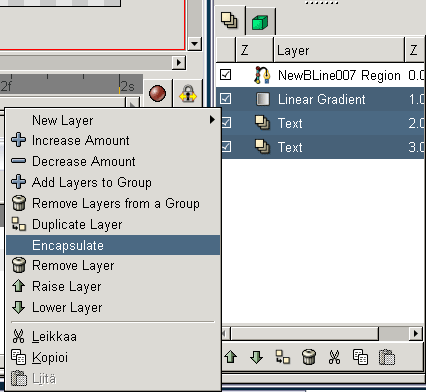
Now let's group our "Linear Gradient" layer and the two "Text" layers by selecting them all. (Select multiple layers by holding CTRL down and selecting the layers). Then press on one of the selected layers and choose "Group". The layers should now be grouped in one layer with a box symbol and labeled "Group". You can open all the layers by clicking on the small arrow on the left side of the box- icon.
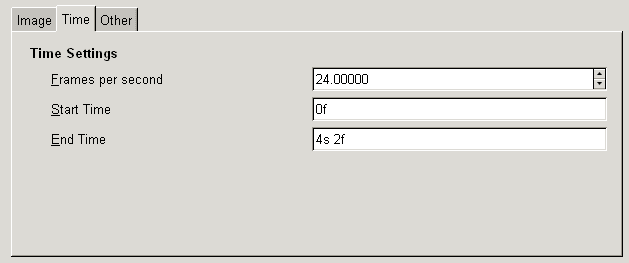
Step 4:
I just noticed, that I screwed up and we have to make the whole
animation a bit longer. Click on the black arrow in the upper left
corner of your canvas, select "Edit" and then "Properties". A new
window should pop up. Go to the "Time" tab and then set the "End Time"
to 4s 2f.
Step 5:
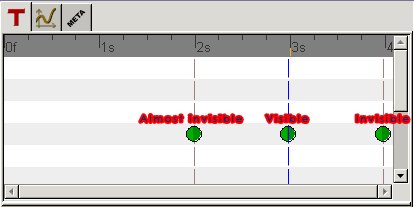
Select the "NewSpline(some number) Region" layer, place the timeline indicator to "2s" and a add a keyframe, like in Step 2. Now repeat this by adding keyframes also to "3s" and "4s". Move your timeline indicator back to "2s" and press the green ball icon to get into the animate editing mode. Now open the "Colors" window from the "Parameters" window and set the "Alpha" value to 1. Close the window. Move the time indicator to "3s" and set the "Alpha" value to 100 trough the "Colors" window like before. Now move the time indicator to "4s" and set "Alpha" to 0. Now we have the shimmer in the corner of our text fading in and out in 2 seconds. Your timeline should now look like this (without those texts, of course):
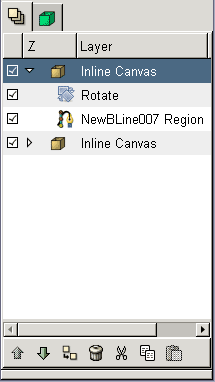
Step 6:
Your animation is basically ready, but that shimmer needs some
enhancement. First add a new layer onto the "NewSpline(some number)
Region" layer, by left clicking on it and selecting "New Layer >
Transform > Rotate". A new layer named "Rotate" should appear. Now
lets group the "Rotate" and "NewSpline..." layer like in Step 3,
but just selecting the "Rotate" and "NewSpline..." layers this
time. If we wouldn't do this the rotation effect would affect our
text too, but that's not what we want. Now you should have 2 Group layers.
Open the first one by pressing on the small
white arrow next to the [box]- icon. This is what your layers list
should look like now:
Step 7:
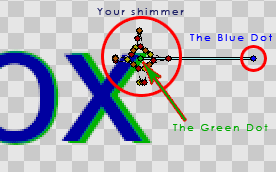
Select both of the layers in the opened "Inline canvas" and you should
see the outline of your shimmer and a new line, which has a green dot
and a blue dot in both ends. Move the green dot to the center of your
shimmer like this:
Step 8:
Make sure, you're still in the "Animate Editing Mode" (the ball in the bottom left corner of your canvas is red, if you are), place your timeline indicator to "2s" and select only the "Rotate" layer. Now you have to set the "Amount" value to 0.01 in the "Parameters" window, just to set the waypoint. Move the timeline indicator to "3s" and set the "Amount" value to 180 (for 180 degrees) and then move the timeline indicator to "4s" and the "Amount" value to 359.
Congratulations, you are done!
Here's the Synfig Studio file: File:Shiny Effects Tutorial 1 by Ceox.sif
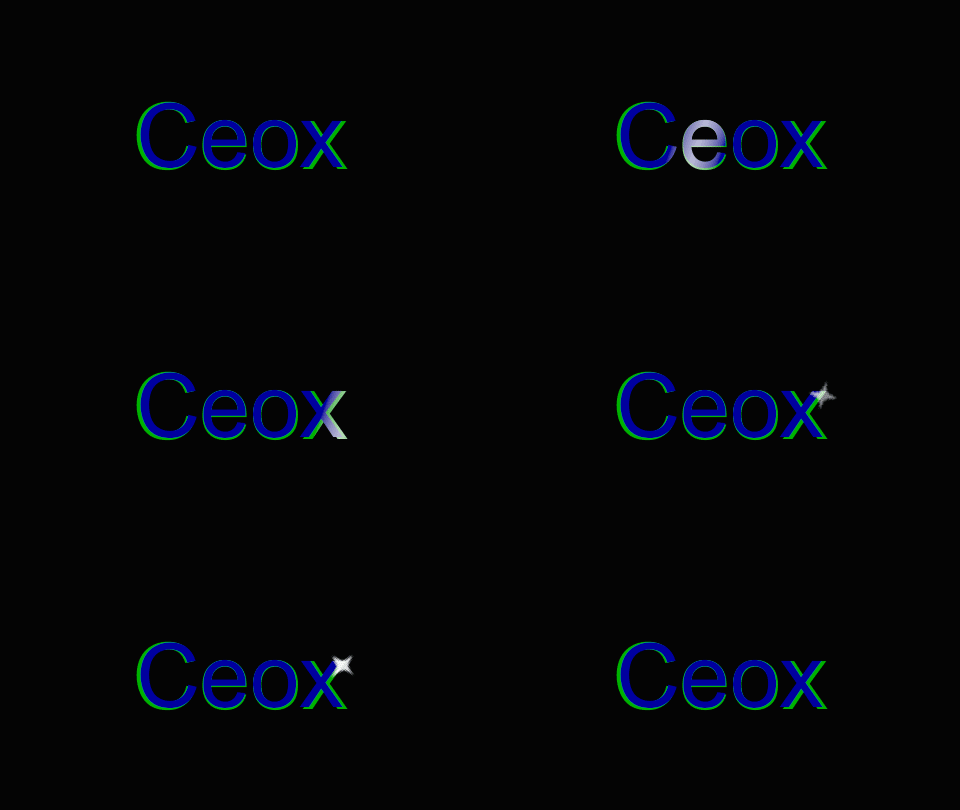
And here's the final result:
Hope this tutorial helped you with something :)
For further questions, contact me at ceoxmusic (at) gmail (dot) com
