Difference between revisions of "Doc:Write On"
m (Text replace - "{{Category|NewTerminology}}" to "{{NewTerminology}}") |
|||
| (11 intermediate revisions by 4 users not shown) | |||
| Line 1: | Line 1: | ||
| − | Write | + | <!-- Page info --> |
| + | {{Title|Write On}} | ||
| + | {{Category|Tutorials}} | ||
| + | {{Category|Tutorials Intermediate}} | ||
| + | {{NewTerminology}} | ||
| + | <!-- Page info end --> | ||
| − | This tutorial | + | This tutorial was actually written while using synfigstudio 0.63.00 . Somes of the screenshots needs to be updated with 0.64.0 |
| − | + | ||
| − | Open Synfig Studio. First in the | + | This is a tutorial the "Write On" effect. |
| + | |||
| + | This tutorial may seem lengthy but it is only because I have tried to indicate every little step for the new user. After you have done it once or twice, it really isn’t a long process. | ||
| + | |||
| + | Open Synfig Studio. First in the {{l|Toolbox}}, change the interpolation to “Linear”. Mine defaults to “TCB”. | ||
[[File:Writeon1.jpg]] | [[File:Writeon1.jpg]] | ||
| − | Next, in the bottom of the | + | Next, in the bottom of the canvas, make sure the lock icon is set to “Past keyframes locked”. This is accomplished by repeatedly clicking on the icon until the correct setting is achieved. |
| − | Next, we want to edit canvas properties. Click the | + | [[File:Writeon2.jpg]] |
| + | |||
| + | Next, we want to edit canvas properties. Click the {{l|Canvas Menu Caret|Caret Menu}} between the horizontal and vertical rules, in the top left hand corner of the canvas. In Linux, this caret is easily seen; in windows it is microscopic: | ||
| + | [[File:Writeon3.jpg]] | ||
| + | |||
| − | + | then select "Edit → Properties". A canvas properties dialog will appear. | |
| + | [[File:Writeon4.jpg]] | ||
| − | |||
| − | |||
| − | + | Give a name and description for your canvas, then click "Apply". Go to the "Time" tab and make sure to edit "End Time". Change "5s" to whatever number of seconds you want the duration of your animation to be. | |
| − | + | If you are going to import a picture to trace, I recommend you change the image size to match that imported drawing. If the drawing is very large, just change the image size to match the proportions of the imported image. Also (in the case of a large image to trace) make sure that Synfig will automatically scale that image to your canvas size. At the top of the toolbox, ->File ->Setup ->Misc tab-> check box that says “scale to canvas size”. If you are not going to import a picture to trace, don’t worry about any of this. | |
| − | + | ||
| − | + | Now to start drawing. In the Toolbox, select the {{l|Spline Tool}}. [[File:Writeon5.jpg]] | |
| − | + | ||
| + | In the {{l|Tool Options Panel}}, make sure only the {{Literal|Create Advanced Outline Spline}} is checked. | ||
| + | [[File:Writeon6.jpg]] | ||
| − | + | By the way if you are looking a panel that doesn’t seem to be on your screen, go to Toolbox -> File -> Panels. | |
| − | Now | + | Now start drawing your shape by clicking your mouse at various intervals on the workspace canvas. When you have finished drawing your line, click on the {{l|Transform Tool}} [[File:Writeon7.jpg]] in the Toolbox. Note that if you are doing detailed drawing, you can zoom in on your picture or zoom out. Now that you have drawn your first line, you will probably see a bunch of yellow and orange circles. The orange ones are Vertex {{l|Handle|Handles}}, the yellow circles are Tangent Handles, and the turquoise circles are the {{Literal|Radius}} Handles. Use the icons at the top of the drawing canvas to make those Handles disappear. To keep the view simple, we just want to see the purple {{Literal|Width}} Handles. |
| − | Expand the Width Points List by clicking on the arrow. | + | [[File:Writeon8.jpg]] |
| + | |||
| + | Now that your first {{l|Spline}} is complete, you will note that you have created a new layer in the {{l|Layers Panel}}. If you are going to have several Splines, you will have several layers so I recommend you rename the layers as you go, so you can distinguish it from the other layers later on. | ||
| + | Now we have a bit of work to do in the {{l|Parameters Panel}} before we start animation. Make sure your new layer is highlighted. Next in the {{l|Parameters Panel}} as shown below: | ||
| + | |||
| + | [[File:Writeon9.jpg]] | ||
| + | |||
| + | Expand the Width Points List by clicking on the arrow. Do the same for Width points 001 and 002. Your screen should then look like the picture below: | ||
| + | [[File:WriteOn10.jpg]] | ||
You will need to make four changes to these parameters as shown below: | You will need to make four changes to these parameters as shown below: | ||
| − | + | ||
| − | You will note that when we change the position values, we are effectively changing the position of our purple width | + | [[File:WriteOn11.jpg]] |
| + | |||
| + | You will note that when we change the position values, we are effectively changing the position of our purple width Handles. | ||
At this point you can also change the Width values in the table about to 2.000 or 3.000 depending how thick you want your line to be. | At this point you can also change the Width values in the table about to 2.000 or 3.000 depending how thick you want your line to be. | ||
| − | |||
| + | Now to animate. Click the green circle at the bottom right of the drawing canvas to switch to the animation mode. The circle will change to a red color. | ||
| + | |||
| + | [[File:WriteOn12.jpg]] | ||
| + | [[File:WriteOn13.jpg]] | ||
| − | In the Keyframes | + | In the {{l|Keyframes Panel}}, click on the + symbol to add the first {{l|Keyframe}}. Add the description “Start” as this is time zero. |
| − | + | [[File:WriteOn14.jpg]] | |
| − | + | ||
| − | + | ||
| + | Next, in the {{l|Timetrack Panel}} at the bottom of the drawing canvas, click in the time when you want your first Spline to complete. In the example below, I have selected 1 second, 3 frames. | ||
| − | You will now be able to add another Keyframe (by clicking on the + symbol) at this point in time. | + | [[File:WriteOn15.jpg]] |
| − | + | ||
| − | Now, let us jump back to the first Keyframes by clicking the (JMP) in the first Keyframes line. | + | You will now be able to add another {{l|Keyframe}} (by clicking on the + symbol) at this point in time. |
| + | |||
| + | [[File:WriteOn_16.jpg]] | ||
| + | |||
| + | Now, let us jump back to the first Keyframes by clicking the (JMP) in the first Keyframes line. At this first Keyframe we want to change the position of the width Handle from 0 and 1 (as we set them earlier) to 0 and 0 as shown below: | ||
| + | [[File:WriteOn17.jpg]] | ||
| − | Note that when you make a change to the above values you will oftentimes have to re-expand the widthpoints. The red arrow shows the value you changed (from 1 to zero) , the green arrow shows the | + | Note that when you make a change to the above values you will oftentimes have to re-expand the widthpoints. The red arrow shows the value you changed (from 1 to zero) , the green arrow shows the {{l|Waypoint|Waypoints}} you created (this particular shape indicates that you are in the linear interpolation mode), the blue dashed arrow shows the time of the selected keyframe (which happens to be the start time), and the orange arrow shows the Keyframe where the first Spline will be complete. |
| − | Next, in the Keyframes panel, we want to jump to the second Keyframe. We want to make sure the 002 width | + | Next, in the Keyframes panel, we want to jump to the second Keyframe. We want to make sure the 002 width Handle position is still at 1. In this particular example, it changed back to zero so let us set it again to one. When we do this we see in the {{l|Parameters Panel}} that we have created a second set of {{l|Waypoint|Waypoints}} as shown below |
| + | |||
| + | [[File:WriteOn18.jpg]] | ||
| − | You have probably figured out by now that the 0,0 width | + | You have probably figured out by now that the 0,0 width Handle setting equates to the line not showing and the 0, 1 setting equates to the line being totally visible. |
| − | This completes the first | + | This completes the first Spline. |
| − | The process continues by getting out of the animation mode and adding additional | + | The process continues by getting out of the animation mode and adding additional Splines. One important additional point: If I add an additional Spline and follow the steps above, I end up with the {{l|Parameters Panel}} for the second Spline looking like: |
| − | + | ||
| − | Instead of having the required 2 sets of waypoints for the second | + | [[File:WriteOn19.jpg]] |
| + | |||
| + | Instead of having the required 2 sets of waypoints for the second Spline layer, we have 3 sets of waypoint. The first set needs to be removed (right-click the top-left waypoint and click remove). | ||
Latest revision as of 11:12, 20 May 2013
This tutorial was actually written while using synfigstudio 0.63.00 . Somes of the screenshots needs to be updated with 0.64.0
This is a tutorial the "Write On" effect.
This tutorial may seem lengthy but it is only because I have tried to indicate every little step for the new user. After you have done it once or twice, it really isn’t a long process.
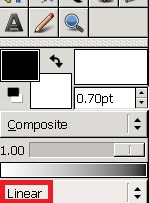
Open Synfig Studio. First in the Toolbox, change the interpolation to “Linear”. Mine defaults to “TCB”.
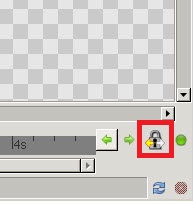
Next, in the bottom of the canvas, make sure the lock icon is set to “Past keyframes locked”. This is accomplished by repeatedly clicking on the icon until the correct setting is achieved.
Next, we want to edit canvas properties. Click the Caret Menu between the horizontal and vertical rules, in the top left hand corner of the canvas. In Linux, this caret is easily seen; in windows it is microscopic:
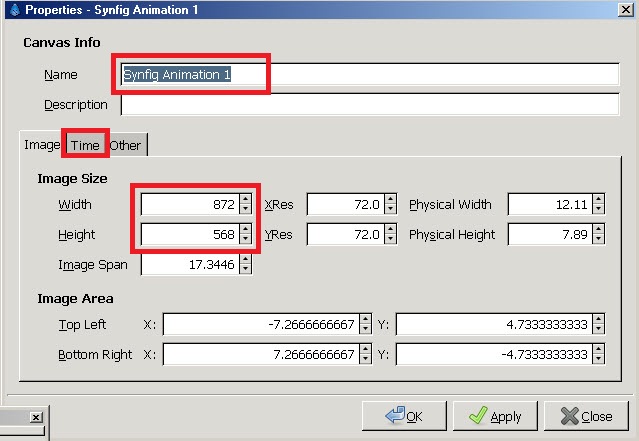
then select "Edit → Properties". A canvas properties dialog will appear.
Give a name and description for your canvas, then click "Apply". Go to the "Time" tab and make sure to edit "End Time". Change "5s" to whatever number of seconds you want the duration of your animation to be.
If you are going to import a picture to trace, I recommend you change the image size to match that imported drawing. If the drawing is very large, just change the image size to match the proportions of the imported image. Also (in the case of a large image to trace) make sure that Synfig will automatically scale that image to your canvas size. At the top of the toolbox, ->File ->Setup ->Misc tab-> check box that says “scale to canvas size”. If you are not going to import a picture to trace, don’t worry about any of this.
Now to start drawing. In the Toolbox, select the Spline Tool. ![]()
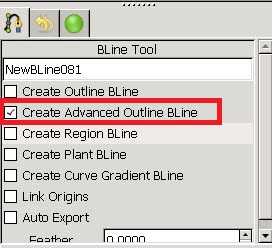
In the Tool Options Panel, make sure only the "Create Advanced Outline Spline" is checked.
By the way if you are looking a panel that doesn’t seem to be on your screen, go to Toolbox -> File -> Panels.
Now start drawing your shape by clicking your mouse at various intervals on the workspace canvas. When you have finished drawing your line, click on the Transform Tool ![]() in the Toolbox. Note that if you are doing detailed drawing, you can zoom in on your picture or zoom out. Now that you have drawn your first line, you will probably see a bunch of yellow and orange circles. The orange ones are Vertex Handles, the yellow circles are Tangent Handles, and the turquoise circles are the "Radius" Handles. Use the icons at the top of the drawing canvas to make those Handles disappear. To keep the view simple, we just want to see the purple "Width" Handles.
in the Toolbox. Note that if you are doing detailed drawing, you can zoom in on your picture or zoom out. Now that you have drawn your first line, you will probably see a bunch of yellow and orange circles. The orange ones are Vertex Handles, the yellow circles are Tangent Handles, and the turquoise circles are the "Radius" Handles. Use the icons at the top of the drawing canvas to make those Handles disappear. To keep the view simple, we just want to see the purple "Width" Handles.
Now that your first Spline is complete, you will note that you have created a new layer in the Layers Panel. If you are going to have several Splines, you will have several layers so I recommend you rename the layers as you go, so you can distinguish it from the other layers later on. Now we have a bit of work to do in the Parameters Panel before we start animation. Make sure your new layer is highlighted. Next in the Parameters Panel as shown below:
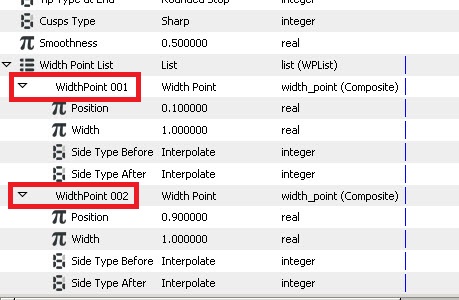
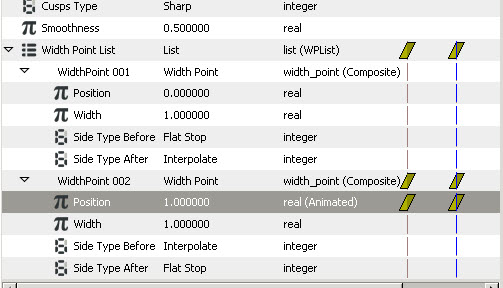
Expand the Width Points List by clicking on the arrow. Do the same for Width points 001 and 002. Your screen should then look like the picture below:
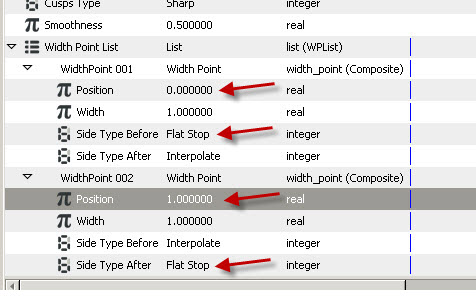
You will need to make four changes to these parameters as shown below:
You will note that when we change the position values, we are effectively changing the position of our purple width Handles. At this point you can also change the Width values in the table about to 2.000 or 3.000 depending how thick you want your line to be.
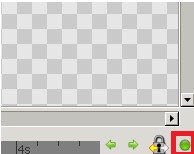
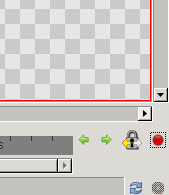
Now to animate. Click the green circle at the bottom right of the drawing canvas to switch to the animation mode. The circle will change to a red color.
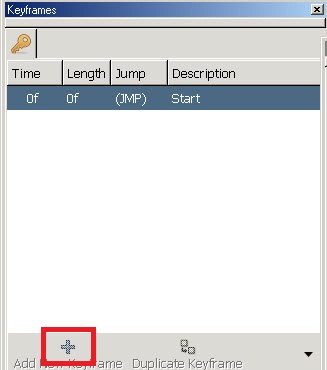
In the Keyframes Panel, click on the + symbol to add the first Keyframe. Add the description “Start” as this is time zero.
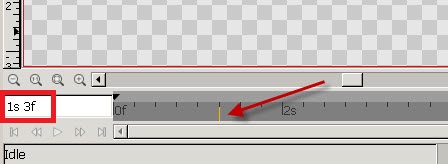
Next, in the Time Track Panel at the bottom of the drawing canvas, click in the time when you want your first Spline to complete. In the example below, I have selected 1 second, 3 frames.
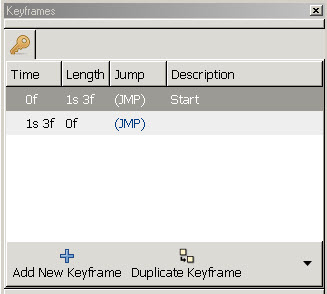
You will now be able to add another Keyframe (by clicking on the + symbol) at this point in time.
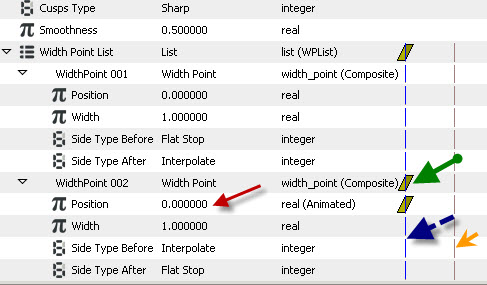
Now, let us jump back to the first Keyframes by clicking the (JMP) in the first Keyframes line. At this first Keyframe we want to change the position of the width Handle from 0 and 1 (as we set them earlier) to 0 and 0 as shown below:
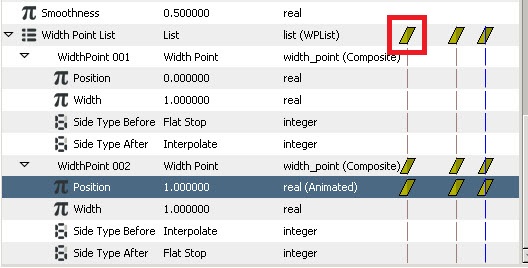
Note that when you make a change to the above values you will oftentimes have to re-expand the widthpoints. The red arrow shows the value you changed (from 1 to zero) , the green arrow shows the Waypoints you created (this particular shape indicates that you are in the linear interpolation mode), the blue dashed arrow shows the time of the selected keyframe (which happens to be the start time), and the orange arrow shows the Keyframe where the first Spline will be complete.
Next, in the Keyframes panel, we want to jump to the second Keyframe. We want to make sure the 002 width Handle position is still at 1. In this particular example, it changed back to zero so let us set it again to one. When we do this we see in the Parameters Panel that we have created a second set of Waypoints as shown below
You have probably figured out by now that the 0,0 width Handle setting equates to the line not showing and the 0, 1 setting equates to the line being totally visible. This completes the first Spline. The process continues by getting out of the animation mode and adding additional Splines. One important additional point: If I add an additional Spline and follow the steps above, I end up with the Parameters Panel for the second Spline looking like:
Instead of having the required 2 sets of waypoints for the second Spline layer, we have 3 sets of waypoint. The first set needs to be removed (right-click the top-left waypoint and click remove).
| Language: |
English |
