Difference between revisions of "Doc:Audio Synchronisation"
m (typo and layout) |
m (→Jack audio server: prepa for tuto (dead linked)) |
||
| (10 intermediate revisions by 2 users not shown) | |||
| Line 1: | Line 1: | ||
<!-- Page info --> | <!-- Page info --> | ||
{{Title|Audio Synchronisation}} | {{Title|Audio Synchronisation}} | ||
| + | {{Category|Manual}} | ||
{{Category|Tutorials}} | {{Category|Tutorials}} | ||
{{Category|Tutorials Intermediate}} | {{Category|Tutorials Intermediate}} | ||
| Line 9: | Line 10: | ||
This tutorial explains how to create a simple Synfig animation synchronised to an audio source. All source material is [https://github.com/berteh/synfig-projects/tree/master/music%20sync available for download] for education purposes. | This tutorial explains how to create a simple Synfig animation synchronised to an audio source. All source material is [https://github.com/berteh/synfig-projects/tree/master/music%20sync available for download] for education purposes. | ||
| + | |||
| + | ==Out of the box== | ||
| + | |||
| + | === Sound Layer=== | ||
| + | With the {{l|Sound_Layer}} you can import sound files and played with the animation previews. | ||
| + | |||
| + | === Jack audio server === | ||
| + | You can synchronized your animation threw the [http://jackaudio.org/ JAck audio server]. | ||
| + | |||
| + | Have a look to the {{l|Jack Audio Synchronization Tutorial}} or this [https://www.youtube.com/watch?v=NHFOyz2WjoA video tutorial]. | ||
==Multiple approaches== | ==Multiple approaches== | ||
| − | Many approaches are possible. We herein propose a very fast way to design a new video for an existing audio track. The audio source is prepared and labeled in [http://audacity.sourceforge.net/ Audacity], a well-known opensource audio editor available for Windows, Mac and Linux. | + | Many approaches are possible. We herein propose a very fast way to design a new video for an existing audio track. The audio source is prepared and labeled in [http://audacity.sourceforge.net/ Audacity], a well-known opensource audio editor available for Windows, Mac and Linux. A [https://github.com/berteh/import-audacity-labels-keyframes Synfig plug-in] will then be used to import these labels into Synfig and design the animation on top. To use Synfig plug-ins you need to [https://wiki.python.org/moin/BeginnersGuide/Download install Python] first. |
A common alternative is to synchronise your audio and video in a third party video editing software (such as [http://avidemux.sourceforge.net/ avidemux], [http://www.openshot.org/ Openshot], [http://wiki.blender.org/index.php/Doc:2.4/Manual/Sequencer/Usage Blender VSE] or [http://en.wikipedia.org/wiki/List_of_video_editing_software#Free_and_open-source many others]). It is overall more flexible, but very accurate synchronisation is harder to reach. | A common alternative is to synchronise your audio and video in a third party video editing software (such as [http://avidemux.sourceforge.net/ avidemux], [http://www.openshot.org/ Openshot], [http://wiki.blender.org/index.php/Doc:2.4/Manual/Sequencer/Usage Blender VSE] or [http://en.wikipedia.org/wiki/List_of_video_editing_software#Free_and_open-source many others]). It is overall more flexible, but very accurate synchronisation is harder to reach. | ||
| + | |||
==The example== | ==The example== | ||
| Line 20: | Line 32: | ||
For this tutorial we'll be creating a ''bouncing ball animation'' based on portions of [https://www.freesound.org/people/beskhu/sounds/149732/ beskhu's Ping Pong Ball sound]. | For this tutorial we'll be creating a ''bouncing ball animation'' based on portions of [https://www.freesound.org/people/beskhu/sounds/149732/ beskhu's Ping Pong Ball sound]. | ||
| − | = | + | The resulting video can be [https://www.youtube.com/watch?v=AD94OMW3LKU viewed online] or [[Media:Music_sync_tutorial.mp4|downloaded]]. |
| + | <videoflash>AD94OMW3LKU|425|344</videoflash> | ||
| + | |||
| + | ===Prepare and label the audio track=== | ||
[[File:Audio-sync-01-label-section.png|200px|thumb|right|adding a label in Audacity]] | [[File:Audio-sync-01-label-section.png|200px|thumb|right|adding a label in Audacity]] | ||
| − | + | In [http://audacity.sourceforge.net/ Audacity], edit your audio to suit your needs (and storyboard), then '''select and label each section that seems relevant''' as an animation reference point (or [[keyframe]] in Synfig) in your audio track. | |
| − | In [http://audacity.sourceforge.net/ | + | |
| + | In our case, these significant moments would be the various impacts of the ball, and optionally the intermediate top of each bounce. Download the [[Media:Music_sync_tutorial.ogg|tutorial audio]] to try it out! | ||
| + | |||
| + | Adding a label in Audacity is done via ''Tracks > Add Label at Selection'' (or ({{Shortcut|CTRL+b}})). See this [http://multimedia.journalism.berkeley.edu/tutorials/audacity/adding-labels/|online tutorial] for more details on labelling audio tracks in Audacity. Try to make each label name unique, short and meaningful. | ||
| + | |||
| + | Once satisfied with your labels location and name, use the ''Tracks > Edit Labels'' dialog to '''export the labels into a file named labels.txt''' in the same directory as your Synfig Project. | ||
| + | |||
| + | |||
| + | ===Import keyframes in your Synfig project=== | ||
| + | |||
| + | [[File:Audio-sync-05-run-plugin.png|200px|thumb|right|run the plugin on your .sif project ]] | ||
| + | Install [https://wiki.python.org/moin/BeginnersGuide/Download Python] and the [https://github.com/berteh/import-audacity-labels-keyframes keyframe import plug-in] if you don't have them yet. | ||
| + | |||
| + | Open Synfig and create a new project, choose a document resolution fit to your use (360x203 Web HD, 24fps, for this tutorial). | ||
| + | |||
| + | Synfig plug-ins only work on .sif files, not the default .sifz format. Simply '''rename your-project.sifz into your-project.sif in the ''> File > Save As'' dialog''' (music_sync_tutorial.sif for this tutorial). | ||
| + | |||
| + | Importing keyframes is then as simple as running the plug-in from ''> Plug-Ins > Import Audacity Labels as Keyframes''. It will import the labels from the file ''labels.txt'' in the same directory as your Synfig project. Some [https://github.com/berteh/import-audacity-labels-keyframes#configuration options] can be customized, but the default settings will do just fine for this tutorial. | ||
| + | |||
| + | Check out the new keyframes in the [[Keyframe#Editing_keyframes:_time.2C_length_.26_description|Keyframes window]]! | ||
| + | |||
| + | |||
| + | ===Set your scene up=== | ||
| + | |||
| + | [[File:Audio-sync-06-create-scene.png|200px|thumb|right|set up the scene]] | ||
| + | Listen to the [[Media:Music_sync_tutorial.ogg|audio]]... in this sample animation we need a ball to bounce, and some wood-like surface to roll on. | ||
| + | |||
| + | Set them up in any way you like, or copy that in the screenshot, it consists of: | ||
| + | * a ball: a circle and curve gradient (pale yellow for the ball, to blue for the background) | ||
| + | * a floor: a brown rectangle with light rotation | ||
| + | |||
| + | |||
| + | ===Animate along the keyframes=== | ||
| + | |||
| + | [[File:Audio-sync-09-animate-ball-location highlights.png|200px|thumb|right|animate the ball position]] | ||
| + | Switch to [[Animate Editing Mode]](1) and navigate your different keyframes using the seek buttons (2) to modify for each the origin of the ball, either manually in the parameters (3) or by moving its handle (4). | ||
| + | |||
| + | You can easily refer to the active keyframe name (5) to know where to locate the ball if the name of your audio label was meaningful enough. | ||
| + | |||
| + | It may be necessary to add a few keyframes or [[waypoint|waypoints]]. We added one "exit" keyframe at the end of the animation to make the ball roll out of the picture. | ||
| + | |||
| + | Fine tune the [[interpolation]] type with a right-click on the waypoint to make the animation smoother. We opted for [linear] on bounce, [clamped] on tops and [Ease_In/Out easy in] to slow the rolling ball on the last (exit) waypoint. | ||
| + | |||
| + | |||
| + | ===Render=== | ||
| + | |||
| + | Rendering in Synfig does not currently support the inclusion of audio tracks, we therefore render the animation as .png images, and merge them with the audio using the opensource [https://libav.org/download.html avconv] tool. This whole process is likely to be integrated in Synfig in a future release. | ||
| + | |||
| + | To render the animation frames select ''> File > Render'', preferably '''locate the target in a distinct directory''' (render/music_sync_tutorial.png in our case), check the time settings (duration of our audio is 2s 10f) and hit "Render". | ||
| + | |||
| + | Collate the rendered frames and the audio using [https://libav.org/download.html avconv]: | ||
| + | avconv -r 24 -i render/music_sync_tutorial.%04d.png -i music_sync_tutorial.ogg -c:a copy music_sync_tutorial.mp4 | ||
| − | + | The above options are: <code>-r</code> rate of the following input stream: the fps used in this Synfig project, <code>-i</code> input: the sequence of images and the audio file, <code>-c:a</code> codec for the audio stream: copy the current audio (ogg) file without re-encoding it. | |
| − | + | The resulting video can be [[Media:Music_sync_tutorial.mp4|downloaded]]. | |
| − | |||
| + | ===Going further=== | ||
| − | + | To go further you may want to make the bounces more realistic: see the [[Doc:Ball Bounce|Ball Bounce]] tutorial, or make a texturized and [[Rotate_Layer|rotating]] ball, or a realistic wood floor... Share your creations in the [http://www.synfig.org/forums/ Synfig forum]! | |
Latest revision as of 20:21, 28 September 2016
This tutorial explains how to create a simple Synfig animation synchronised to an audio source. All source material is available for download for education purposes.
Contents
Out of the box
Sound Layer
With the Sound Layer you can import sound files and played with the animation previews.
Jack audio server
You can synchronized your animation threw the JAck audio server.
Have a look to the Jack Audio Synchronization Tutorial or this video tutorial.
Multiple approaches
Many approaches are possible. We herein propose a very fast way to design a new video for an existing audio track. The audio source is prepared and labeled in Audacity, a well-known opensource audio editor available for Windows, Mac and Linux. A Synfig plug-in will then be used to import these labels into Synfig and design the animation on top. To use Synfig plug-ins you need to install Python first.
A common alternative is to synchronise your audio and video in a third party video editing software (such as avidemux, Openshot, Blender VSE or many others). It is overall more flexible, but very accurate synchronisation is harder to reach.
The example
For this tutorial we'll be creating a bouncing ball animation based on portions of beskhu's Ping Pong Ball sound.
The resulting video can be viewed online or downloaded.
Prepare and label the audio track
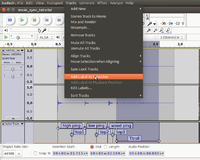
In Audacity, edit your audio to suit your needs (and storyboard), then select and label each section that seems relevant as an animation reference point (or keyframe in Synfig) in your audio track.
In our case, these significant moments would be the various impacts of the ball, and optionally the intermediate top of each bounce. Download the tutorial audio to try it out!
Adding a label in Audacity is done via Tracks > Add Label at Selection (or (Ctrl+b)). See this tutorial for more details on labelling audio tracks in Audacity. Try to make each label name unique, short and meaningful.
Once satisfied with your labels location and name, use the Tracks > Edit Labels dialog to export the labels into a file named labels.txt in the same directory as your Synfig Project.
Import keyframes in your Synfig project
Install Python and the keyframe import plug-in if you don't have them yet.
Open Synfig and create a new project, choose a document resolution fit to your use (360x203 Web HD, 24fps, for this tutorial).
Synfig plug-ins only work on .sif files, not the default .sifz format. Simply rename your-project.sifz into your-project.sif in the > File > Save As dialog (music_sync_tutorial.sif for this tutorial).
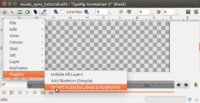
Importing keyframes is then as simple as running the plug-in from > Plug-Ins > Import Audacity Labels as Keyframes. It will import the labels from the file labels.txt in the same directory as your Synfig project. Some options can be customized, but the default settings will do just fine for this tutorial.
Check out the new keyframes in the Keyframes window!
Set your scene up
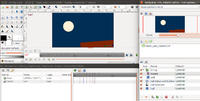
Listen to the audio... in this sample animation we need a ball to bounce, and some wood-like surface to roll on.
Set them up in any way you like, or copy that in the screenshot, it consists of:
- a ball: a circle and curve gradient (pale yellow for the ball, to blue for the background)
- a floor: a brown rectangle with light rotation
Animate along the keyframes
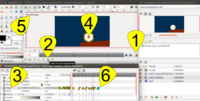
Switch to Animate Editing Mode(1) and navigate your different keyframes using the seek buttons (2) to modify for each the origin of the ball, either manually in the parameters (3) or by moving its handle (4).
You can easily refer to the active keyframe name (5) to know where to locate the ball if the name of your audio label was meaningful enough.
It may be necessary to add a few keyframes or waypoints. We added one "exit" keyframe at the end of the animation to make the ball roll out of the picture.
Fine tune the interpolation type with a right-click on the waypoint to make the animation smoother. We opted for [linear] on bounce, [clamped] on tops and [Ease_In/Out easy in] to slow the rolling ball on the last (exit) waypoint.
Render
Rendering in Synfig does not currently support the inclusion of audio tracks, we therefore render the animation as .png images, and merge them with the audio using the opensource avconv tool. This whole process is likely to be integrated in Synfig in a future release.
To render the animation frames select > File > Render, preferably locate the target in a distinct directory (render/music_sync_tutorial.png in our case), check the time settings (duration of our audio is 2s 10f) and hit "Render".
Collate the rendered frames and the audio using avconv:
avconv -r 24 -i render/music_sync_tutorial.%04d.png -i music_sync_tutorial.ogg -c:a copy music_sync_tutorial.mp4
The above options are: -r rate of the following input stream: the fps used in this Synfig project, -i input: the sequence of images and the audio file, -c:a codec for the audio stream: copy the current audio (ogg) file without re-encoding it.
The resulting video can be downloaded.
Going further
To go further you may want to make the bounces more realistic: see the Ball Bounce tutorial, or make a texturized and rotating ball, or a realistic wood floor... Share your creations in the Synfig forum!
| Language: |
English |


