Difference between revisions of "New Layer Defaults"
m (→Default Blend Method: set from the Tool_Options_Panel) |
m (sumarry) |
||
| (5 intermediate revisions by the same user not shown) | |||
| Line 1: | Line 1: | ||
| + | <!-- Page info --> | ||
{{Title|New Layer Defaults}} | {{Title|New Layer Defaults}} | ||
{{Category|Toolbox}} | {{Category|Toolbox}} | ||
{{NewTerminology}} | {{NewTerminology}} | ||
| − | + | {{TOCright}} | |
| + | <!-- Page info End--> | ||
| + | ==Summary== | ||
| + | {{l|New Layer Defaults}} aim to group all settings that influence a new {{l|Layer}} that can be created from the {{l|Category:Layer_Menu#New_Layer_Menu|New Layer}} menu entry or using a {{l|Category:Tools|tool}}. | ||
| + | |||
| + | Some defaults settings can be set from the {{l|Toolbox}}. Others defaults settings are set by tools from the {{l|Tool Options Panel}} or from the {{l|Category:Canvas_Window}}. | ||
==Brush Colors== | ==Brush Colors== | ||
| − | This section of the palette contains two large overlapping squares - the one in front is the {{Literal|Outline Color}} (previously called foreground color), the one in back is the {{Literal|Fill Color}} (previously called background color). When you are creating a layer of only one color, the {{Literal|Outline Color}} is always used. When you create a {{l|Region Layer|region}} and an {{l|Outline Layer|outline}} simultaneously, the region is given the {{Literal|Fill Color}}. The {{l|#Current Gradient|current gradient}} fill defaults to dynamically between these two colors. Clicking either will bring up the {{l|Colors Dialog}} to select a new color. | + | [[File:FlowerTutorial 0.png|right|frame]]This section of the palette contains two large overlapping squares - the one in front is the {{Literal|Outline Color}} (previously called foreground color), the one in back is the {{Literal|Fill Color}} (previously called background color). When you are creating a layer of only one color, the {{Literal|Outline Color}} is always used. When you create a {{l|Region Layer|region}} and an {{l|Outline Layer|outline}} simultaneously, the region is given the {{Literal|Fill Color}}. The {{l|#Current Gradient|current gradient}} fill defaults to dynamically between these two colors. Clicking either will bring up the {{l|Colors Dialog}} to select a new color. |
In addition to these two controls, there are two smaller controls located in the corners between them. | In addition to these two controls, there are two smaller controls located in the corners between them. | ||
| Line 18: | Line 24: | ||
==Default Blend Method== | ==Default Blend Method== | ||
| − | + | The {{l|Blend Method}} is set from the {{l|Tool_Options_Panel}}. It's a by tool preference. | |
| − | + | ||
| − | + | ||
==Default Opacity== | ==Default Opacity== | ||
Sets the {{l|Amount Parameter}} for new layers. Defaults to 1.00 (Completely opaque) | Sets the {{l|Amount Parameter}} for new layers. Defaults to 1.00 (Completely opaque) | ||
| + | The Opacity is set from the {{l|Tool Options Panel}}. It's a by tool preference. | ||
==Current Gradient== | ==Current Gradient== | ||
Latest revision as of 13:45, 10 October 2016
Summary
New Layer Defaults aim to group all settings that influence a new Layer that can be created from the New Layer menu entry or using a tool.
Some defaults settings can be set from the Toolbox. Others defaults settings are set by tools from the Tool Options Panel or from the Canvas Window.
Brush Colors
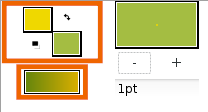
This section of the palette contains two large overlapping squares - the one in front is the "Outline Color" (previously called foreground color), the one in back is the "Fill Color" (previously called background color). When you are creating a layer of only one color, the "Outline Color" is always used. When you create a region and an outline simultaneously, the region is given the "Fill Color". The current gradient fill defaults to dynamically between these two colors. Clicking either will bring up the Colors Dialog to select a new color.In addition to these two controls, there are two smaller controls located in the corners between them.
The arrows on the upper-right side swap the outline and fill colors. ![]()
The two little squares on the lower left reverts the outline and fill colors to their default of black and white respectively.
Brush Size
- If you are using the Draw Tool, this sets the maximum size that the line will be based on pressure sensitivity (on graphic tablet).
- Adjust the size of the Brush Tool
The size of Outline Layers's line is set in the Tool Options Panel
Default Blend Method
The Blend Method is set from the Tool Options Panel. It's a by tool preference.
Default Opacity
Sets the Amount for new layers. Defaults to 1.00 (Completely opaque)
The Opacity is set from the Tool Options Panel. It's a by tool preference.
Current Gradient
Used by the Spline Tool when creating a new Curve Gradient layer. Also used by all Gradient layers as their fill. This defaults to a gradient between the "Outline Color" (previously foreground color) and "Fill Color" (previously background color). Clicking this will bring up the Gradient Editor Dialog
Default Interpolation
Sets the default interpolation of new waypoints. Initially this is set to Clamped.
The Default Interpolation is set into the Canvas Window

