Preview
m (→Time Settings) |
m (→Time Settings) |
||
| Line 70: | Line 70: | ||
TODO find out why you can set a negative begin time. | TODO find out why you can set a negative begin time. | ||
| − | |||
====End Time==== | ====End Time==== | ||
| − | + | TODO find out why you can set a negative end time. | |
==The Preview Window== | ==The Preview Window== | ||
Revision as of 11:52, 12 February 2012
Contents
Introduction
Rendering a long or complicated animation can take a while. You may need to do several renders before you are happy with your finished animation. Therefore, before you render your animation, it's a good idea to preview all or just a part of it at lower quality to save time.
You may also find that working on your animation by looking at a render in a normal media player is not very useful. You will see time displayed in fractions of a second instead of as frame numbers and moving backwards and forwards (scrubbing) can be difficult.
Synfig Studio has a very flexible preview tool that solves both of these problems.
Previewing an animation
There are two ways to preview the animation in your current canvas:
- You can press the canvas window toolbar Preview button
 , or
, or - you can open the Canvas Menu using the Canvas Menu Caret button and then select "File → Preview".
If you do either of these things the Preview Options dialog will appear.
The Preview Options Dialog
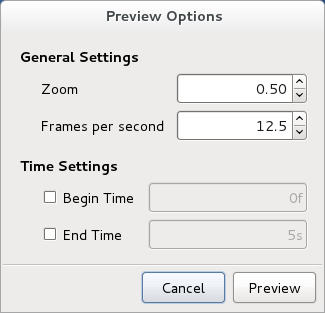
The Preview Options dialog looks like this:
It is divided into two sections: "General Settings" and "Time Settings". These are described below. When you have finished adjusting these settings you can click "Preview" and Synfig Studio will start rendering your preview and open the Preview Window.
General Settings
The "General Settings" allow you to adjust the quality of your preview – its size and its frame rate.
Normally, to save time, previews are smaller and have a lower frame rate than the original animation. But, because Synfig Studio is so flexible, you can actually render a preview with a higher frame rate and a larger size than the canvas you are working on!
Zoom
The "Zoom" spin box allows you to increase or decrease the size of your preview.
The number in the "Zoom" spin box is a scalar value. In other words, the width and height of your canvas are multiplied by this number to give you the final size of your preview. For example, a "Zoom" setting of:
- "1.0" means your preview will be the same size as your canvas
- "0.5" means your preview will be half the size of your canvas
- "2.0" means your preview will be twice the size of your canvas
You can enter a number directly into the "Zoom" spin box, or use the spin box arrows to increase or decrease it. You can not enter a value of less than "0.1" which is a tenth of your canvas size or more than "5.0" which is five times the size of your canvas.
Your preview is scaled to fit inside the Preview Window. The "Zoom" setting does not change the size of the Preview Window. So, if you use a high zoom setting you may have to increase the Preview Window size to see your preview properly.
|
Tip When you are animating you'll probably want to look at previews often. To save time, we recommend that you normally use a "Zoom" setting that is less than "1.0" when previewing your work. We think a "Zoom" setting "0.5" is a good compromise between preview rendering speed and quality.
|
Frames per second
The "Frames per second" spin box allows you to increase or decrease the frame rate - the number of frames per second your preview will have.
The number in the "Frames per second" spin box is a floating point number with one decimal place, so you can specify the frame rate accurate to a tenth of a second.
You can enter your frame rate setting directly into the "Frames per second" spin box, or use the spin box arrows to increase or decrease it. You can enter a "Frames per second" setting between "1.0" and "120.0".
|
Tip When you are animating you'll probably want to look at previews often. To save time, we recommend that you normally use a "Frames per second" setting that is less than the frame rate of your finished animation when previewing your work. We think a "Frames per second" setting that is half of your final frame rate is a good compromise between preview rendering speed and quality.
|
Time Settings
The "Time Settings" allow you to specify which point in time you want your preview to begin and end. You don't have to adjust these settings – if you don't adjust them the entire duration specified in the Properties dialog box for your canvas will be previewed.
However, for complicated animations it can save a lot of time if you just preview a small section.
Begin Time
If you want to your preview to begin at a time that is not the beginning of your animation
TODO find out why you can set a negative begin time.
End Time
TODO find out why you can set a negative end time.
The Preview Window
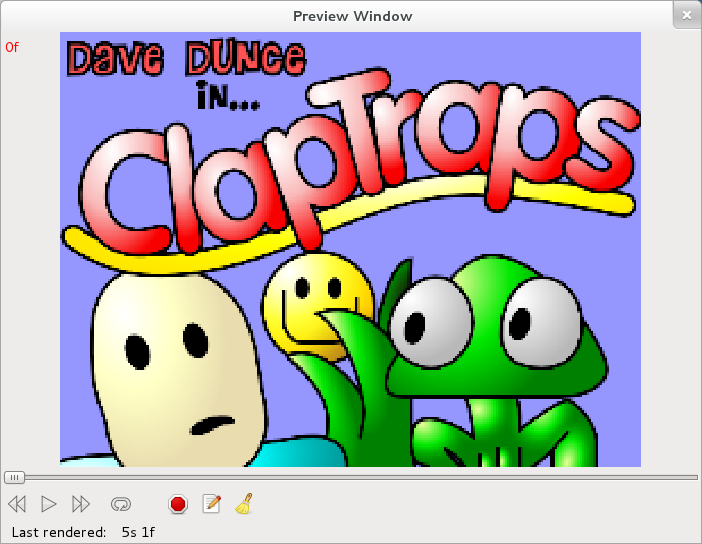
When you click "Preview" in the Preview Options dialog the preview will start rendering and the Preview Window will appear:
Once the preview has rendered (the time after Last Rendered should equal your End Time), you can now preview your animation. Take a look the following icons under the Preview image.
The slider above the Preview icons can be moved back and forth to scrub through your animation.
TODO You can re-size your Preview by resizing your preview window.
TODO You can begin to play your preview before it has finished rendering.
You can close the Preview window at any time by pressing Escape, pressing Alt and F4 or clicking the close icon at the top right hand side of the window.
| Language: |
English |

