Following a Spline
m (→Summary: Correct links) |
(Terminology Updated) |
||
| Line 1: | Line 1: | ||
<!-- Page info --> | <!-- Page info --> | ||
| − | {{Title|Following a | + | {{Title|Following a Spline}} |
{{Category|Tutorials}} | {{Category|Tutorials}} | ||
{{Category|Tutorials Advanced}} | {{Category|Tutorials Advanced}} | ||
| + | {{Category|NewTerminology}} | ||
<!-- Page info end --> | <!-- Page info end --> | ||
== Introduction == | == Introduction == | ||
| − | If you are using version 0.61.08 or lower, please see the {{l|Following a | + | If you are using version 0.61.08 or lower, please see the {{l|Following a Spline (the old way)|old version}} of this tutorial, since this version is about the 0.61.09 version. |
This tutorial will demonstrate how to make an object follow the path of an arbitrary curve, rotating to face the direction of travel. | This tutorial will demonstrate how to make an object follow the path of an arbitrary curve, rotating to face the direction of travel. | ||
| Line 15: | Line 16: | ||
We're going to: | We're going to: | ||
| − | * {{l|Doc:Following a | + | * {{l|Doc:Following a Spline#Create the Layers|Draw a curve and an arrow}} |
| − | * {{l|Doc:Following a | + | * {{l|Doc:Following a Spline#Make the Arrow Move and Rotate|Link the arrow's Origin and Rotation}} to the Spline so the arrow follows the curve |
== Tutorial == | == Tutorial == | ||
| Line 28: | Line 29: | ||
=== Create the Layers === | === Create the Layers === | ||
| − | select the | + | select the Spline Tool |
[[File:Bline_tool.png]] | [[File:Bline_tool.png]] | ||
enable just the Outline checkbox | enable just the Outline checkbox | ||
| − | draw a | + | draw a spline that you want the arrow to move along |
| − | click the "Make | + | click the "Make Spline" icon in the bottom left of the "Tool Options" panel to create the spline. |
| − | still in the | + | still in the Spline Tool, enable {{Literal|Create Outline}} and {{Literal|Create Region}} checkboxes in tool options |
[[File:Tool_Options.png]] | [[File:Tool_Options.png]] | ||
draw an arrow or whatever, pointing to the right | draw an arrow or whatever, pointing to the right | ||
| − | switch to the | + | switch to the Transform Tool |
| − | select the outline, hit control-a to select all its | + | select the outline, hit control-a to select all its handles except the green position handle |
| − | drag the | + | drag the handle so that the arrow is centred around the green position handle |
add a rotate layer above the outline and region | add a rotate layer above the outline and region | ||
| − | + | group the rotate, outline, and region layers | |
| − | so now you've got 2 top-level layers: a curved path, and | + | so now you've got 2 top-level layers: a curved path, and a group containing an arrow and a rotate layer |
=== Make the Arrow Move and Rotate === | === Make the Arrow Move and Rotate === | ||
| − | select the | + | select the group layer by clicking it in the Layers panel |
| − | select its green position | + | select its green position handle by clicking on it in the canvas window |
additionally select the Rotate layer by holding Control and clicking it in the Layers panel | additionally select the Rotate layer by holding Control and clicking it in the Layers panel | ||
| − | additionally select the blue "rotation amount" | + | additionally select the blue "rotation amount" handle by holding Control and clicking on it in the canvas window |
| − | so now we should have 2 layers selected, and one | + | so now we should have 2 layers selected, and one handle from each of those 2 layers selected |
| − | now additionally select the curved | + | now additionally select the curved spline layer (it should be the last layer in the Layer panel's list) by holding Control and clicking on it |
| − | right-click on the dotted line that indicates the position of the curved | + | right-click on the dotted line that indicates the position of the curved spline - not on any handle, but on the dotted line between handle |
| − | from the context menu that pops up, select "Link to | + | from the context menu that pops up, select "Link to Spline" |
[[File:Link_to_Bline.png]] | [[File:Link_to_Bline.png]] | ||
| − | the | + | the arrow group should move so that its green position handle is on the spline, and it should rotate so that the arrow points along the spline at that point |
| − | select just the | + | select just the group layer, and drag its green handle around. you'll see that the handle is constrained now to line on the spline, and that dragging it also affects the rotation of the arrow as expected |
we can now animate the arrow. turn on "animate edit mode" by clicking the icon in the bottom right of the canvas window. | we can now animate the arrow. turn on "animate edit mode" by clicking the icon in the bottom right of the canvas window. | ||
| − | at time 0f, drag the | + | at time 0f, drag the group layer's green position handle to one end of the spline |
| − | at time 5s, drag the same position | + | at time 5s, drag the same position handle to the other end of the spline |
Try File > Preview or View > Play to watch the animation. | Try File > Preview or View > Play to watch the animation. | ||
| Line 91: | Line 92: | ||
== Controlling the linear velocity == | == Controlling the linear velocity == | ||
| − | By default, the arrow takes the same time to move along each segment of the | + | By default, the arrow takes the same time to move along each segment of the spline. So if there's a long straight part then a bendy complex part, the arrow will move much faster along the straight parts (since there will be less vertices in that part). In physics terms, the linear velocity (that is, the speed over the spline) is not constant. |
| − | By enabling the ''homogenous'' parameter of Link to | + | By enabling the ''homogenous'' parameter of Link to Spline, the velocity becomes constant, as one almost always wants. See [http://www.youtube.com/watch?v=3PGXroxBcuo this demo]. |
Revision as of 18:55, 5 February 2013
Contents
Introduction
If you are using version 0.61.08 or lower, please see the old version of this tutorial, since this version is about the 0.61.09 version.
This tutorial will demonstrate how to make an object follow the path of an arbitrary curve, rotating to face the direction of travel.
Summary
We're going to:
- Draw a curve and an arrow
- Link the arrow's Origin and Rotation to the Spline so the arrow follows the curve
Tutorial
This is a brief tutorial giving an example of how to use it:
Create the Animation
File > New
Create the Layers
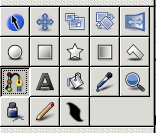
enable just the Outline checkbox
draw a spline that you want the arrow to move along
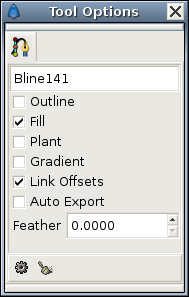
click the "Make Spline" icon in the bottom left of the "Tool Options" panel to create the spline.
still in the Spline Tool, enable "Create Outline" and "Create Region" checkboxes in tool options

draw an arrow or whatever, pointing to the right
switch to the Transform Tool
select the outline, hit control-a to select all its handles except the green position handle
drag the handle so that the arrow is centred around the green position handle
add a rotate layer above the outline and region
group the rotate, outline, and region layers
so now you've got 2 top-level layers: a curved path, and a group containing an arrow and a rotate layer
Make the Arrow Move and Rotate
select the group layer by clicking it in the Layers panel
select its green position handle by clicking on it in the canvas window
additionally select the Rotate layer by holding Control and clicking it in the Layers panel
additionally select the blue "rotation amount" handle by holding Control and clicking on it in the canvas window
so now we should have 2 layers selected, and one handle from each of those 2 layers selected
now additionally select the curved spline layer (it should be the last layer in the Layer panel's list) by holding Control and clicking on it
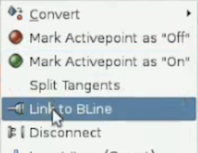
right-click on the dotted line that indicates the position of the curved spline - not on any handle, but on the dotted line between handle
from the context menu that pops up, select "Link to Spline"

the arrow group should move so that its green position handle is on the spline, and it should rotate so that the arrow points along the spline at that point
select just the group layer, and drag its green handle around. you'll see that the handle is constrained now to line on the spline, and that dragging it also affects the rotation of the arrow as expected
we can now animate the arrow. turn on "animate edit mode" by clicking the icon in the bottom right of the canvas window.
at time 0f, drag the group layer's green position handle to one end of the spline
at time 5s, drag the same position handle to the other end of the spline
Try File > Preview or View > Play to watch the animation.
Results
This is the animation I ended up with: Arrow-follows-bline.sifz
Controlling the linear velocity
By default, the arrow takes the same time to move along each segment of the spline. So if there's a long straight part then a bendy complex part, the arrow will move much faster along the straight parts (since there will be less vertices in that part). In physics terms, the linear velocity (that is, the speed over the spline) is not constant.
By enabling the homogenous parameter of Link to Spline, the velocity becomes constant, as one almost always wants. See this demo.
