Render Dialog
From Synfig Studio :: Documentation
m (Update Render Dialog Screenshot + Add Extract Alpha parameter) |
m (Add quality and AA informations) |
||
| Line 15: | Line 15: | ||
**'''Target''' - Set your {{l|Render options|output format}}. At {{Literal|Auto}} the format is decided by the filename suffix. If none is present png-format is default. | **'''Target''' - Set your {{l|Render options|output format}}. At {{Literal|Auto}} the format is decided by the filename suffix. If none is present png-format is default. | ||
*'''Settings''' | *'''Settings''' | ||
| − | **'''Quality''' - Set the quality of the render. Quality changes behavior of some layers, not all of them. For example Motion Blur layer renders more subsamples based on quality values in intervals. | + | **'''Quality''' - Set the quality of the render. Quality changes behavior of some layers, not all of them. For example Motion Blur layer renders more subsamples based on quality values in intervals. Quality '''3''' and '''1''' are mostly the same in all cases, so if '''3''' is enough, then leave as '''3'''. |
***Default quality is '''3'''. | ***Default quality is '''3'''. | ||
***'''1''' is highest quality but with longest render time. | ***'''1''' is highest quality but with longest render time. | ||
***'''9''' is lowest quality but renders faster. | ***'''9''' is lowest quality but renders faster. | ||
***'''0''' is even lower than '''9''' and seems to disable apha channels as well. | ***'''0''' is even lower than '''9''' and seems to disable apha channels as well. | ||
| − | **'''Anti-Aliasing''' - Set the amount of anti-aliasing. Accepts values between '''1''' and '''31''', although values above '''3''' is very subtle improvements and hard to notice | + | **'''Anti-Aliasing''' - Set the amount of anti-aliasing. Accepts values between '''1''' and '''31''', although values above '''3''' is very subtle improvements and hard to notice it's also '''hugely increases''' the render time. |
***'''31''' is higtest anti-aliasing amout but with longest render time. | ***'''31''' is higtest anti-aliasing amout but with longest render time. | ||
***'''1''' is lowest anti-aliasing amout but renders faster. | ***'''1''' is lowest anti-aliasing amout but renders faster. | ||
Revision as of 12:26, 15 December 2014
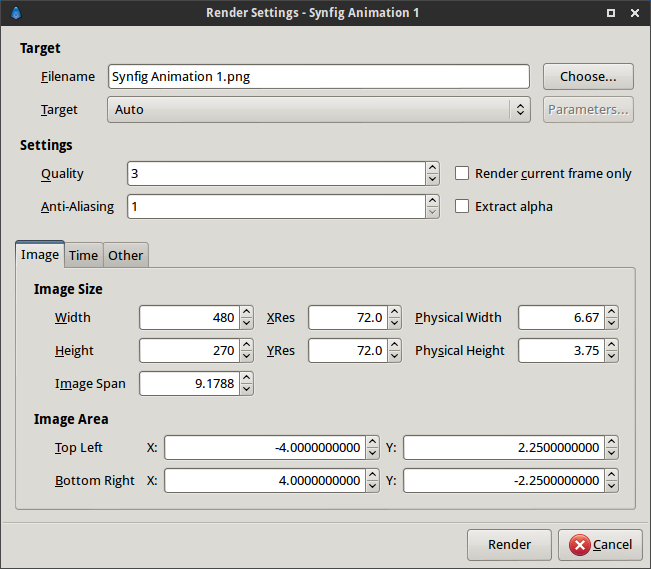
The "Render Dialog" lets you render your animation.
It can be reached through the Canvas Menu Caret "<File> → Render".
Let's have an in-depth look at it.
- Target
- Filename - Here you can set desired output filename and also a custom path to the render.
- Target - Set your output format. At "Auto" the format is decided by the filename suffix. If none is present png-format is default.
- Settings
- Quality - Set the quality of the render. Quality changes behavior of some layers, not all of them. For example Motion Blur layer renders more subsamples based on quality values in intervals. Quality 3 and 1 are mostly the same in all cases, so if 3 is enough, then leave as 3.
- Default quality is 3.
- 1 is highest quality but with longest render time.
- 9 is lowest quality but renders faster.
- 0 is even lower than 9 and seems to disable apha channels as well.
- Anti-Aliasing - Set the amount of anti-aliasing. Accepts values between 1 and 31, although values above 3 is very subtle improvements and hard to notice it's also hugely increases the render time.
- 31 is higtest anti-aliasing amout but with longest render time.
- 1 is lowest anti-aliasing amout but renders faster.
- Render current frame only - With this ticked only one frame is rendered; the current one.
- Extract Alpha - When checked, two files are rendered. The normal ouput file(s) indicated by Filename plus another(s) you can easily identify by the alpha suffix. This file(s) will contains the transparency data of your project that you can use as a mask when compositing.
- Quality - Set the quality of the render. Quality changes behavior of some layers, not all of them. For example Motion Blur layer renders more subsamples based on quality values in intervals. Quality 3 and 1 are mostly the same in all cases, so if 3 is enough, then leave as 3.
Then there are three tabs, we're starting with;
Image tab
- Image Size
- Width - set width of render in pixels.
- Height - set height of render in pixels.
- XRes - set horizontal resolution of render.
- YRes - set vertical resolution of render.
- Physical Width - set physical printing size of render. (Calculated from Width/XRes).
- Physical Height - set physical printing size of render. (Calculated from Height/YRes).
- Image Span - (?)
- Image Area - sets the portion of the workarea to be rendered.
- Top Left X:/Y: - set where in the workarea top left of render starts.
- Bottom Right X:/Y: - set where in the workarea bottom right of render starts.
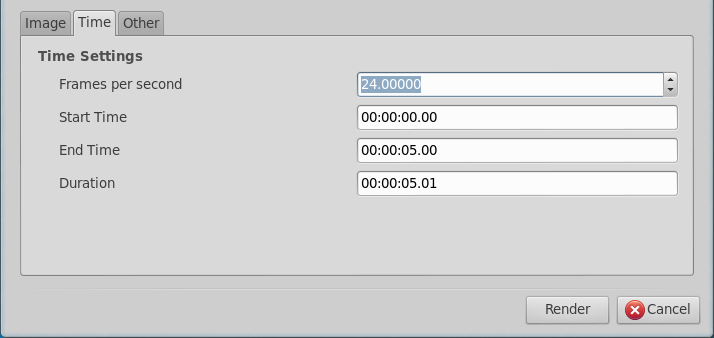
Time tab
- Time Settings
- Frames per second - set render framerate. Only applicable when rendering to movie-file, not image sequences.
- Start Time - set where in your timeline rendered sequence will start.
- End Time - set where in your timeline rendered sequence will end.
- Duration - set the duration of the animation.
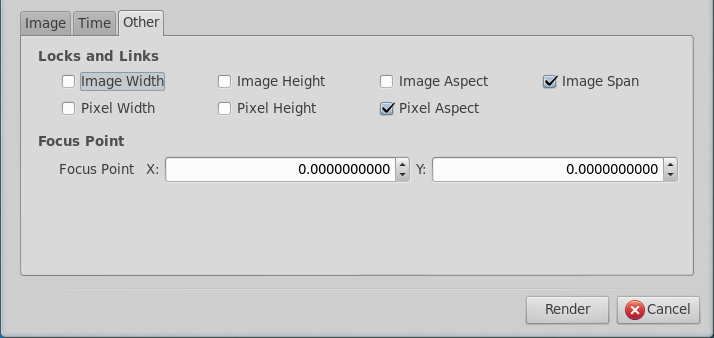
Other tab
TODO writeme (explain how to use "other tab" parameters
- Locks and Links
- Image Width
- Image Height
- Image Aspect
- Image Span
- Pixel Width
- Pixel Height
- Pixel Aspect
- Focus Point
- Focus Point X:/Y:


