Looping Background
Contents
Introduction
A looping background is a moving background that simulates camera panning, and that seamlessly repeats itself. It is a standard animation technique.
There are multiple ways to do looping backgrounds in Synfig. The one presented here is simple, minimizes manual work and repetition, and doesn't need keyframes.
We will be using two files: one for the background and one for the animation.
Say that the animation size will be WA = 640 pixels, HA = 480 pixels.
The background image
The background can be a bitmap or a vector graphics. In order to be usable as a looping background, the requirements are the same. Imagine duplicating the image and putting the duplicate next to the original in an horizontal line: the left edge must seamlessly blend with the right edge.
This tutorial uses a vector graphics background, but the same workflow can be applied for bitmap images.
If you already have a background, skip to section The animation.
Create background
Since we are creating the background and the animation from scratch, the easiest way is to use the same scale for the two synfig files.
In Synfig Studio, create a new canvas with File | New. Its height should be the same as the animation (HB = HA = 480), while its width should be bigger than the animation (no need to be a multiple). Say WB = 1200. To be sure to keep the correct background size when importing it into the animation, proceed as follows:
Open the Canvas Properties Dialog (Caret | Edit | Properties). In the Other tab, check pixel width, pixel height, image aspect, pixel aspect. Uncheck the other items. In the Image tab, finally put the size: Width = WB = 1200, Height = HB = 480. All the other values should be automatically updated.
In the Time tab, set Start time and End time to 0. This tells synfig that the canvas is a still image and the interface becomes simpler.
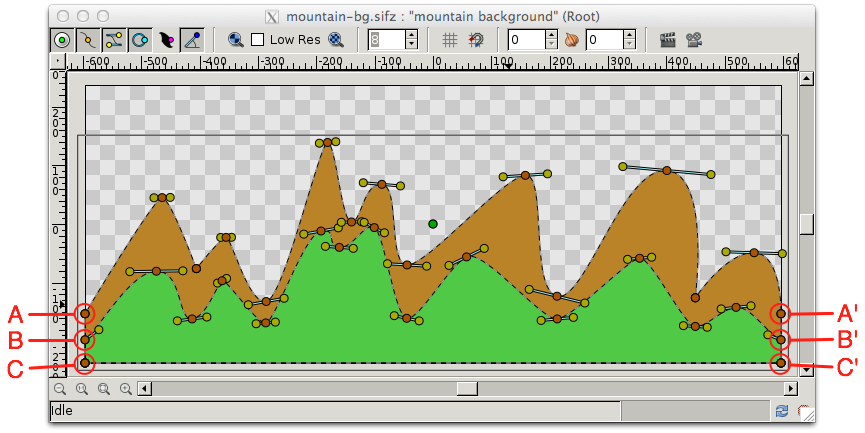
Now draw the background :-). This is the one we will be using for the tutorial:
It is made of two bline regions. To tile seamlessly, the Y coordinates of the left control points A, B, C must match with the Y coordinates of the right control points A', B', C'. In addition, the tangents should make the lines as smooth as necessary to adapt to the overall image stile.
If you look at the sample sif file, you will see that the Y coordinates of A, A' and C, C' are hardcoded to match. The same could be done for B, B', but just to show another, more flexible way, the Y coordinate of B is exported and reused by the Y coordinate of B'. This means that if you move with the mouse point B, point B' will move too, and vice versa :-)
Save the file. We use the name mountain-bg.sifz.
The animation
Create a new canvas for the animation. As mentioned previously, in this tutorial we will use WA = 640, HA = 480. See section Create background for a safe way to set the dimensions of a canvas. In the Time tab of the canvas properties, set Start time = 0f, End Time = 30s.
Import the background (Caret | File | Import), name it [bg 1]. Duplicate it (Layers palette | right click on background layer | duplicate), name it [bg 2].
Move the Origin of layer [bg 2] WB pixels in the same direction of the simulated camera panning. So if the camera pans towards the right, in our tutorial example the coordinates of [bg 2] Origin would be X = WB = 1200, Y = 0.
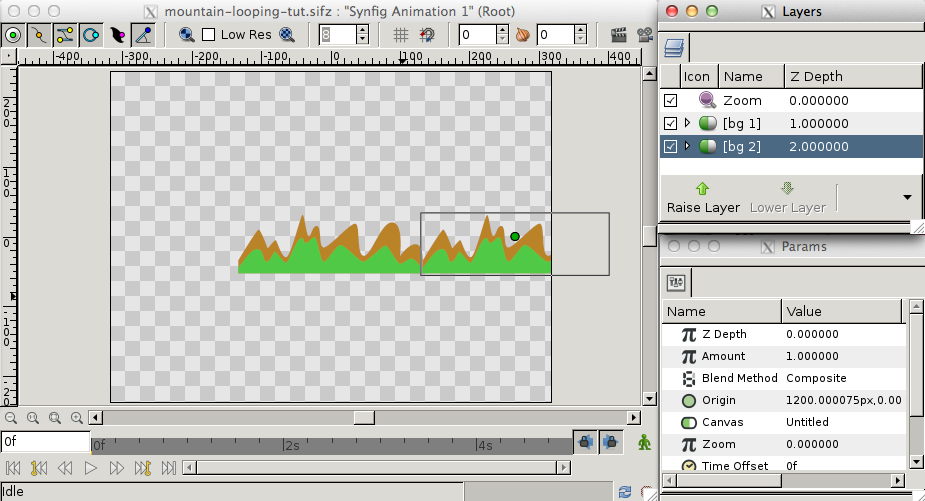
Add on top a Zoom layer with Amount = -1.5. When rendering, this layer must be disabled, but it is very useful to see the two background layers at once and validate what one is doing.
In the above screenshot, you can see the [bg 2] layer selected in the layers panel, its bounding box in the main window and, in the Params panel, the coordinates on the Origin (X = 1200, Y = 0). The zoom layer is enabled.
Add a Translate layer just above the two background layers. Keep it selected. We now need to add two waypoints, on at the beginning of the loop and one at the end. Turn on animate editing mode. The loop will last T = 10 seconds. Move the animation time to 10s. Set the X coordinate of Origin to the opposite of [bg 2], in this case X = -1200 px. This will add a waypoint at time 10s.
Set the in/out interpolation of the waypoint to linear (right-click the waypoint | Both | Linear).
Move the animation time to 0s. Set the X coordinate of Origin to 0. This will create another waypoint. Set its in/out interpolation to linear.
Turn off Animate editing mode.
In the above screenshot, in the layers palette there is the added Translate layer. In the timeline there are the two waypoints, one at 0s and one at 10s, with the icons that represent linear interpolation. The time is now 5s, shown by the small blue vertical line. The X value of Origin is -600, and matches the fact that the value goes from 0 to -1200, that the interpolation is linear, and that 5s is exactly half loop time.
If you play the animation, the background will move for 10 seconds and then stop. We will now add a Time Loop layer to have the flexibility to automatically adapt to any total animation duration, as we will see later.
Add a Time Loop layer over the Translate layer (right-click translate layer | New Layer | Other | Time Loop). Set the Duration to the same duration of the loop, in this case Duration = 10s.
That's it! Click play and enjoy the moving background for the same duration of the animation, in this case 30 seconds!
Thanks to the looping background, if you change the duration of the canvas animation (Caret | Edit | Properties) in the Time tab, the background animation will adapt automatically.
Sample files
File:Mountain-bg.sifz File:Mountain-looping-tut.sifz
Credits
Based on posts and sample sif files by Genete and others in the Synfig forum, check them out.
| Language: |
English |


