Layers Panel
From Synfig Studio :: Documentation
Summary
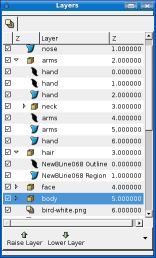
The Layers Dialog allows you to view and manipulate the layer hierarchy in your scene. This is where you can determine which objects get drawn first, and create subsets of layers for the purpose of applying effects.

Elements of the Layers Dialog
The Layers Dialog contains a detailed list of the Layers in your scene. Each row represents a layer, and the columns are:
- Show/Hide checkbox
- Turns the layer on or off in the composition. This parameter is not keyable.
- Z (This column will likely be renamed in subsequent releases)
- The icon representing the layer type. For Regions, Outlines, and Gradients, the icons will be those of the bline tool, the width tool, and the gradient tool, respectively.
- Layer Name
- The name of the layer you're currently working on.
- Z (does not always appear)
- The second Z column indicates the Z position of the layer, which can also affect layer compositing.
Below the layer list, are buttons (and a drop down menu containing any buttons that don't fit on the palette) for the basic layer commands. These are the same commands found in the Layer Menu in the Canvas Menu Caret[1], and in the context menu for the Layer Dialog.