BLine Tool (Кривые)
From Synfig Studio :: Documentation
< Spline Tool
Revision as of 11:01, 1 February 2012 by Zurba11 (Talk | contribs) (Created page with "<!-- Page info --> {{Title|BLine Tool (Кривые)}} {{Category|Tools (Инструменты)}} <!-- Page info end --> {{l|Image:Bline_icon.png|64px}} <span style="font-size:...")
Введение
Blines (Кривые) самый используемый объект в обычной анимации сделанной в Synfig и создать его можно с помощью инструмента Bline tool (Кривые).
Использование
Нажав на кнопку Bline tool вы попадаете в режим создания кривых, чтобы выйти из этого режима просто кликните на любой другой кнопке на панели инструментов. Пользоваться этим инструментом очень просто:
- Простой клик на холсте создаёт новую вершину. Величина касательной при этом равна (0,0) и вершина создаёт острый угол.
- Если после клика потянуть курсор в сторону то это позволит менять размер касательной к вновь созданной вершине, чем длиннее касательная тем более гладким получится угол.
- Каждая новая вершина соединяется с предыдущей "Кривой Безье" форма которой зависит от положения вершин и их касательных.
- Кривая создаётся последовательно, вершины следуют одна за другой.
- Последняя вершина кривой соединится со следующей создавая форму, пока вы не закроете её. Созданная затем кривая будет уже независимой от предыдущей.
- Вы можете подправить созданные вершины выделив "Дак" (Точку управляющую формой кривых) и потянув его.
- Вы также можете кликнуть правой кнопкой на "Дак" вершины или её касательной чтобы попасть в контекстное меню:
- For tangent ducks: "Split tangents" will split the tangent so that you can independently modify the arch of an end point of a beizer curve. "Merge tangents" will merge the independent tangents so that you can align the arches of the end points of two connecting beizer curves.
- For vertex ducks: "Loop Bline" or "UnLoop Bline" (depending on if it is already looped or not) allows you to close or open the bline. "Delete vertex" allows you to delete the vertex.
- You can also right click in the middle of a beizer curve. "Insert vertex" allows insertion of a vertex (and set its tangents intelligently according to the neighboring vertices' values) where you clicked.
To finish the Bline:
- Select other tool.
- Or click on the gear button of the Tool Options panel.
To clear out the working Bline, press the "Esc" button.
Options
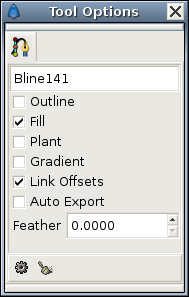
This tool has the following options:
- BLine layer name. The name of the Bline that you will create is set by the text input box. In this case it is "Bline141". This input text will parse the end of the string if any integer number is found, increasing that number for the next time you create other Bline. If not number is found it adds a three digit number for the next Bline created.
- Outline check box. If checked it creates an Контуры (Outline Layer).
- Fill check box. If checked it creates a Области (Region Layer).
- Plant check box. If checked it creates a Plant Layer.
- Gradient check box. If checked it creates a Curved Gradient.
- Link Offsets check box. If enabled it links the Offset Parameter for the Plant, Region or Outline if two of them (or all them) are checked.
- Auto Export check box. If checked it automatically exports the Vertices parameter (that's a BLine type parameter)
- Feather numerical input field. There you set the feather paramter of the Region Layer or Outline Layer created.
Other sources of information
See this video tutorial to see it in action.
Read Создание Фигур which talks a little about the BLine tool.
Read Bline Speed which explains about variations in the Amount parameter of BLines.

