Looping Background
Contents
Introduction
A looping background is a moving background that simulates camera panning, and that seamlessly repeats itself. It is a standard animation technique.
There are multiple ways to do looping backgrounds in Synfig. The one presented here is simple, minimizes manual work and repetition, and doesn't use keyframes.
We will be using two files: one for the background and one for the animation.
Say that the animation size will be WA = 640 pixels, HA = 480 pixels.
The background image
The background can be a bitmap or a vector graphics. In order to be usable as a looping background, the requirements are the same. Imagine duplicating the image and putting the duplicate next to the original in an horizontal line: the left edge must seamlessly blend with the right edge.
This tutorial uses a vector graphics background, but the same workflow can be applied for bitmap images.
If you already have a background, skip to the The animation section.
Create background
Since we are creating the background and the animation from scratch, the easiest way is to use the same scale for the two synfig files.
In Synfig Studio, create a new canvas with File | New. Its height should be the same as the animation (HB = HA = 480), while its width should be bigger than the animation (no need to be a multiple). Say WB = 1200. To be sure to keep the correct background size when importing it into the animation, proceed as follows:
Open the Canvas Properties Dialog (Caret | Edit | Properties). In the Other tab, check pixel width, pixel height, image aspect, pixel aspect. Uncheck the other items. In the Image tab, finally put the size: Width = WB = 1200, Height = HB = 480. All the other values should be automatically updated.
In the Time tab, set Start time and End time to 0. This tells synfig that the canvas is a still image and the interface becomes simpler.
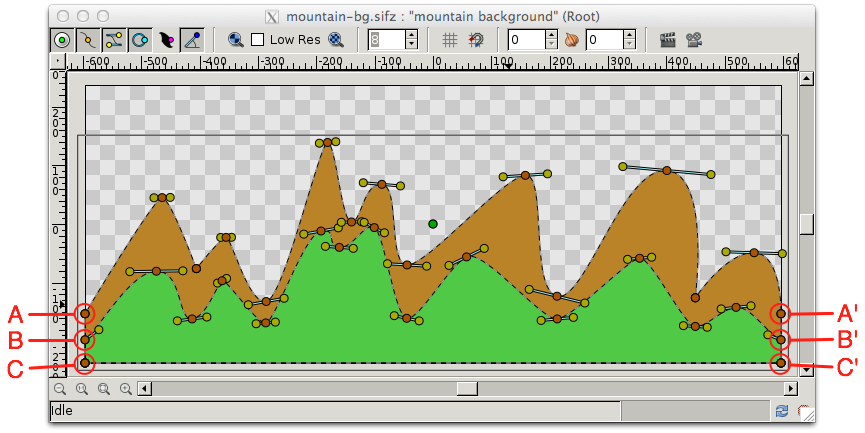
Now draw the background :-). This is the one we will be using for the tutorial:
It is made of two bline regions. To tile seamlessly, the Y coordinates of the left control points A, B, C must match with the Y coordinates of the right control points A', B', C'. In addition, the tangents should make the lines as smooth as necessary to adapt to the overall image stile.
If you look at the sample sif file, you will see that the Y coordinates of A, A' and C, C' are hardcoded to match. The same could be done for B, B', but just to show another, more flexible way, the Y coordinate of B is exported and reused by the Y coordinate of B'. This means that if you move with the mouse point B, point B' will move too, and vice versa :-)
Save the file. We use the name 'mountain-bg'.
The animation
writeme :-)
Workflow overview
- Prepare or gather background.
- Mention trick to keep same size when importing a sif file.
- Mention trick to keep the two ends the same (exported, decomposed vector).
- Import background.
- Genete's trick of the Zoom layer.
- Duplicate encapsulated background. Say bounding box width is L pixels.
- Move center of the duplicate L pixels towards the direction of the loop.
- Add translation layer.
- Record mode. Move translation layer opposite direction of loop, L pixels. Two waypoints, one at time 0, one at time T. Exit from record mode.
- Add Timed Loop layer. Set duration to T.
- Enjoy!
Examples
Credits
Based on posts by Genete and others in the Synfig forum.
| Language: |
English |
