Difference between revisions of "Doc:Flower Animation"
m (→Animate the stem) |
(→Animate the stem: Removed the overmuch keyframes. More work done with waypoints) |
||
| Line 27: | Line 27: | ||
We need to change our simple image into something that can be animated. | We need to change our simple image into something that can be animated. | ||
| − | In the Canvas Menu, select ''Edit > Properties''. Go to the Time tab and set the ''End time'' to | + | In the Canvas Menu, select ''Edit > Properties''. Go to the Time tab and set the ''End time'' to 6s. |
| − | There's now a timetrack at the bottom of the canvas. | + | There's now a small timetrack at the bottom of the canvas. |
Click at the beginning of the timetrack (<tt>0f</tt>), then, on the [[Keyframes Dialog]] (the one with a key icon) click on "+" (add a new keyframe). | Click at the beginning of the timetrack (<tt>0f</tt>), then, on the [[Keyframes Dialog]] (the one with a key icon) click on "+" (add a new keyframe). | ||
| − | Click again on the timetrack, at <tt> | + | Keyframes allows us to ''settle down'' the scene; i.e. on a keyframe, every element of the scene will have all its properties remembered. |
| − | Press the green circle at the bottom right of the canvas, to switch to the Animate Editing Mode (the circle is now red). | + | Click again on the timetrack, at <tt>4.5s</tt>. |
| + | Press the green circle at the bottom right of the canvas (or whatever icon you have there, depending on your icon theme), to switch to the [[Animate Editing Mode]] (the circle is now red). | ||
| − | With the [[Normal Tool]], select the green sprout, and move the upper vertex up a | + | With the [[Normal Tool]], select the green sprout, and move the upper vertex up to make a stem. |
| − | + | You can play with the vertex handles to bend the shape a bit if you want. | |
| − | + | ||
<div style="display:block;"> | <div style="display:block;"> | ||
| − | http://i209.photobucket.com/albums/bb207/rore4wiki/Synfig/ | + | http://i209.photobucket.com/albums/bb207/rore4wiki/Synfig/flower_3.png</div> |
| − | + | While you are still at <tt>4.5s</tt>, right-click on the stem border, close to the top, and choose "''Insert Item (smart)''". Do the same on the other side of the stem. Right click on those new points and choose ''Split Tangent'' again. Then try to make a shape that looks like the one on the image, to create the flower bud. | |
| − | + | ||
<div style="display:block;"> | <div style="display:block;"> | ||
| − | http://i209.photobucket.com/albums/bb207/rore4wiki/Synfig/ | + | http://i209.photobucket.com/albums/bb207/rore4wiki/Synfig/flower_4.png </div> |
| − | + | Now if you click on <tt>2s</tt> (for example), you'll see that the shape of the bud is slightly visible, even if the sprout is rather small, and even if the bud ducks are invisible. Let's say we want the bud to appear only at 3.5s, and be full size at 4.5s. | |
| − | + | ||
| + | Click on <tt>3.5s</tt> on the timetrack. Now take a look at the ''Params'' and ''Timetrack'' dialog. You'll see that each parameter in the [[Params Dialog]] matches a row in the [[Timetrack]] dialog. The last parameter is the vertices list. Click on the small arrow on the left to unfold the list. You should see something like this: | ||
<div style="display:block;"> | <div style="display:block;"> | ||
| − | http://i209.photobucket.com/albums/bb207/rore4wiki/Synfig/ | + | http://i209.photobucket.com/albums/bb207/rore4wiki/Synfig/flower_5.png </div> |
| + | Each big green dot (or [[waypoints|waypoint]]) stands for a recorded value (here the vertices positions were recorded at 0f with the keyframe, and at 4s when we moved some vertices or vertices handles). The two vertices we added to make the bud are marked at "DYN" (dynamic). Right-click on them in the params list, and select "Mark Activepoint as Off".<br/> | ||
| + | The dialog should now look like this, the grayed part being the part where the bud vertices have no effect on the stem. | ||
| + | <div style="display:block;"> | ||
| + | http://i209.photobucket.com/albums/bb207/rore4wiki/Synfig/flower_6.png </div> | ||
| + | For example if you click on <tt>2s</tt> or even <tt>3s</tt> now, the bud shape is not visible. It starts to appear only a little after 3.5s. | ||
| + | |||
| + | However, the shape of the stem may not look very nice during its growth between 0 and 4s. Make sure you're still in Animate Edit Mode, and tweak the shape at various moments in time, to get something you like. | ||
The animation of the stem is now finished, but it still lacks the petals. | The animation of the stem is now finished, but it still lacks the petals. | ||
Revision as of 01:12, 30 August 2007
This tutorial will show you how to create a simple animation of a growing flower with blines.
Basic settings
Click on File > New. You can keep the default values here and just click OK.
Click on the foreground and background colors in the toolbox, in order to create a gradient you like. (You can also directly edit the gradient by clicking on it). Select the Gradient Tool and drag your cursor vertically across the canvas to fill it with the gradient.
Select the Bline Tool and in the tool Options dialog, make sure that only "Fill" is checked. In the toolbox, Set the foreground color to green. Draw a kind of triangle with the Bline tool. To close the shape after drawing the 3 vertices, right click on the first vertex and choose "Loop Bline".
- Note: If only the "Split Tangents" option is available, drag a little the red dot (the "duck") that covers the first vertex, then right-click again on the vertex (the orange dot) to make the Loop Bline option appear.
Now that the shape is closed, you can "create" the bline shape by selecting another tool or pressing the Create button (gear-like icon) at the bottom of the tool options.

This will be the base of the stem. You can tweak the tangent handles (red dots) a bit to make a rounder triangle. With the Normal Tool, right-click on each vertex and select "Split Tangent", so the tangent handles of each vertex can be moved separately. We're done with the basic settings.

Animate the stem
We need to change our simple image into something that can be animated. In the Canvas Menu, select Edit > Properties. Go to the Time tab and set the End time to 6s. There's now a small timetrack at the bottom of the canvas.
Click at the beginning of the timetrack (0f), then, on the Keyframes Dialog (the one with a key icon) click on "+" (add a new keyframe). Keyframes allows us to settle down the scene; i.e. on a keyframe, every element of the scene will have all its properties remembered. Click again on the timetrack, at 4.5s. Press the green circle at the bottom right of the canvas (or whatever icon you have there, depending on your icon theme), to switch to the Animate Editing Mode (the circle is now red).
With the Normal Tool, select the green sprout, and move the upper vertex up to make a stem. You can play with the vertex handles to bend the shape a bit if you want.
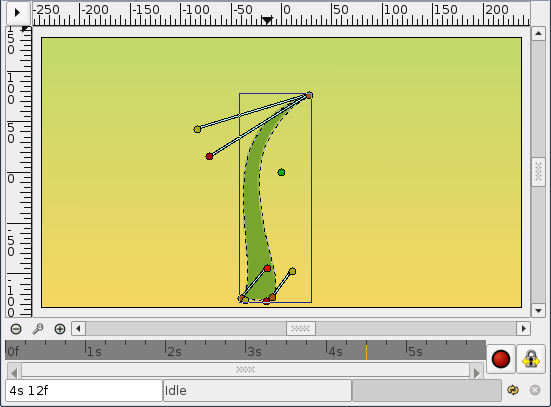
While you are still at 4.5s, right-click on the stem border, close to the top, and choose "Insert Item (smart)". Do the same on the other side of the stem. Right click on those new points and choose Split Tangent again. Then try to make a shape that looks like the one on the image, to create the flower bud.
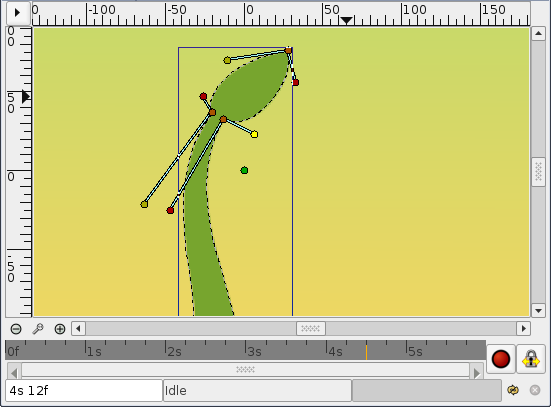
Now if you click on 2s (for example), you'll see that the shape of the bud is slightly visible, even if the sprout is rather small, and even if the bud ducks are invisible. Let's say we want the bud to appear only at 3.5s, and be full size at 4.5s.
Click on 3.5s on the timetrack. Now take a look at the Params and Timetrack dialog. You'll see that each parameter in the Params Dialog matches a row in the Timetrack dialog. The last parameter is the vertices list. Click on the small arrow on the left to unfold the list. You should see something like this:
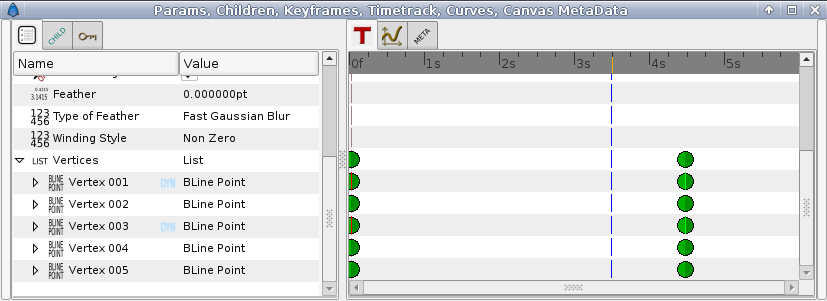
Each big green dot (or waypoint) stands for a recorded value (here the vertices positions were recorded at 0f with the keyframe, and at 4s when we moved some vertices or vertices handles). The two vertices we added to make the bud are marked at "DYN" (dynamic). Right-click on them in the params list, and select "Mark Activepoint as Off".
The dialog should now look like this, the grayed part being the part where the bud vertices have no effect on the stem.
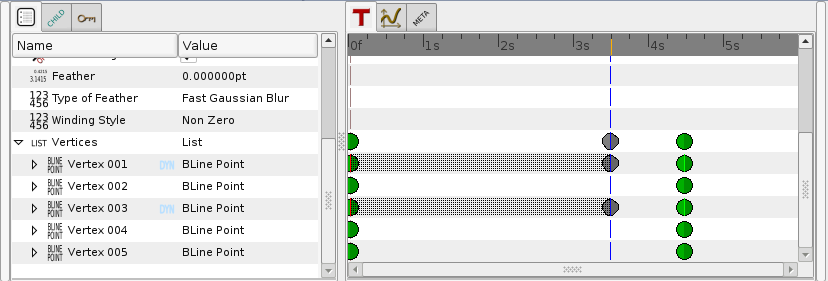
For example if you click on 2s or even 3s now, the bud shape is not visible. It starts to appear only a little after 3.5s.
However, the shape of the stem may not look very nice during its growth between 0 and 4s. Make sure you're still in Animate Edit Mode, and tweak the shape at various moments in time, to get something you like.
The animation of the stem is now finished, but it still lacks the petals. You can watch a preview of your animation: Go to File > Preview, validate, wait for the preview to be generated, and watch :) (Previews are often aliased and blurry, but the final render will be clean-cut. Higher quality previews are obtainable by using higher values for 'Zoom' and 'Frames per second' in the preview dialog window).
Adding the petals
Change the paint color to pink, and create a petal with the bline tool. You'll notice that the green duck that allows easy movement of a shape is at the center of the canvas. Select all the vertices of the petal with Ctrl+A and move them close to the green duck (with the Normal Tool), as shown.

You can now leave the Animate Editing Mode by clicking on the red circle at the right bottom of the canvas. Then drag the green duck very close to the top of the stem. Tweak a bit the petal if needed. Also, in the Layers Dialog select the petal layer and put it under the stem layer.

Click on the petal to select it, then Ctrl-Click on the stem. Both objects should be selected. Now click on the vertex at the top of the stem and ctrl-click on the green duck of the petal (both should appear in a lighter color, as they are selected). Then right-click on the stem top vertex, and select "link". The petal will move a bit as the green duck is snapped on the stem vertex.

Now that there's a link between the petal and the top of the stem, when the top of the stem moves, the petal will follow the move. (And if the green duck of the petal move, the top of the stem will move, but we don't want to do that here.)
On the Layers Dialog, select the newly created Petal layer and duplicate it (with the third button, on the bottom of the dialog). On the canvas, press Ctrl+A to select all the vertices of the duplicated petal, and move them a little, so the petals are no longer overlaid (Don't move the green duck, just the orange ones). Repeat the process several time, to get something looking like this image.

Note that the duplicated petals are also linked to the stem. If you go back to the first keyframe, you'll see that the petals are visible :

We don't want that. We want the petals to appear and bloom almost at the end of the growth.
Hiding the petals
- This part is maybe the most clumsy one. I guess there may be an easier way to manage this step, and if I find it, I'll update the tutorial ;)
Let's say we want the petals to appear a little after 3.5 seconds in the animation, and be full size at 4seconds, instead of being full size all the time.
Switch to Animate Edit Mode by clicking on the green circle at the bottom right of the canvas.
On the timetrack, click to place the cursor at 3 and a half seconds. On the Keyframes dialog, click on "+" to add a new keyframe. On the Layers dialog, select all the petals layers (with Ctrl+click), then press Ctrl+A to select all the petals vertices. Scale them down with the Scale Tool, and move them, so they are hidden by the stem, as shown.

From 3.5s to 4s, the petals will now appear and bloom. But the problem is that they are still visible from the first keyframe to the 3.5s keyframe. We could either change the size of the petals an make them tiny and hidden on every frame between 0s to 3.5s, or we could make them invisible on those frames.
Let's choose the second solution. With all the petals still selected, jump to the first keyframe. In the Param tabs, set the "Amount" value to 0. The petals are now invisible on that keyframe. Repeat the process for the keyframes at 1s, 2s and 3s. The animation is almost OK now.
The last remaining problem is that the petals are slightly visible between the 3s keyframe and the 3s 12f keyframe. On the timetrack, click a little before 3.5s (at 3s 11f it will be the best) and add a new keyframe in the Keyframes dialog. Make all the petals invisible (Amount: 0 in the Param tab) on that frame too.
Now you're done. The stem grows for 4 seconds and then stays still the last second. The petals are hidden until 3.5 seconds, and then grow quickly between 3.5 and 4 seconds, and stay still the last second too.
Click on File > Render to render your animation. Select any format you want, and don't forget to uncheck the "Use current frame" option (otherwise, one frame only will be rendered).