Doc:Flower Animation/es
|
Warning! This page contains outdated information. The release of Synfig Studio 0.64.0 introduced new terminology and this translated page needs to be updated according to original English text. You can help updating this page - see instructions here. Thank you! |
Esta página debería estar escrita en Español. Por favor ayúdanos a traducirla!
This tutorial will show you how to create a simple animation of a growing flower with blines.
Ajustes Básicos
Haz click sobre Fichero > Nuevo. Puedes mantener los valores por defecto aquí y simplemente hacer click sobre OK.
Haz click sobre los colores de frente y de fondo en la caja de herramientas, para crear un gradiente como desees. (También puedes editar el gradiente directamente haciendo click sobre él).
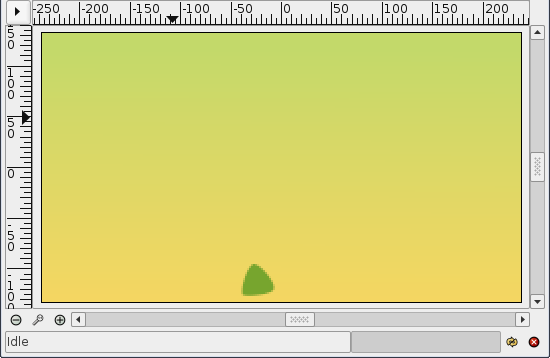
Selecciona la Herramienta de Gradiente y arrastra el cursor verticalmente sobre el tapiz para rellenarlo con el gradiente.
Selecciona la Herramienta Bline (Línea de Bezier) y en el diálogo de las opciones de la herramienta, asegúrate de que solamente "Rellenar" está seleccionado.
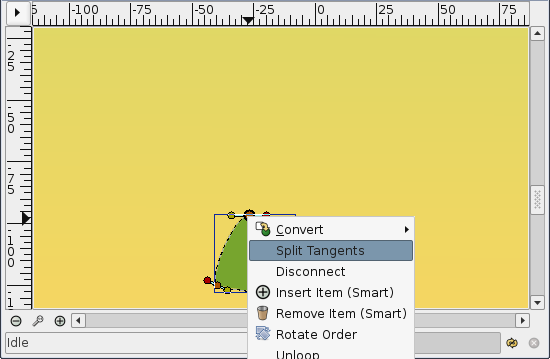
En la caja de herramientas, fija el color de frente a verde. Dibuja una especie de triángulo con la herramienta Bline. Para cerrar el contorno después de poner tres vértices, haz click con el botón derecho del ratón sobre el primer vértice y selecciona "Loop Bline" (Hacer Bucle).
- Nota: Si la única opción disponible es "Separar Tangentes", arrastra un poco el punto rojo (el "pato") que cubre el primer vértice, y entonces haz click con el botón derecho de nuevo sobre el vértice (el punto naranja) para que aparezca la opción Hacer Bucle.
Ahora que el contorno está cerrado, puedes "crear" la figura Bline seleccionando otra herramienta o presionando el boton Crear (el icono como unas ruedas dentadas) debajo de las opciones de herramienta.
Esto será la base del tallo. Puedes tocar los manejadores de tangentes (los puntos rojos) un poco, para hacer un triángulo más redondo. Con la Herramienta Normal, haz click con el botón derecho sobre cada vértice y selecciona "Separar tangentes", de modo que las dos tangentes de cada vértice se pueden manejar separadamente. Hemos acabado con los ajustes básicos.
Animar el tallo
Necesitamos cambiar nuestra imagen simple en algo que pueda ser animado. En el Menú del Lienzo selecciona Editar > Propiedades. Ve a la pestaña de tiempo y fija el Tiempo Final en 6s.
Ahora hay una pequeña linea de tiempo bajo el lienzo.
Haz click en el comienzo de la línea de tiempo (0f), luego, en el Panel Fotogramas Clave (el que tiene un icono de una llave) haz click en "+" (añadir un fotograma clave). Los fotogramas clave Keyframes nos permiten Asentar la escena; esto es, en un fotograma clave, las propiedades de cada elemento se recordarán.
Haz click de nuevo en la línea de tiempo, en 4.5s. Presiona el círculo verde en la esquina inferior derecha del lienzo ( o el icono que tengas ahí, dependiendo del tema que uses), para cambiar Modo de Edición de Animación (el círculo es rojo ahora).
Con la Herramienta Normal, selecciona la punta verde, y mueve el vértice superior hacia arriba para hacer un tallo.
Puedes jugar con los manejadores de las tangentes para mover un poco la forma si lo deseas.
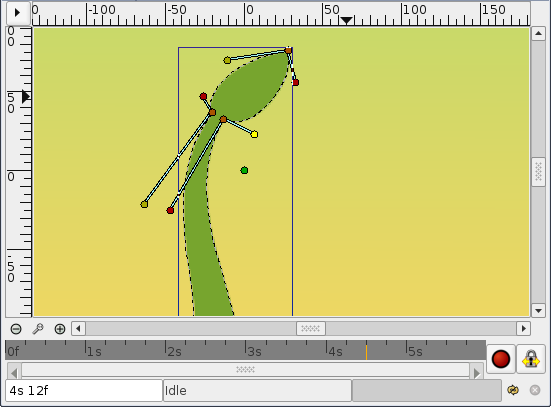
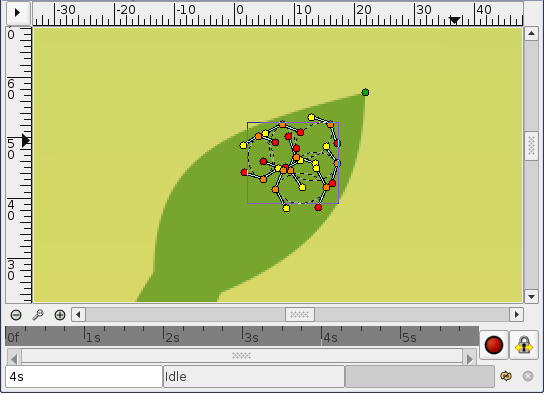
Estando aún en 4.5s, haz click con el botón derecho en el borde del tallo cerca de la parte más alta, y elige, "Insertar Vértice". Haz lo mismo en el otro lado del tallo. Haz click con el botón derecho sobre esos puntos nuevos y elige de nuevo Dividir Tangentes. Intenta hacer una figura que se parezca a la de la imagen para crear el brote.
Si ahora pinchas en 2s (por ejemplo), verás que la figura del brote es ligeramente visible, incluso si es más bien pequeña, e incluso si los patos del brote son invisibles. Digamos que queremos que el brote aparezca en el momento 3.5s, y el tamaño completo en el momento 4.5s.
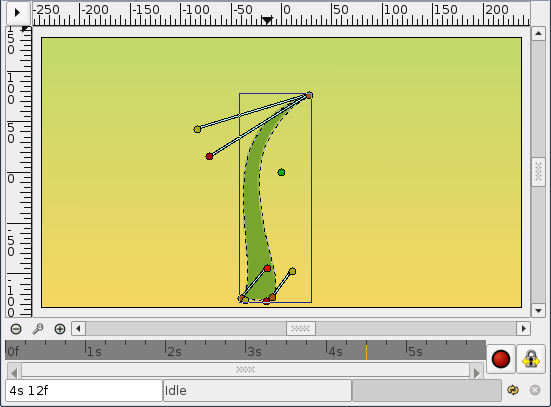
Pincha en 3.5s en la línea de tiempo. Échale un vistazo a los Parámetros y al diálogo Línea de tiempo. Verás que cada parámetro en el Panel de Parámetros corresponde a una fila en el diálogo de la Línea de tiempo. El último parámetro es la lista de vértices. Haz click sobre la flecha pequeña a la izquierda para desempaquetar la lista. Deberías ver algo como esto:
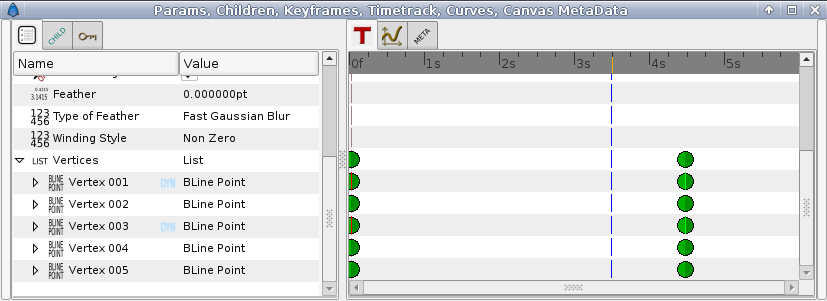
Cada punto grande verde (o waypoint) es un valor grabado (aquí las posiciones de los vértices se grabaron en el momento cero con el fotogramaclave, y en el momento 4s cuando movimos algunos vértices o manejadores de vértices). Los dos vértices que añadimos para hacer la yema o brote están marcados en "DYN" (dinámico). Haz click sobre ellos en la lista de parámetros, y selecciona "Mark Activepoint as Off". El diálogo debería aparecer ahora como en la imagen, la parte en gris es la parte donde los vértices del brote no tienen efecto sobre el tallo.
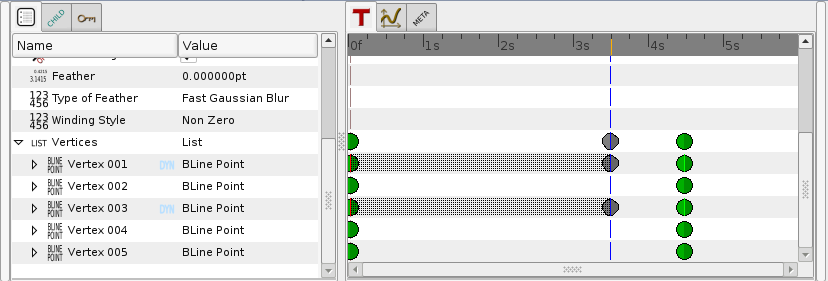
Por ejemplo si haces click ahora sobre 2s o sobre 3s, el contorno de la yema no es visible. Comienza a verse un poco tras el momento 3.5s.
Sin embargo, el contorno del tallo puede no parecer bonito durante el crecimiento desde 0 a 4s. Asegúrate de que estás ahún en Modo de Edición de Animación, y retoca la figura, en varios momentos del tiempo, hasta conseguir algo que te guste.
La animación del tallo se ha terminado, pero aún faltan los pétalos.
Puedes observar una previsualización: Ve a Fichero > Previsualización, selecciónalo y espera hasta que la previsualización se genere, y observa:) (Las previsualizaciones son a menudo alisadas y desenfocadas, pero el resultado final será claro. Se pueden obtener previsualizaciones de mejor calidad usando el zoom y el número de imágenes por segundo en la ventana de diálogo de previsualizaciones.
Añadiendo los pétalos
You can now leave the Animate Editing Mode by clicking on the red circle at the right bottom of the canvas.
Change the paint color to pink, and create a petal with the bline tool. You'll notice that the green duck that allows easy movement of a shape is at the center of the canvas. Select all the vertices of the petal with Ctrl+A and move them close to the green duck (with the Normal Tool), as shown.
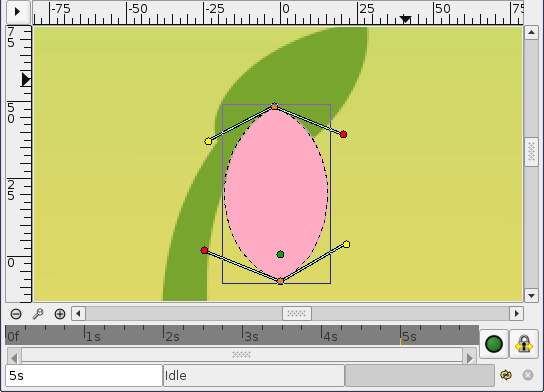
Then drag the green duck very close to the top of the bud. Tweak a bit the petal if needed. Also, in the Layers Panel select the petal layer and put it under the stem layer. Click on the petal to select it, then Ctrl-Click on the stem. Both objects should be selected.
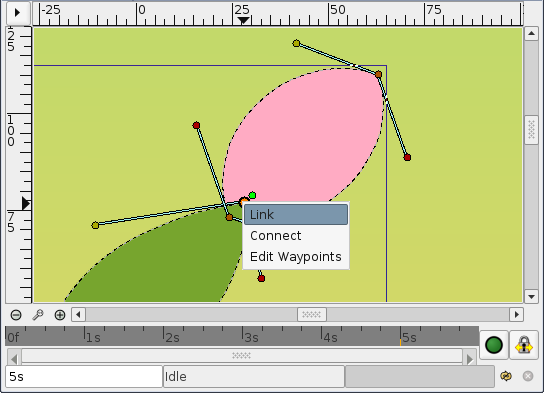
Now click on the vertex at the top of the stem and ctrl-click on the green duck of the petal (both should appear in a lighter color, as they are selected). Then right-click on the stem top vertex, and select "link". The petal will move a bit as the green duck is snapped on the stem vertex.
Now that there's a link between the petal and the top of the stem, when the top of the stem moves, the petal will follow the move. (And if the green duck of the petal move, the top of the stem will move, but we don't want to do that here.)
On the Layers Panel, select the newly created Petal layer and duplicate it (with the third button, on the bottom of the dialog). On the canvas, press Ctrl+A to select all the vertices of the duplicated petal, and move them a little, so the petals are no longer overlaid (Don't move the green duck, just the orange ones). Repeat the process several time, to get something looking like this image.

Note that the duplicated petals are also linked to the stem.
If you go back to the first keyframe, you'll see that the petals are visible.
We don't want that. We want the petals to appear and bloom almost at the end of the growth.
Hiding the petals
- This part is maybe the most clumsy one. I guess there may be an easier way to manage this step, and if I find it, I'll update the tutorial ;)
Let's say we want the petals to appear a little after 4 seconds in the animation, and be full size at 5 seconds, instead of being visible and full size all the time.
Switch to Animate Edit Mode again by clicking on the green circle at the bottom right of the canvas.
On the timetrack, click to place the cursor at 5 seconds.
On the Keyframes Panel, click on "+" to add a new keyframe. As the flower won't move between 5 and 6 seconds, adding a keyframe at 5s makes sure that the changes we will make won't affect the next frames.
Now click on 4s, and on the Layers Panel, select all the petals layers (with Ctrl+click), then press Ctrl+A to select all the petals vertices. Scale them down with the Scale Tool, and move them, so they are hidden by the stem, as shown.
From 4s to 5s, the petals will now appear and bloom. But the problem is that they are still visible from the first keyframe to the 4s keyframe.
We could either change the size of the petals an make them tiny and hidden on every frame from 0s to 4s, or we could make them invisible on those frames.
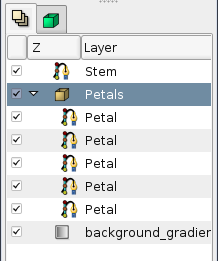
Let's choose the second solution. To make things easier, we are going to encapsulate the petal layers in an Inline Canvas. With all the petal layers selected, right-click on them on the Layers Panel and select Encapsulate. You can rename the layers to make things more understandable.
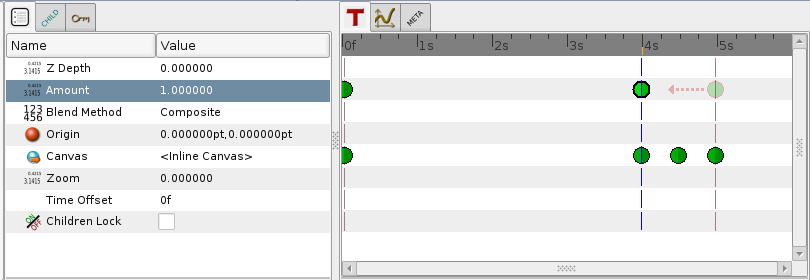
Select the "Petals" inline canvas and jump to the first keyframe. In the Param tabs, set the Amount value to 0. The petals are now invisible on that keyframe.
Note that two waypoints were added in front of the "Amount" parameter, one at 0s and the other at 5s. Drag the 5s waypoint to 4s, so that the opacity of the petals is at 1 at 4s.
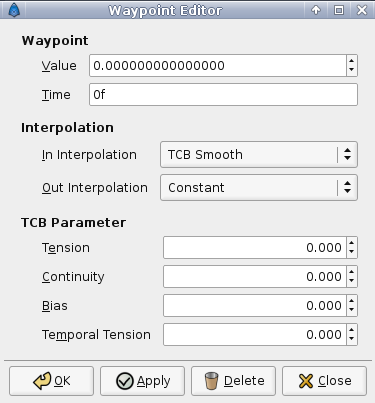
There is still one problem left : From 0s to 4s, the opacity of the petals slowly increases, making the petals visible when they shouldn't. To solve this, we will change the Amount interpolation method: Right click on the Amount waypoint at 0f, and select Edit waypoint. A new dialog will appear, in which you can choose the In and Out interpolation. Set the Out Interpolation to Constant. This means that after that waypoint, the Amount value will remain constant, until another waypoint is encountered. So from 0f to 4s the Amount value will be equal to 0, and at 4s it will suddenly changed to 1, and make the petals visible, as expected. Alternatively, we could have achieved the same effect by setting the In Interpolation of the waypoint at 4s to Constant.
Notice how (half of) the waypoint changes from a green circle (meaning smooth animation of the amount parameter) to a red step (meaning that the amount parameter is suddenly stepped).
Now you're done. The stem grows for 4.5 seconds and then stays still the last 1.5 second. The petals are hidden until 4 seconds, and then grow quickly between 4 and 5 seconds, and stay still the last 1.5 second too.
Click on File > Render to render your animation. Select any format you want, and don't forget to uncheck the "Use current frame" option (otherwise, one frame only will be rendered).