Doc talk:Cut-out Animation
From Synfig Studio :: Documentation
Why are you making multiple copies of the rotation layers? This technique will work exactly the same if you nest the 'children' limbs inside the parent's encapsulation. Then you need only a single rotation layer for each joint which should make things render faster, and make the document simpler to examine. -- dooglus 03:03, 18 December 2007 (EST)
http://dooglus.rincevent.net/synfig/cutoutsample2.sifz shows an example of what I'm talking about. It renders in 41s, compared to 68s for the original, around 33% faster. -- dooglus 04:00, 18 December 2007 (EST)
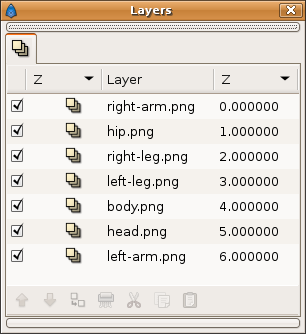
- That's valid only if the nested image layers are also composed in the same Z order. But if the image layers are composed in different Z order but the ortiation hieracrchy is different, then the set-up I've done is the only one that allow a general character set-up. If you look to the initial set-up:
- you can see that the body layer must be placed behind the hip, the left, the right leg, and the rigth arm layers to compose properly the character. How can I perform a body rotation (what means a head, left arm and rigt arm rotation too) without rotate the hip or the legs in a nested hierarchy? (NOTE: I've replied your comments without watching your sample. Maybe I'm wrong.)--Genete 10:36, 18 December 2007 (EST)
- Ah yes, I see what you mean. The hip rotation layer (or root rotation layer) can be placed on top of all the composition due that it affects to all the image layers at the same time so it is no needed a copy on each child. But you cannot do it with all the intermediate parent layers. It is due that some child layers have not the same Z order than the rotation hieracrchy. Then a copy of the parent rotation layer must be duplicated necessarily over all the children image layers. On the other hand a nested set-up doesn't allow modify the Z order of the child/parent layers during the animation meanwhile the standard method I have explained, yes.--Genete 04:49, 19 December 2007 (EST)
- When i click all the layers by pressing the CTRL and click the layers in the navigation windows I get two grey dots, which change to green when hold the mouse over it, but I can't find the link in the right click menu. I only have Convert and Export. I can easy link to circles I have draw, I use windows vista. Thomaxz
- You should also select both ducks using CTRL and click. Then a new right click over one of them would show the "Link" menu. --Genete 15:28, 8 January 2008 (EST)
- Ooh, okay , now i get the link menu, but i have another weird problem, when I link, but on an Vista and or an XP, at least one part disappear, often the right-arm or the head. --Thomaxz 14:19, 9 January 2008 (EST)
- This may be caused because you are linking together some control points (here we call them "ducks") of the image layer. Each layer is controlled by two points (left top and bottom right if I remember. If you link them you project the image over a square of a size of 0x0 pixels so it is not visible. But I think you're confusing the tutorial. You should make right click over the parameter in the parameter list not over the control point in the canvas window, after make a multiple layer select. It would link properly each layer parameter for each layer and not the parameters within the same layer.--Genete 16:20, 9 January 2008 (EST)
- Ohh, yes it worked, thank you. --Thomaxz 02:29, 10 January 2008 (EST)
- This may be caused because you are linking together some control points (here we call them "ducks") of the image layer. Each layer is controlled by two points (left top and bottom right if I remember. If you link them you project the image over a square of a size of 0x0 pixels so it is not visible. But I think you're confusing the tutorial. You should make right click over the parameter in the parameter list not over the control point in the canvas window, after make a multiple layer select. It would link properly each layer parameter for each layer and not the parameters within the same layer.--Genete 16:20, 9 January 2008 (EST)
- Ooh, okay , now i get the link menu, but i have another weird problem, when I link, but on an Vista and or an XP, at least one part disappear, often the right-arm or the head. --Thomaxz 14:19, 9 January 2008 (EST)
- You should also select both ducks using CTRL and click. Then a new right click over one of them would show the "Link" menu. --Genete 15:28, 8 January 2008 (EST)

