Doc talk:Cut-out Animation using Group Transformation Widget
Rewrite preparation for 0.65
to do:add links, pictures, resources, check spelling, highlight keywords
This is a tutorial to show how to create cut-out style animations. Usually cut-out style animations use image art instead of vector art to create the animation. See South Park series. You should obtain some kind of animation like this one:
Contents
Preparing the material
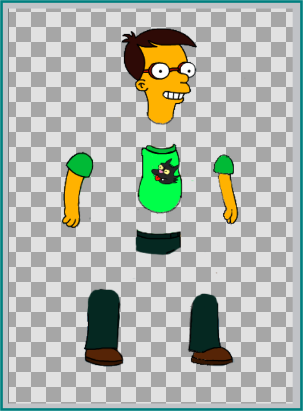
For a cut out animation we will need some images that represent the moving parts of the animation. For this example we will use a Simpsons like boy. You can take the images from this file.
Each part of the body (head, arms, legs, etc.) is a single PNG file. (In the split image, the individual images are composited in a bigger one). Try to set all the files to have the same horizontal and vertical dimensions so all the images can fit one over the other to create the character without the need to adjust their sizes or positions. It will help later to import each image into Synfig.
Importing the cut out images
This is as simple as going to the Caret Menu and selecting File->Import and select the proper file for each part of the character. After repeating this process for each of the image files of your character you should obtain what is shown below:
Grouping the parts
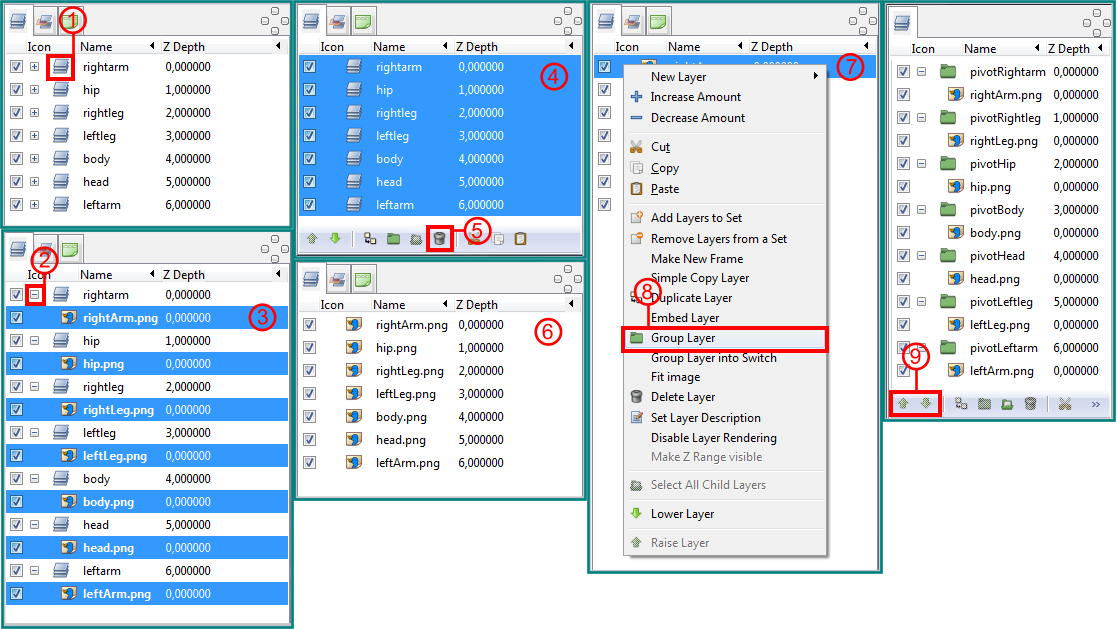
After importing the png images Synfig automatically places them in a switch layer (A1). We have to turn the switch layers into normal group layers first. Open each switch layer by clicking on the little plus sign in front of it (A2). Then Control-click on each png file (A3). Press Control-X to cut the files out of the switch layers. Control-click on each of the remaining switch layers (A4) and delete them by clicking the bucket icon (A5). Press Control-V to paste the original png files back into the Layers Panel (A6). Now we will group the png files. Select and right click the first png file (A7) in the Layers Panel choose group (A8)and give it the same name as the png file but put pivot in front of it. After you have done that with all the png files your Layers Panel should look like the last image on the right in picture A. If not then move the groups up or down using the arrows (A9).
Setting pivot points
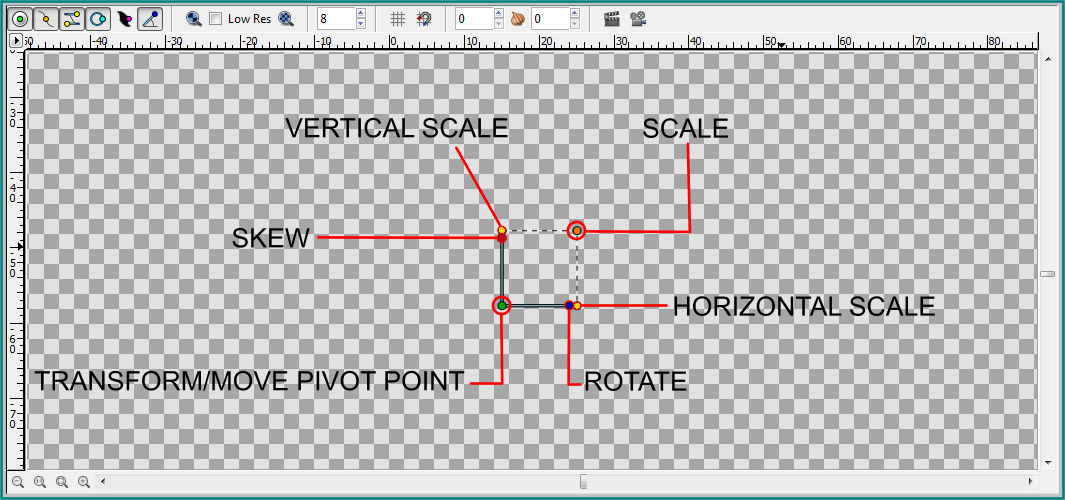
We are going to animate the parts of our character by using the Talk:Group Transformation Widget. If we click on a group in the Layers Panel then we can see the Talk:Group Transformation Widget on the canvas picture(B).To rotate the parts of our character we have to set a pivotpoint for each of the part. The Talk:Group Transformation Widget will rotate the part using the pivotpoint as the origin for the rotation. We will start with the hip. Select the pivotHip group in the Layers Panel(C1). Press space and drag the bottom left green handle of the Talk:Group Transformation Widget to the position of the hip where we want to have our pivotpoint (C2). Do the same for all the others parts of the character. Just select the next group in the Layers Panel, press space and drag the bottom left green handle of the corresponding Talk:Group Transformation Widget to the correct position. When finished control select all layers in the Layers Panel (C3)and your canvas should look like (C4). To rotate a part just select its corresponding group in the Layers Panel and drag the blue (rotation) handle of the Talk:Group Transformation Widget and the part should rotate around its pivotpoint. Note that the parts are not connected yet. When we rotate the hip then the body, head and arms don't rotate alongside it yet so we still have to assemble the pieces to get a fully animated character.
Building limb hierarchy
We are now going to connect the body, the head and the arms to the hip so that when we rotate the hip all the other parts rotate alongside with it. Select the pivotHip group in the Layers Panel and then go to the Parameters Panel (e)and open up the Talk:Group Transformation Widget information by clicking the little plus in front of it (e1). Right click on Offset (e2) and choose export (e3) and name the exported value pivotHip (e4). Also right click on Angle (e5), choose export and name the exported value angleHip (e6). When we go to the Library Panel (f) and click on the little plus sign (f1) in front of ValueBase Nodes then we see our two exported values (f2) and (f3). First we will connect the right arm to the hip. Select the pivotRightarm group in the Layers Panel, right click and choose group. Name the group rightArm. Now go to the Library Panel and select the pivotHip ValueBase Node (f2). Go to the Parameters Panel (g), open the Talk:Group Transformation Widget information by clicking the little plus in front of it (g1)and right click on Offset (g2)and choose connect (g3). The arm will move slightly downwards but we will correct that later when we assemble the character. Now go to the Library Panel again and select the angleHip ValueBase Node. With the rightArm group still selected go to the Parameters Panel, open up the Talk:Group Transformation Widget information by clicking the little plus in front of it (it's probably still open) and right click on Angle and choose export. We now have a group called rightArm that is connected to the hips origin and angle and a subgroup pivotRightarm that rotates around its own pivot point. When we select the pivotHip group in the Layers Panel and rotate it with the blue handle of the Talk:Group Transformation Widget the the hip will rotate and the right arm will rotate alongside with it. When we select the pivotRightarm group and rotate its blue handle then the arm will rotate independently from the hip. After you tried both rotations just press undo until you get to the original layout. Now we will have to do the same for the body, the head and the left arm. Select the pivotBody group in the Layers Panel, right click and choose group and name the group Body. Select the new Body group and connect its origin and angle of its Talk:Group Transformation Widget to the corresponding exported ValueBase Nodes. Don't forget to select the right ValueBase Node in the Library Panel before you connect them.
Assemble the character
Now that all parts are connected it is time to assemble our character, because it kind of looks messy at the moment. Select the pivotBody group in the Layers Panel and drag the bottom left green handle (do not press space!) until the body is in the right place above the hip. Do the same for the pivotHead group, the pivotLeftarm group, the pivotRightarm group, the pivotRightleg group and the pivotLeftleg group. When finished our character should look like this.(h). We have to be able to move the entire character including the legs so select all groups in the Layers Panel, right click and choose group and call the group Character. When we select the group Character we can use its Talk:Group Transformation Widget to transform the entire character and all the connection in the group will stay intact.
Tip
Elbow and wrist joints or knee and ankle joints do not have to be connected to the exported ValueBase Nodes of the pivotHip group because it is enough that you put them in a subgroup and they will rotate properly.


