Difference between revisions of "Gradient Tool"
From Synfig Studio :: Documentation
| Line 21: | Line 21: | ||
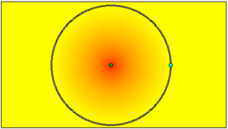
* Radial - This produces circular colors with the transition being at the center of those circles. Click where you want the center of the circles to be, and drag to set the radius of the transition. Use the [[Normal Tool]] to edit the position (center endpoint), or the radius (surface endpoint), of the radial gradient. | * Radial - This produces circular colors with the transition being at the center of those circles. Click where you want the center of the circles to be, and drag to set the radius of the transition. Use the [[Normal Tool]] to edit the position (center endpoint), or the radius (surface endpoint), of the radial gradient. | ||
[[Image:Radial_gradient.png|228px]] | [[Image:Radial_gradient.png|228px]] | ||
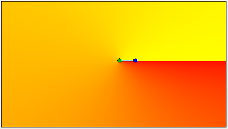
| − | * Conical - This has the appearance | + | * Conical - This has the appearance of looking down on a tip of a spiral. The lines radiate out from a fixed position, and go in all directions. Click to set the center, and drag to indicate the direction in which the foreground and background colors should go. |
[[Image:Conical_gradient.png]] | [[Image:Conical_gradient.png]] | ||
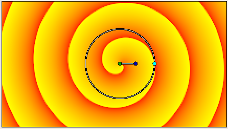
| − | * Spiral - | + | * Spiral - This produces a spiral gradient. Click to set the center of the spiral and drag to set the 'tightness'. |
| + | [[Image:Spiral_gradient.png]] | ||
Revision as of 07:24, 19 July 2009
The Gradient Tool is used to create smooth transitions between two or more colors in an object.
When you select the Gradient Tool, the Tool Options Panel will show the options for the Gradient Tool.

These allow you to:
- Set a name for the layer you are about to create,
- Choose the type of gradient to create (Linear, Radial, Conical, Spiral) via the dropdown menu.
NOTE: The name of the layer can always be changed later via the Layers Panel or the Params Panel if necessary, but the type of gradient needs to be chosen now.
There are 4 types of gradients:
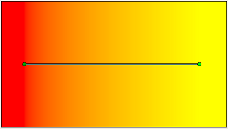
- Linear - This produces a simple transition in a straight line. Set your foreground and background colors. Click where you want the gradient to begin, and drag to where you want the transition to end. The gradient will be created perpendicular to the line you drag out. At any time, you can edit the gradient by moving either endpoint in any direction. You must use the Normal Tool to be able to edit the endpoints.
- Radial - This produces circular colors with the transition being at the center of those circles. Click where you want the center of the circles to be, and drag to set the radius of the transition. Use the Normal Tool to edit the position (center endpoint), or the radius (surface endpoint), of the radial gradient.
- Conical - This has the appearance of looking down on a tip of a spiral. The lines radiate out from a fixed position, and go in all directions. Click to set the center, and drag to indicate the direction in which the foreground and background colors should go.
- Spiral - This produces a spiral gradient. Click to set the center of the spiral and drag to set the 'tightness'.


