Interface
(Try to make this page less cluttered...) |
|||
| Line 10: | Line 10: | ||
This page tries to give you a short introduction to the different elements you will find after opening synfig. | This page tries to give you a short introduction to the different elements you will find after opening synfig. | ||
| − | + | ==The Toolbox window== | |
| − | + | [[File:Toolbox.png|150px|thumb|right|The Toolbox]] | |
The {{l|Category:Toolbox}} is the main window of Synfig: even if you have several open projects, there will only be one Toolbox. The window is separated into three areas or palettes: | The {{l|Category:Toolbox}} is the main window of Synfig: even if you have several open projects, there will only be one Toolbox. The window is separated into three areas or palettes: | ||
| Line 19: | Line 19: | ||
* The lowest palette contains the '''default settings''' for new layers: fore- and background colors, line width, opacity and layer mode. | * The lowest palette contains the '''default settings''' for new layers: fore- and background colors, line width, opacity and layer mode. | ||
| − | + | ==The Canvas window== | |
| − | + | [[File:canvas.png|center|The Canvas]] | |
| − | + | ||
Once you have opened a file or created a new project (e.g. via the buttons in the toolbox) you'll see the '''canvas''' window. This is where you'll create your animation! | Once you have opened a file or created a new project (e.g. via the buttons in the toolbox) you'll see the '''canvas''' window. This is where you'll create your animation! | ||
| Line 31: | Line 30: | ||
In the picture above there are three elements on the canvas, the black curve - called {{l|BLine|BLine}} - is selected. The little coloured dots control the curve and are called {{l|duck|ducks}}. | In the picture above there are three elements on the canvas, the black curve - called {{l|BLine|BLine}} - is selected. The little coloured dots control the curve and are called {{l|duck|ducks}}. | ||
| − | |||
| − | + | ==The Navigator and Layers Panel== | |
| + | [[File:layers_window.png|250px|left|thumb|Navigator and Layers Panel]] | ||
The third window contains again three areas, each of which can show different {{l|Category:Panels|panels}}: in this picture the {{l|Navigator Panel}}, the {{l|Tool Options Panel}} and the {{l|Layers Panel}} are active. | The third window contains again three areas, each of which can show different {{l|Category:Panels|panels}}: in this picture the {{l|Navigator Panel}}, the {{l|Tool Options Panel}} and the {{l|Layers Panel}} are active. | ||
You can access detailed descriptions of the other panels {{l|Category:Panels|here}}. | You can access detailed descriptions of the other panels {{l|Category:Panels|here}}. | ||
| − | + | ||
| − | + | ==The Parameter and Time Track Panel== | |
| + | [[File:params_etc.png|600px|thumb|Parameters and Time Track panels]] | ||
The fourth and last window shows the {{l|Params Panel}}, where you can find detailed parameters and settings for the active element like colour, width, opacity, location and so on. To the right is the {{l|Timetrack Panel}} that allows you to create and modify {{l|waypoints}}. | The fourth and last window shows the {{l|Params Panel}}, where you can find detailed parameters and settings for the active element like colour, width, opacity, location and so on. To the right is the {{l|Timetrack Panel}} that allows you to create and modify {{l|waypoints}}. | ||
Revision as of 18:40, 14 February 2011
Synfig doesn't start in one window, but opens a number of individual windows on your desktop. If you are familiar with The GIMP, you will recognize this layout. This page tries to give you a short introduction to the different elements you will find after opening synfig.
Contents
The Toolbox window
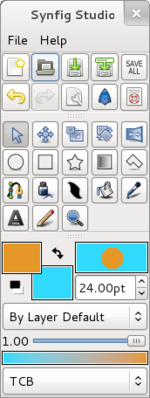
The Toolbox Panel is the main window of Synfig: even if you have several open projects, there will only be one Toolbox. The window is separated into three areas or palettes:
- The upper palette contains buttons with access to standard file operations: create a new file, open a file, save (all) file(s) (under a new name), undo and redo as well as access to the settings dialog and the help system.
- Located in the palette underneath are the tools which allow you to create and manipulate objects (or better: layers, as each object lies in its own layer). You can find a detailed description of each tool here.
- The lowest palette contains the default settings for new layers: fore- and background colors, line width, opacity and layer mode.
The Canvas window
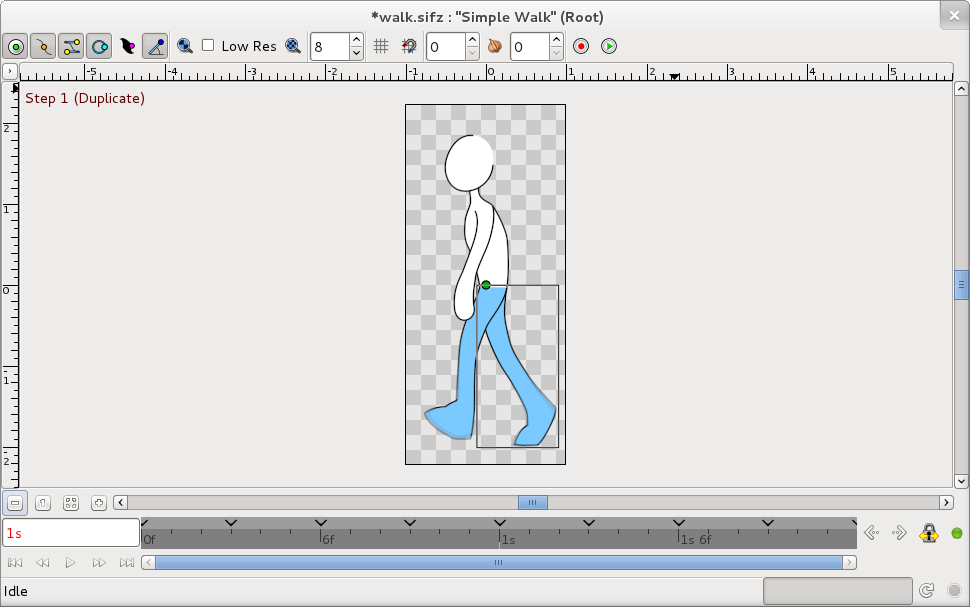
Once you have opened a file or created a new project (e.g. via the buttons in the toolbox) you'll see the canvas window. This is where you'll create your animation!
Whereas most graphics apps have a set of menus at the top of the screen, the top of the MDI window, or the top of the drawing window, Synfig has a caret: the little black triangle in the upper left corner of the canvas. Beneath are all the menus you would expect and that allow you to access most of Synfig's features.
The area with the grey check-board pattern is your working area in which you can create elements/layers and manipulate them.
The timeline that you can see in the picture here only appears when you have defined a non-zero duration in the settings dialog of your project. To the left you can see the number of the current frame and on the right side two buttons to switch the animation status and to lock/unlock the keyframes. The Animation Basics Tutorial gives a good introduction on how to work with this buttons.
In the picture above there are three elements on the canvas, the black curve - called BLine - is selected. The little coloured dots control the curve and are called ducks.
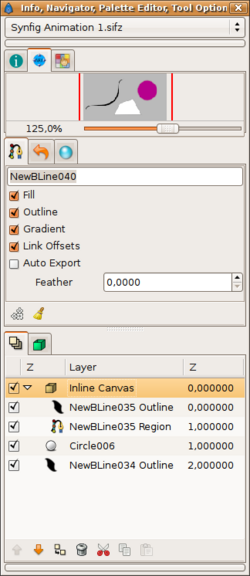
The third window contains again three areas, each of which can show different panels: in this picture the Navigator Panel, the Tool Options Panel and the Layers Panel are active.
You can access detailed descriptions of the other panels here.
The Parameter and Time Track Panel
The fourth and last window shows the Params Panel, where you can find detailed parameters and settings for the active element like colour, width, opacity, location and so on. To the right is the Time Track Panel that allows you to create and modify Waypoints.


