Creating shapes
Basic Shapes
There are three basic shapes in Synfig Studio that can be accessed from the toolbox:
 Circle - Creates circles.
 Rectangle - Creates rectangles.
 Star - Creates stars of varying dimensions.
Let's learn more about creating basic shapes by doing a quick tutorial:
- In the toolbox, click on the Circle Tool icon
 or alternately, use the shortcut AltC. And before we actually create the circle on the canvas, let's look at some options.
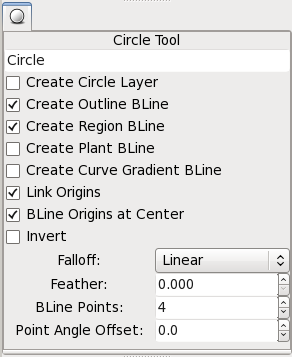
 - In the Tool Options Panel, make sure that you have same options as shown on screenshot below.
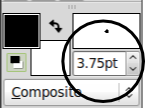
- Now let's select the stroke color of the circle. Near the bottom of toolbox find the FG/BG color widget and click on the black square. (Black is the default stroke color). A color editor should pop up which will allow you to choose any color you want. Select a red color.
- Change the stroke width. Click on the stroke width number in the toolbox, and manually input 10 for the stroke width.
- Next, choose the fill color. On the FG/BG color widget, click on the white square. At the color editor, let's choose a black fill color.
- Now we can actually create the circle on the canvas. Left click anywhere on the canvas where you want the circle center to go, hold, and drag out. You should get a black circle with a red stroke color, and a width of 10pt.
- Notice in the Layers Panel that we now have two separate layers for the Circle Outline and Region. Both are highlighted now. Circles, and other objects created in the way we just did are constructed from BLines. We can be modify them by moving, rotating, and scaling the object as a whole or change their shape via its vertices.
Complex Shapes
Basic primitives are all great, but they are pretty much geometrically inflexible. What about creating more complex shapes? To do this, we can use a few tools found in the toolbox:
 BLine - Creates complex paths that can be easily manipulated.
 Draw - Creates BLine paths by first sketching the shape on the canvas.
- Polygon - Creates BLine paths by drawing straight lines.
BLines
In Synfig, the construct for describing shapes is called a Bline. This is roughly analogous to a "path" in other programs, except that it is strictly a hermite spline.
Before we get started with the BLine tutorial, let's look at some additional notes on how Synfig works. When you click on the Bline Tool, you will see that the vertices from your currently selected object (if there was one) will disappear, but the layer(s) will still remain selected in the Layers Panel. This is normal. Anything you create with the Bline Tool will be inserted above the currently selected layer. Keep in mind that if you want to insert a shape somewhere, you should select where you want to insert it before you go into the Bline Tool—changing the selection afterward will automatically swap you back to the normal tool.

|
Let's create some BLines:
- First, go ahead and click on the "R" button in the lower left corner of the FG/BG color widget in the toolbox. This will reset us back to the default black and white.
- Set the default line width to something nice and thick. If you still have it at 10pt from the previous Circle tutorial, the you can leave it there for now.
- Take a look at the Tool Options Panel. Make sure that Region BLine, Outline BLine, and Link Origins, are checked.
- Start left clicking with your mouse around the canvas to place vertex ducks. Do this over and over, and you will have created your first Bline.
- Now let's loop, or close, the BLine. Right click on the first vertex duck and select Loop BLine.
- If you do not like the position of any vertex duck, you can move it anywhere you want. So let's do this. Left click, hold, and drag any vertex you want to move. You've noticed that two tangent ducks, or handles, grew out of the vertex first. Moving these tangents allow you adjust the curvature of the paths leading up to this vertex.
- Now left click, hold, and drag this vertex again. Place this duck anywhere you want.
- And if you want to remove any vertex, right click on it and select Delete Vertex.
- So I assume you got your first BLine laid out like you want it. That's great. But you may have noticed that the layers have not been created yet. That's because we are still in construction mode. This is a unique concept for BLines, as the object has not been finalized and its layers have not been created yet.
To create the layers is easy, just either switch to another tool, or press the Create button at the bottom of the Tool Options Panel (it's the icon that looks like a gear). For now, just go ahead and click on the normal tool because we are done with the Bline Tool.
Modifying BLine Vertices
Ok, we now have a nice pretty white region with a thick black outline. Since we checked off those options in part 3 in the above tutorial, you'll notice that there are two layers that we have created--the Outline and the Region in the Layers Panel. Despite the fact that they are two separate layers, their vertices parameter has already been linked--so you can select either one and move its ducks around and the other one will also change.
So if you want to manipulate the vertices after you have created the layers, it is very easy to do so. Just click on one of the layers and have at it. If you want to remove a vertex, right click on it and hit Remove Item (smart). Want to insert a point somewhere? Right click on the segment where you want to insert something and his Insert item (smart).
|
Note The only major difference between this normal editing mode and the construction mode is in how you split the tangents — in construction mode you right click on the tangent itself. In normal duck editing mode, you must right click on the vertex that the tangents are attached to. This could be considered a usability bug, and it will be resolved at some point.
|
This may appear to be leading to a mess of layers. And yes, if you aren't using the software properly, that is exactly what you will get. But there is a way to make this more sane. As mentioned in the previous tutorial, Adding Layers, you can Encapsulate, or group layers of a common object.
One quick thing to mention before I finish up. You can change the width of an outline at each vertex. You do this by selecting the outline layer (NOTE: you must select the Outline Layer, the Region Layer has no width data) and tweaking with the width ducks. By default, these are masked. To show them, press Alt5. Repeat to hide them again. You can also see other things to mask via the Canvas Menu Caret: "View → Show/Hide Ducks".


