Doc:Walk Cycle

Somes of the screenshots needs to be updated with 0.64.0
Contents
The List File
One of the less obvious features of Synfig is buried in the Import Image layer. In addition to being able to import some basic still image file types, it will also accept a 'lst' file. This list file is simply a text file consisting of a framerate followed by a list of images to display. (If no framerate is supplied a default rate of 15 Frames per Second (FPS) is used.)
An example, provided by Voria Studios, takes 4 still images of a character in various stages of a walk cycle. These images are shown at 4 FPS to give a sequence that when repeated, show a man walking.
Here are the images
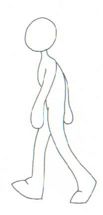
Frame 1
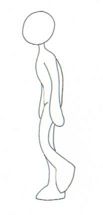
Frame 2
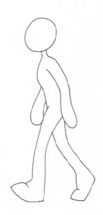
Frame 3
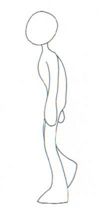
Frame 4


And here is the beginning of the 'lst' file.
FPS 4

frame_01.jpg

frame_02.jpg

frame_03.jpg

frame_04.jpg

frame_01.jpg

frame_02.jpg

frame_03.jpg

frame_04.jpg

frame_01.jpg

frame_02.jpg

frame_03.jpg

frame_04.jpg

...
Constructing a Walk cycle
Let's take a look at how we can use these images to create a complete walk cycle for a character in Synfig.
Start with a new canvas and add a timeline of several seconds with the default framerate of 24 FPS. On the canvas, select the Caret > Layer, New layer, Other, Import Image.
This creates a new Import Image layer, but nothing will show up until the filename is selected. Go to the Parameters Panel and scroll down to Filename. There you can navigate to the '.lst' file and select open. Now you should see the first image in the list. Moving forward along the timeline will show successive images from the list every 6 frames. You can preview or render these as is and get a low frame rate animation.
But the result doesn't look very smooth, and the images are not very flexible. (The images can be translated, rotated and stretched, but no elements within the images can be changed.) To make a fully editable character we need to trace over it with Synfig elements such as Splines.
I work with a drawing tablet, so the easiest solution for me is to use the Draw Tool. Move back to frame 0, select the draw tool and trace over the character. I find it easiest to break the character down into several regions (Head, Left Arm, Right Arm, Torso, Left Leg, Right Leg). As a helpful tip, if the shape didn't come out quite right, go to the layer menu and uncheck the region checkbox - this will allow you to see the image below as you drag the handles around to correct your line.

Once you've finished Frame 0, move along the timeframe to Frame 6. Instead of tracing, this time we're going to take the existing elements and reposition them to match the image. Again, turning off the region layers will allow you to see the image below as you edit them. Use the rotate and translate tools to reposition the body parts, adjusting the line handles for fine tuning. [Don't forget to switch to "Animate Editing Mode" as explained in Animation Basics.]
Repeat for Frames 12 & 18, then you can turn off the Import Image layer (uncheck the checkbox in the layer menu). Now, even though we've only drawn 4 keyframes, by the power of Synfig, we can render a smooth 24 frames of man walking. Add a 1 second timeloop layer on top, and the man will pace on the spot for the length of your animation.

Adding Translation layer will enable your character to walk from one side of the canvas to the other (or moonwalk backwards if you're so inclined.)
Here is a zipfile with the list file, 4 still images, and the finished Synfig file. Unzip them in the same directory and open the newwalk.sif file with synfig.
Character walking, moving (full explanation).
Before you succeed in walking a character, you must know the basics «to know»:
Basic Bone Tutorial (For your limbs to be able to rotate 360° without any bugs).
Basic Bone Morphing (To create a "walking skeleton").
- 1: Draw the character in your drawing program.
- 2: Add outline

- 3: We move the limbs, in the best position so that the "arm" can be decompose into:
Arm: arm, forearm, hand.
Leg: thigh, calf, shoe.
- 4: Once the limbs are in a natural location, (the angles are avoided at 90°, because it is more difficult to place crosshair on twisted limbs).
When they are almost straight it is a simpler operation.
It is necessary to decompose the limb to be able to pose our "crosshair".

- 5: We replace, a hand with closed fist, a wider t-shirt so that the legs can run, the shoes, by something simpler.
Because it will be simpler in animation to have basic members.
- 7: Once all the limbs are decompose, and the crosshair are placed.

- 8: Here are simple fast crosses that have been laid, to be able to turn the limbs, in a fast way.
(They did not follow process "crosshair").
- 9: If your drawing program, allows you to make rotations from a fixed point, make a maximum of test, by turning your character in all directions to ensure that there is no "bug". (test in motion).
Then you would import your final drawing into "synfig studio".
- 10: To make a more real walk, we can bend the shoe, the orange outline is a guide to easily put on the right shoe.
The crosses represent the vertices:
- Green crosses do not move.
- The orange cross was lowered vertically until it reached the ground.
- The blue cross was moved to the right and the handles moved.

- 11: For simplicity when creating crosshair.
-The left arm is identical to the right arm.
-The left leg is identical to the right leg.
Things that are unique: the left shoulder and the right shoulder (which are red) are different as well as the location of the crosses fast.
- 12: The top line, is a marker so that the character can lower or raise the head.
The purple rectangle is the marker that will be used to know the "walking size" it is precisely to place behind the rear shoe and behind the front shoe, the 2 red lines are lines to be more precise.
You can import your drawing into "synfig studio" and place the skeleton on your character.

- 13: Simple trick for animation, and work with more details, put an opacity (as in this image) you will work more easily.
- 14: Once your character with a "walking skeleton", place your character as on the "character 1" schema.
Then you would move your "purple rectangle" so that your walk is identical to "walking size".

- 15: Here is the schema used for the animation, it serves just as a landmark (it is available in 2 formats, SVG, SIFZ,) available in the ZIP.
To see the next character you have to uncheck the other numbers to see the "next" step.
I recall that this "schema" is just an "aid" to understand when to place the key images.
The variants that will make your walking will be different will be "walking size", and placing your legs.
So you will make a character with a walk, short, long, or running.
To know: the characters 5,6,7,8 are the same images as the 4th, the limbs have only been reversing the other way.

All keyframes, are represented by a number there are "8" in all.

They must all be placed with "24f" and in interpolation mode "linear"(it is at the end of the animation that you will change the time, to accelerate the walk.

The final result depends only on the schema (with the numbers on each head), you must modify it to have a result that will suit you. With a slow time of 24f you will immediately see the errors.
Here you see a walk with a time of 10,18,6,16f to find the time to use on the following keyframe a simple trick has been used, for 4 keyframes, you delete 1 image, and search for the time of the missing image.
Example: A B C D
You delete the keyframe: "B" you go to image A and you advance the time from 1f to 1f from A to C, there will be a time when your missing image will be the same as B. Then you report the result on your animation, and check that the result is smooth. Once it is fluid you can really accelerate the walk by dividing your numbers by 2 or accelerate by 70% the result.
Here is list of tricks used during the animation in synfig (with these helps it is easier to succeed):
- Onion (to see the previous keys in opacity).
- ⇧ Shift + left mouse click, and SLIDE the group with green handle (to slide on a line).
- Use a rectangle to have the "walking size"(+2 lines at the edge for precision).
- Drawing sketch (to have the legs and arms exactly the same, and report it further).
- If your work is vectorial, as in this chapter, preferably use the quality preview "1,00", taille 100%, avoid working directly with a canvas of a size UHD (too large),
with a quality of "1.00" and 100% in size you will see the final result, as will appear, in a "video".
- When the 8 steps of the "schema" are all finished use the "duplicate" to copy the already made drawings. (See image below).
To make a duplicate link:
- 1 I select the keyframe.
- 2 I select the layer to duplicate.
- 3 I click on the waypoint.
- 4 I duplicate.

Here are the videos that were used to realize this tutorial:
ALAN BECKER - Animating Walk Cycles
STREAM Morevna Episode 3 Making of Shot 24
Important
- The shoes have not been bent to make this tutorial easy to understand, the easiest technique for folding shoes is to use the vertices (image 10), but you can do differently as on the video link n°2.
- We advise you to read this video at least once to understand the process of creation for the walk.
- We remind you one last time that we must place the keys in "linear" interpolation mode.
Links
The zip file containing the parts of this tutorial can be found here: Walking-technique-archive.zip