Group Layer
About Group Layer
The "Group Layer" is a special layer that can hold other layers. It is generated via the Group command accessed via the context menu in the {l|Layers Panel}} or through the Layer Menu in the Canvas Menu Caret.
As well as grouping a set of layers, it can also apply transformations to the contained layers like translation, scaling, and even modify their time offset.
A "Group Layer" can also be created through the New Layer Menu, using "<New Layer> → <Other> → Group Layer".
Parameters of Group Layer
The parameters of the "Group Layer" are:
| Name | Value | Type |
| 0.000000 | real | |
| 1.000000 | real | |
| Composite | integer | |
| 0.000000u,0.000000u | vector | |
| Transformation | 0.000000, 0.000000, 0.00°, 60, 60 | transformation |
| <No Image Selected> | canvas | |
| 1.000000 | real | |
| 0.000000 | real | |
| Of | time | |
|
|
bool (Static) | |
| 0.000000u,0.000000u | vector | |
| 0.000000 | real | |
|
|
bool | |
| 0.000000 | real | |
| 1.000000 | real | |
| 0.000000 | real |
Transformation Parameter
The "Transformation" parameter is a composite parameter, it holds an Offset, a rotation Angle, a Skew Angle and a Scale value for the group. The "Transformation" parameter is already converted to composite when the Group Layer is created and so directly exposes the Offset, Rotation, Skew and Scale subparameters.
See also Group Transformation Widget
Canvas Parameter
This is "Group" by default if the "Group Layer" was created by grouping other layers, or "No Image Selected" if it was created from the New Layer Menu. This parameter lets you select another canvas.
The Canvas parameter presents a drop-down menu of the exported canvases, plus an extra entry called "Other...". Selecting "Other..." presents the user with a text entry box asking for the name of the canvas to use. The name typed should have the following format (where [ ] indicates an optional part, ( ) is for grouping, and * means "0 or more times"):
[[filename]#][:]id(:id)*
In its simplest form, this is just an id, ie. the exported name of one of the child canvases of the current canvas.
Other possibilities are:
- if a '#' is present, the part before the '#' is interpreted as the filename of an external .sif file to use.
- if the '#' is the first character of the string (ie. the filename is blank) then the '#' is ignored, and the current canvas is used instead
- if a ':' appears before the first id, it means to start at the root canvas of the current canvas
- each subsequent :id steps down into the specified child
Examples:
- /usr/share/doc/synfig/examples/business_card.sifz#:IndividualCard -- gives the absolute path to a .sifz file, and says to use the canvas that was exported from its root canvas as "IndividualCard"
- ../../examples/business_card.sifz#:IndividualCard -- the same, but with a relative path to the .sifz file
- #:sy:head:eyes:left -- look in the current composition, and starting from the root, navigate down through the canvas tree. Find a child canvas of the root canvas called 'sy', look in 'sy' for a child canvas called 'head', and so on.
- :sy:head:eyes:left -- exactly as above. an empty filename is the same as not using the '#' at all
- eyes:left -- without a ':' before the first id, this starts at the current canvas (presumably the Group in question is in the "head" subcanvas of the "sy" subcanvas of the root)
Outline Grow Parameter
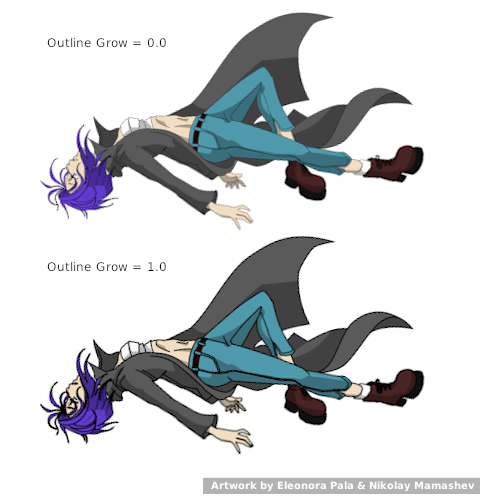
This parameter allows to control thickness of all outline layers inside. Assigning positive value to this parameter makes all child outlines rendered thicker, while negative value makes them look thinner. This feature is very helpful for tuning outlines in complex artwork and it also allows to achieve some nice effects like constant outline width at any zoom level.
Note: The "Outline Grow" parameter can not be applied to exported and imported (external) Groups layers.
Z Range parameters
Z Depth Range Enabled
When checked, only layers inside range are visible and the visible layers are signaled with bolded font in the Layers Panel
Z Depth Range Position
Starting Z Depth position where layers are visible
Z Depth Range Depth
Depth where layers are visible in Z Depth range
Z Depth Range Transition
Z Depth area where layers inside are partially visible.
Example of Z Range use : http://www.youtube.com/watch?v=UPpmOz0wUY4
Speed
Alters the velocity group's child animated layers (not the "Group Layer" itself)
Set it to zero, it would stop the animation. A value of one makes the animation run at normal speed and a value of two makes it run double speed. Minus one reverses the animation.
