Difference between revisions of "Polygon Tool"
From Synfig Studio :: Documentation
m (Proper categorization) |
m (→Options: template) |
||
| (14 intermediate revisions by 3 users not shown) | |||
| Line 1: | Line 1: | ||
<!-- Page info --> | <!-- Page info --> | ||
{{Title|Polygon Tool}} | {{Title|Polygon Tool}} | ||
| − | + | {{Category|Tools}} | |
| + | {{NewTerminology}} | ||
<!-- Page info end --> | <!-- Page info end --> | ||
| − | |||
| − | + | {{l|Image:Tool polygon icon.png|64px}}<span style="font-size:150%"> '''ALT-P'''</span> | |
| − | This tool draws regions with straight edges. | + | ==Introduction== |
| + | This tool draws regions with straight edges. It is deprecated in favor of the {{l|Spline Tool}} which can draw straight edged polygons and also curved shapes. | ||
Here are some example polygons (in case you forgot what they look like): | Here are some example polygons (in case you forgot what they look like): | ||
| − | + | {{l|Image:Polygons.png}} | |
| − | + | {{l|Image:Sif_icon.png|24px}}{{l|Media:Polygons.sifz|source file}} | |
| − | Note that the edges can cross each other. | + | Note that the edges can cross each other. When they do, the {{l|Winding Style Parameter}} comes into play. |
| + | ==Options== | ||
| + | <!-- Use of Template|PolygonToolOptions --> | ||
| + | {{PolygonToolOptions}} | ||
== Usage == | == Usage == | ||
| + | Just click over the different corners of the polygon. | ||
| + | |||
| + | To finish the creation of the spline you have different options : | ||
| + | * Click again over the first vertex, | ||
| + | * Using the gear {{literal|Make Polygon}} button at the bottom of the {{l|Tool Options Panel}}. | ||
| + | * Select any other tool from the {{l|Category:Toolbox}} | ||
| − | + | The {{literal|Clear Current Polygon}} button at the bottom of the {{literal|Tool Options Panel}} could be used to clear the current polygon. | |
Latest revision as of 01:22, 8 March 2016
Introduction
This tool draws regions with straight edges. It is deprecated in favor of the Spline Tool which can draw straight edged polygons and also curved shapes.
Here are some example polygons (in case you forgot what they look like):
Note that the edges can cross each other. When they do, the Winding Style Parameter comes into play.
Options
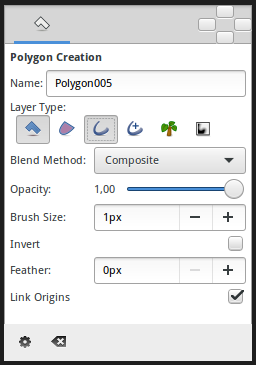
The Tool Options Panel allows you to specify:
- Name : Used for the new layer; any number in this field will automatically increment with each layer created
- Layer Type : Whether create Polygon Layer and/or Outline, Advanced Outline, Region, Plant and Curve Gradient layers (Splines)
- Blend Method : The blending method used to composite on the layers below
- Opacity : Sets the Amount for new layers. Defaults to 1.00 (Completely opaque)
- Brush Size : Sets the Outline width or the size of the gradient (only for Outline, Advanced Outline and Curve Gradient)
- Invert : Whether invert the create(d) layer(s). Is related to his Invert.
- Feather : Width of the area to be dissolved at the edge (not for Plant and Curve Gradient)
- Link Origins : Whether Link the Offset of Splines
Usage
Just click over the different corners of the polygon.
To finish the creation of the spline you have different options :
- Click again over the first vertex,
- Using the gear "Make Polygon" button at the bottom of the Tool Options Panel.
- Select any other tool from the Toolbox Panel
The "Clear Current Polygon" button at the bottom of the "Tool Options Panel" could be used to clear the current polygon.


