Difference between revisions of "Preferences Dialog"
m (moved Doc:Setup Dialog to Setup Dialog over redirect: Not Manual or Tutorial namespace. It belongs to Reference) |
m (D.j.a.y moved page Setup Dialog to Preferences Dialog: new name) |
||
| (18 intermediate revisions by 5 users not shown) | |||
| Line 1: | Line 1: | ||
<!-- Page info --> | <!-- Page info --> | ||
| − | {{Title| | + | {{Title|Preferences Dialog}} |
| − | {{ | + | {{Category|Dialogs}} |
| + | {{Category|Edit Menu}} | ||
| + | {{TOCright}} | ||
| + | {{NewTerminology}} | ||
<!-- Page info end --> | <!-- Page info end --> | ||
| − | == | + | == Purpose of the Preferences Dialog == |
| − | The | + | The {{l|Preferences Dialog}} allows the user set certain properties and preferences that are globally adopted by the application and used by all the Documents opened or to be opened. The Preferences Dialog is organized in Tabs allowing modify the properties or preferences by meaningful groups. |
== Gamma Tab == | == Gamma Tab == | ||
| − | + | [[File:Setup-Gamma_Dialog_current.png|frame|center]] | |
| + | |||
| + | === Color representation === | ||
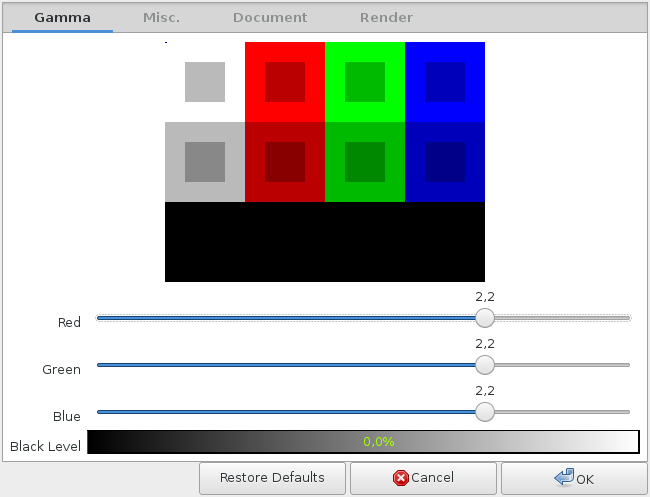
The gamma tab controls how the color representation in Synfig Studio is managed while editing a Document. There is a gamma pattern diagram on the top to let the user visually know how the gamma modifications would look in the color space. | The gamma tab controls how the color representation in Synfig Studio is managed while editing a Document. There is a gamma pattern diagram on the top to let the user visually know how the gamma modifications would look in the color space. | ||
| + | === Red, Green, Blue === | ||
In the middle there are three color sliders that control the gamma for each separate channel. Default values for those sliders are 2.2 for each color. Depending on the gamma adjustment you have in your monitor or output device, you may want to change those values to be more appropriate. | In the middle there are three color sliders that control the gamma for each separate channel. Default values for those sliders are 2.2 for each color. Depending on the gamma adjustment you have in your monitor or output device, you may want to change those values to be more appropriate. | ||
| + | |||
| + | === Black level === | ||
Below those sliders there is a Black level selector. It is used to calibrate your output device to show the black color as black. Most of the time you'll need this value set to 0.0. | Below those sliders there is a Black level selector. It is used to calibrate your output device to show the black color as black. Most of the time you'll need this value set to 0.0. | ||
| Line 19: | Line 27: | ||
==Miscellaneous tab== | ==Miscellaneous tab== | ||
| − | + | [[File:Setup-Misc_Dialog_current.png|frame|center]] | |
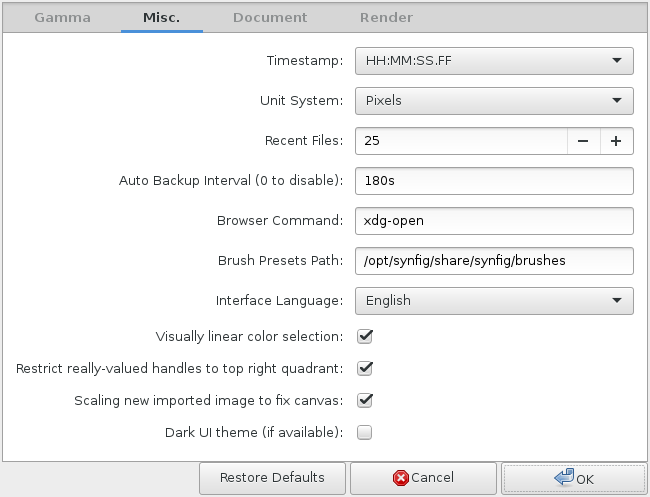
This tab groups some miscellaneous global preferences for the application. All of them would affect new files opened or created after they have been changed. | This tab groups some miscellaneous global preferences for the application. All of them would affect new files opened or created after they have been changed. | ||
| − | === Time | + | |
| + | === Time Stamp === | ||
This selection menu allows to set the time format used in the application. It would affect how all time parameters and information you see in Synfig Studio are shown. Although internally all the time values are stored as seconds, you can see the time in other formats: | This selection menu allows to set the time format used in the application. It would affect how all time parameters and information you see in Synfig Studio are shown. Although internally all the time values are stored as seconds, you can see the time in other formats: | ||
* HH:MM:SS.FF. This is a fixed format that shows always the time in hours:minutes:seconds.frames with two significant digits minimum. Examples: 123:45:58.13, 00:00:04.23 | * HH:MM:SS.FF. This is a fixed format that shows always the time in hours:minutes:seconds.frames with two significant digits minimum. Examples: 123:45:58.13, 00:00:04.23 | ||
| − | *(HHh MMm SSs) FFf | + | *(HHh MMm SSs) FFf . This is a flexible format that would use the needed space to show the time using the correct derived unit. Examples: 123h 45m 58s 13f, 4s 23f. Notice that the second time only use the needed derived units (seconds) not using minutes or hours like in the previous type. |
*(HHhMMmSSs)FFf. This one works exactly like the previous one but in a more compact format (no spaces). Examples: 123h45m58s13f, 4s23f. | *(HHhMMmSSs)FFf. This one works exactly like the previous one but in a more compact format (no spaces). Examples: 123h45m58s13f, 4s23f. | ||
* HHh MMm SSs FFf. This is like the default one but in a fixed format like the first one. Examples: 123h 45m 58s 13f, 00h 00m 04s 23f. | * HHh MMm SSs FFf. This is like the default one but in a fixed format like the first one. Examples: 123h 45m 58s 13f, 00h 00m 04s 23f. | ||
* HHhMMmSSsFFf. I think you can imagine how does this one works. Examples: 123h45m58s13f, 00h00m04s23f. | * HHhMMmSSsFFf. I think you can imagine how does this one works. Examples: 123h45m58s13f, 00h00m04s23f. | ||
| − | * FFf. This one shows all the times in frames. (There is a bug here because it doesn't work properly) Examples: 10693405f, 119f, assuming that the frames per second are set to 24. | + | * FFf. ('''default''') This one shows all the times in frames. (There is a bug here because it doesn't work properly) Examples: 10693405f, 119f, assuming that the frames per second are set to 24. |
=== Unit System === | === Unit System === | ||
| Line 40: | Line 49: | ||
* points (pt) | * points (pt) | ||
* units (u) | * units (u) | ||
| − | * pixels (px) | + | * pixels (px) '''(default)''' |
* inches (in) | * inches (in) | ||
| − | * | + | * meters (m) |
* centimeters (cm) | * centimeters (cm) | ||
* millimeters (mm) | * millimeters (mm) | ||
| Line 59: | Line 68: | ||
This entry box allows the user select the name of your preferred browser. Set there the name of the binary to execute when Synfig Studio need to invoke the external browser (for example when clicking on the help menu items). The default value for Unix like system is "xdg-open" and "open" for Windows and MacOs. | This entry box allows the user select the name of your preferred browser. Set there the name of the binary to execute when Synfig Studio need to invoke the external browser (for example when clicking on the help menu items). The default value for Unix like system is "xdg-open" and "open" for Windows and MacOs. | ||
| + | |||
| + | === Brush Presets Path === | ||
| + | |||
| + | Allow to configure where to look at brushes for the {{l|Brush Tool}} | ||
===Visually Linear Color Selection === | ===Visually Linear Color Selection === | ||
| Line 68: | Line 81: | ||
If you turn this option off, everything will go back to its non-linear, yet strangely comfortable and familiar mode. | If you turn this option off, everything will go back to its non-linear, yet strangely comfortable and familiar mode. | ||
| − | === Restrict Real Value | + | === Restrict Real Value Handles to the Top Right Quadrant === |
| − | This is a feature that makes the manipulation of the real value | + | This is a feature that makes the manipulation of the real value handles easier in certain situations. Real value handles are the ones that can manage any kind of real number (if it is implemented in the layer interface). For example {{l|Circle_Layer#Radius|Circle Radius}} is controlled by a Real Value Handle. Also the Outlines Width are controlled by this kind of handles. If you have to set the real value exactly to 0.0 it becomes especially difficult to do with the normal behavior of the real value handles. If you set this parameter on, the position of the handle is restricted to be in the top right quadrant of the 2D space. In this way you can set the real value to any number and also easily reach the value of 0.0 just dragging the handle to the left bottom part of your 2D space. |
| + | |||
| + | === Scale New Imported Images to Fit Canvas === | ||
| + | |||
| + | When you import images, check this option if you want they fit the {{l|Canvas}} size. | ||
| + | |||
| + | <!-- | ||
| + | === Enable experimental features (restart required) === | ||
| + | |||
| + | When checked, this option, at the next synfig studio start, activate experimental feature(s) of the current version. | ||
| + | --> | ||
| + | === Use Only a Single Thread (Windows only) === | ||
| + | |||
| + | When checked, this option obligates to the renderer to use only a single thread to do the render of the scene on the screen. Keeping this enables performs the stability of Synfig Studio in the Windows platform. Uncheck this option would cause the program to hang or crash more frequently. | ||
| + | |||
| + | === Use dark UI theme === | ||
| + | |||
| + | Synfig is shipped with two user interface theme : a light and a dark one. By default, the light one is used, if you want to switch to the dark one, just check {{literal|Use dark UI theme}} | ||
== Document Tab == | == Document Tab == | ||
| − | + | [[File:Setup-Document 0.63.06.png|frame|center]] | |
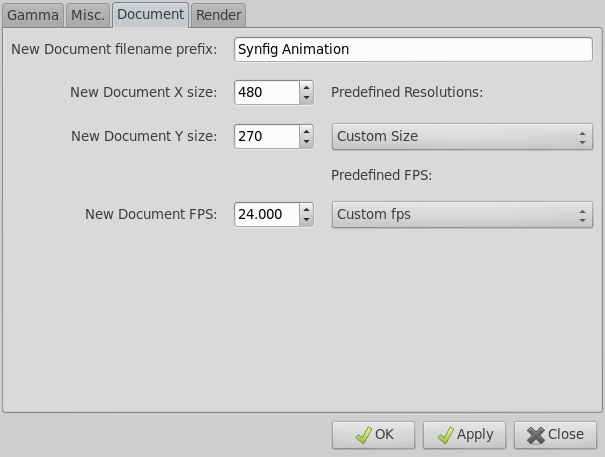
This tab groups some Document global preferences for the application. All of them would affect new files opened or created after they have been changed. | This tab groups some Document global preferences for the application. All of them would affect new files opened or created after they have been changed. | ||
| Line 84: | Line 114: | ||
=== New Document X and Y sizes === | === New Document X and Y sizes === | ||
| − | In those spin buttons entries you can set the preferred X and Y dimensions of | + | In those spin buttons entries you can set the preferred X and Y dimensions in pixels of newly created documents. This is useful if you're working with a certain resolution and want to keep all the file exactly the same without the tedious task of editing the particular dimensions of each newly created file. Image Area (in units) are calculated accordingly to the correspondence between pixels and units (60 pixels = 1 unit). Default values are X=480 and Y=270 pixels. |
| + | |||
| + | There is also a drop down list of predefined resolutions according to the standards of the digital industry. Default resolution is "480x270 Web 480x HD". | ||
| + | |||
| + | === New Document FPS === | ||
| + | |||
| + | In this spin buttons entry you can set the preferred frames per second of newly created documents. | ||
| + | |||
| + | There is also a drop down list of predefined resolutions according to the standards of the digital industry. | ||
| + | |||
| + | == Render Tab == | ||
| + | |||
| + | [[File:Setup-Render 0.63.06.png|frame|center]] | ||
| + | |||
| + | === Image Sequence Separator String === | ||
| + | |||
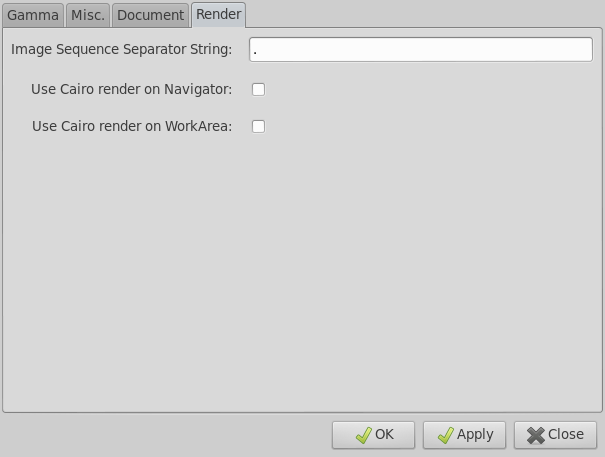
| + | When the render is configured to sequence image output, this string will be used to separate the image name part of the filename from the index part. | ||
| + | |||
| + | === Use Cairo render on Navigator === | ||
| + | |||
| + | When checked, the Cairo renderer is used in the {{l|Navigator Panel}}. | ||
| + | |||
| + | === Use Cairo render on WorkArea === | ||
| − | + | When checked, the Cairo renderer is used in the {{l|WorkArea}} and so in the {{l|Canvas}}. | |
Latest revision as of 00:21, 18 December 2015
Contents
- 1 Purpose of the Preferences Dialog
- 2 Gamma Tab
- 3 Miscellaneous tab
- 3.1 Time Stamp
- 3.2 Unit System
- 3.3 Recent Files
- 3.4 Automatic Backup Interval
- 3.5 Browser command
- 3.6 Brush Presets Path
- 3.7 Visually Linear Color Selection
- 3.8 Restrict Real Value Handles to the Top Right Quadrant
- 3.9 Scale New Imported Images to Fit Canvas
- 3.10 Use Only a Single Thread (Windows only)
- 3.11 Use dark UI theme
- 4 Document Tab
- 5 Render Tab
Purpose of the Preferences Dialog
The Preferences Dialog allows the user set certain properties and preferences that are globally adopted by the application and used by all the Documents opened or to be opened. The Preferences Dialog is organized in Tabs allowing modify the properties or preferences by meaningful groups.
Gamma Tab
Color representation
The gamma tab controls how the color representation in Synfig Studio is managed while editing a Document. There is a gamma pattern diagram on the top to let the user visually know how the gamma modifications would look in the color space.
Red, Green, Blue
In the middle there are three color sliders that control the gamma for each separate channel. Default values for those sliders are 2.2 for each color. Depending on the gamma adjustment you have in your monitor or output device, you may want to change those values to be more appropriate.
Black level
Below those sliders there is a Black level selector. It is used to calibrate your output device to show the black color as black. Most of the time you'll need this value set to 0.0.
Miscellaneous tab
This tab groups some miscellaneous global preferences for the application. All of them would affect new files opened or created after they have been changed.
Time Stamp
This selection menu allows to set the time format used in the application. It would affect how all time parameters and information you see in Synfig Studio are shown. Although internally all the time values are stored as seconds, you can see the time in other formats:
- HH:MM:SS.FF. This is a fixed format that shows always the time in hours:minutes:seconds.frames with two significant digits minimum. Examples: 123:45:58.13, 00:00:04.23
- (HHh MMm SSs) FFf . This is a flexible format that would use the needed space to show the time using the correct derived unit. Examples: 123h 45m 58s 13f, 4s 23f. Notice that the second time only use the needed derived units (seconds) not using minutes or hours like in the previous type.
- (HHhMMmSSs)FFf. This one works exactly like the previous one but in a more compact format (no spaces). Examples: 123h45m58s13f, 4s23f.
- HHh MMm SSs FFf. This is like the default one but in a fixed format like the first one. Examples: 123h 45m 58s 13f, 00h 00m 04s 23f.
- HHhMMmSSsFFf. I think you can imagine how does this one works. Examples: 123h45m58s13f, 00h00m04s23f.
- FFf. (default) This one shows all the times in frames. (There is a bug here because it doesn't work properly) Examples: 10693405f, 119f, assuming that the frames per second are set to 24.
Unit System
This drop down list allows change the global preference to the unit system that the user would want to use in any opened or created documents. Although all the vector dimensions are stored internally in synfig as units there are unit conversions to other systems to make editing more friendly or appropriate to the values that the user has from the model. Available Unit Systems are:
- points (pt)
- units (u)
- pixels (px) (default)
- inches (in)
- meters (m)
- centimeters (cm)
- millimeters (mm)
See the Unit System in action to know the equivalence between those units.
Recent Files
This spin button entry box allows the user to define how many recent files are shown when the Toolbox>File>Recent Files menu option is selected. Maximum value is set to 50 and minimum to 1. Default is 25.
Automatic Backup Interval
Synfig studio may crash (an infrequent thing lately), or you may have lost power or killed the program for any reason. Synfig Studio does a security copy of the current working document and would ask to recover it the next time you run the program. It can be set to a minimum of 1 second and does not have a maximum. Set it to 0s to disable the automatic backup. Default value is 3m.
Browser command
This entry box allows the user select the name of your preferred browser. Set there the name of the binary to execute when Synfig Studio need to invoke the external browser (for example when clicking on the help menu items). The default value for Unix like system is "xdg-open" and "open" for Windows and MacOs.
Brush Presets Path
Allow to configure where to look at brushes for the Brush Tool
Visually Linear Color Selection
This Wikipedia article talks about how color output is non-linear, that if 0 is black and 100 is white, then 50 is only about 22 percent of the brightness of white, rather than 50% as you might expect.
In Synfig Studio there is an option (on by default) to make sure that if you ask for 50, you get 50% of the brightness of white.
If you turn this option off, everything will go back to its non-linear, yet strangely comfortable and familiar mode.
Restrict Real Value Handles to the Top Right Quadrant
This is a feature that makes the manipulation of the real value handles easier in certain situations. Real value handles are the ones that can manage any kind of real number (if it is implemented in the layer interface). For example Circle Radius is controlled by a Real Value Handle. Also the Outlines Width are controlled by this kind of handles. If you have to set the real value exactly to 0.0 it becomes especially difficult to do with the normal behavior of the real value handles. If you set this parameter on, the position of the handle is restricted to be in the top right quadrant of the 2D space. In this way you can set the real value to any number and also easily reach the value of 0.0 just dragging the handle to the left bottom part of your 2D space.
Scale New Imported Images to Fit Canvas
When you import images, check this option if you want they fit the Canvas size.
Use Only a Single Thread (Windows only)
When checked, this option obligates to the renderer to use only a single thread to do the render of the scene on the screen. Keeping this enables performs the stability of Synfig Studio in the Windows platform. Uncheck this option would cause the program to hang or crash more frequently.
Use dark UI theme
Synfig is shipped with two user interface theme : a light and a dark one. By default, the light one is used, if you want to switch to the dark one, just check "Use dark UI theme"
Document Tab
This tab groups some Document global preferences for the application. All of them would affect new files opened or created after they have been changed.
New Document filename prefix
This option sets the prefix of the newly created Documents in Synfig Studio. A sequential number, starting with 1, will be added to it for each new file you create in a Synfig Studio session. This is particularly useful if you're working in a project with several files.
New Document X and Y sizes
In those spin buttons entries you can set the preferred X and Y dimensions in pixels of newly created documents. This is useful if you're working with a certain resolution and want to keep all the file exactly the same without the tedious task of editing the particular dimensions of each newly created file. Image Area (in units) are calculated accordingly to the correspondence between pixels and units (60 pixels = 1 unit). Default values are X=480 and Y=270 pixels.
There is also a drop down list of predefined resolutions according to the standards of the digital industry. Default resolution is "480x270 Web 480x HD".
New Document FPS
In this spin buttons entry you can set the preferred frames per second of newly created documents.
There is also a drop down list of predefined resolutions according to the standards of the digital industry.
Render Tab
Image Sequence Separator String
When the render is configured to sequence image output, this string will be used to separate the image name part of the filename from the index part.
When checked, the Cairo renderer is used in the Navigator Panel.
Use Cairo render on WorkArea
When checked, the Cairo renderer is used in the WorkArea and so in the Canvas.


