Difference between revisions of "Time Loop Layer"
m (link to youtube and .avi versions) |
(Local Time is now fixed, fix will be shipped in 1.3.14) |
||
| (42 intermediate revisions by 8 users not shown) | |||
| Line 1: | Line 1: | ||
| − | + | <!-- Page info --> | |
| + | {{Title|Time Loop Layer}} | ||
| + | {{Category|Layers}} | ||
| + | {{Category|Time}} | ||
| + | <!-- Page info end --> | ||
| − | + | {{l|Image:Layer_other_timeloop_icon.png|64px}} | |
| − | + | == About Time Loop Layers== | |
| − | + | The {{literal|Time Loop layer}} is used to repeat an animation over and over. It loops a section of the layers below and within the same canvas over and over. | |
| − | + | See also the {{l|Convert#Time_Loop|Time Loop ValueNode}} conversion, which can be used to loop the value of a single parameter, rather than an entire layer or group of layers. | |
| − | : | + | ==Parameters of Time Loop Layers== |
| + | |||
| + | These parameters, to '''prevent undesired modification''', by default are {{l|Static_Parameters|statics}}. | ||
| + | |||
| + | The parameters of the time loop layers are: | ||
| + | |||
| + | {|border="0" align="none" style="border-collapse" cellpadding="3" cellspacing="0" | ||
| + | |-style="background:silver" | ||
| + | |'''Name'''||'''Value'''||'''Type''' | ||
| + | |-style="background:#" | ||
| + | ||{{l|Image:Type_real_icon.png|16px}} {{l|Z Depth Parameter|Z Depth}} | ||
| + | ||0.000000 | ||
| + | ||real | ||
| + | |||
| + | |-style="background:#eeeeee" | ||
| + | ||{{l|Image:Type_time_icon.png|16px}} {{l|Time_Loop_Layer#Link_Time_.28time.29|Link Time}} | ||
| + | ||0f | ||
| + | ||time | ||
| + | |||
| + | |-style="background:#" | ||
| + | ||{{l|Image:Type_time_icon.png|16px}} {{l|Time_Loop_Layer#Local_Time_.28time.29|Local Time}} | ||
| + | ||0f | ||
| + | ||time | ||
| + | |||
| + | |-style="background:#eeeeee" | ||
| + | ||{{l|Image:Type_time_icon.png|16px}} {{l|Time_Loop_Layer#Duration_.28time.29|Duration}} | ||
| + | ||1s | ||
| + | ||time | ||
| + | |||
| + | |-style="background:#" | ||
| + | ||{{l|Image:Type_bool_icon.png|16px}} {{l|Time_Loop_Layer#Only_For_Positive_Duration_.28bool.29|Only For Positive Duration}} | ||
| + | || | ||
| + | {| style="width:16px; height:16px" border="1" | ||
| + | |- | ||
| + | |} | ||
| + | ||bool | ||
| + | |||
| + | |-style="background:#eeeeee" | ||
| + | ||{{l|Image:Type_bool_icon.png|16px}} {{l|Time_Loop_Layer#Symmetrical_.28bool.29|Symmetrical}} | ||
| + | || | ||
| + | {| style="width:16px; height:16px" border="1" | ||
| + | |- | ||
| + | |} | ||
| + | ||bool | ||
| + | |||
| + | |} | ||
| + | |||
| + | === Link Time (time) === | ||
| + | Start time of cycled material/child layers. | ||
| + | |||
| + | === Local Time (time) === | ||
| + | Start time of loop. | ||
| + | |||
| + | === Duration (time) === | ||
| + | Number of seconds or frames that are looped in the child layer. | ||
| + | |||
| + | === Only For Positive Duration (bool) === | ||
| + | * If checked and {{Literal|Duration}} is zero or negative, then the time loop layer is effectively disabled, and acts as if it wasn't there. | ||
| + | * If not checked and the Duration is zero, the Time Loop layer freezes the animation of the children layers at the value of {{Literal|Link Time}}. | ||
| + | |||
| + | === Symmetrical (bool) === | ||
| + | If not checked, and the current time is less than {{Literal|Local Time}}, then {{Literal|Duration}} is taken off the resulting time. This is to provide compatibility with {{l|Time Loop Layer (v0.1)|version 0.1}} of the time loop layer. | ||
| + | |||
| + | == How to use the Time Loop Layer ? == | ||
| + | |||
| + | The {{literal|Time Loop layer}} repeatedly loops through the {{Literal|Duration}} seconds of its child layers, from {{Literal|Link Time}} to {{Literal|Link Time}} + {{Literal|Duration}}. | ||
| + | |||
| + | {{Literal|Local Time}} is used to line up the offset of the time looping. | ||
| + | |||
| + | When the Time Loop layer is asked to set its time to {{Literal|Local Time}}, it sets the time in its child layers to be {{Literal|Link Time}}, ie. the start of the loop. | ||
| + | |||
| + | === Breaking loop === | ||
| + | |||
| + | # Be Sure you are not in {{l|Animate Editing Mode|Animation Mode}} | ||
| + | # In the layer's parameters of the time loop, you need to remove the 'green guy' ({{l|Image:Animate mode off icon.png|16px}}), indicating that the parameter is {{literal|Static}}, from {{l|Time_Loop_Layer#Duration_.28time.29|Duration Parameter}}. Just right-click on him and set {{literal|Allow animation}}. See {{l|Static Parameters}} for more informations. | ||
| + | # On the {{L|Timebar|timeline}} navigate to a place where you want to break the animation. And now enter the {{l|Animate Editing Mode|Animation Mode}}. | ||
| + | # In the time loop parameters, set 'Duration' to {{literal|EOT}} (End-of-Time). | ||
| + | # Now you have three {{l|Waypoint|waypoints}}. One before the current, we left it as it is. One is current, we {{l|Convert|convert}} it to the {{literal|constant}} (right-click on it -> Both -> Constant). And one after current, this one have to be removed (right-click on it -> Remove). | ||
| + | # Now test it. Pay attention, that loop will always break at the very first frame of you animation, so you need to break it in the right place. | ||
| + | |||
| + | ===Detailed explanation=== | ||
| + | 'Green guy' ({{l|Image:Animate mode off icon.png|16px}}) - {{l|Static Parameters}} - is a guard that says "You shall not pass!" to the animation. So when you attempt to change such parameter in animation mode it just changes the usual way. It's done to prevent unnecessary parameters to be animated, e.g. {{l|Blend Method Parameter|Blend Method}}. | ||
| + | |||
| + | Setting {{Literal|Duration}} to {{literal|EOT}}. If you set it to 0f, then the whole animation will stop, because you try to play it from 0f ({{Literal|local time}}) to 0f ({{Literal|Duration}}). And EOT means it'll continue to play your animation to the end of the time... | ||
| + | |||
| + | Removing {{l|Waypoint|waypoint}} after current one. If you skip this step, then at the next waypoint {{Literal|Duration}} parameter will be restored to the value before current waypoint. It's a standard Synfig's behavior, but there's a magical button somewhere that can change it. | ||
| + | |||
| + | Converting current waypoint to the constant. Without it, {{Literal|Duration}} will be smoothly interpolated from value you set to the EOT and the constant type will just set immediately at the waypoint. Interpolation can be a bit confusing sometimes, so you better read this about {{l|Waypoint|waypoints}}. | ||
| + | |||
| + | |||
| + | <!-- | ||
| + | To break a loop and continue animating you basically need to do two things; break the loop with a {{L|Waypoint|waypoint}} and copy the animation {{L|Keyframe|keyframe}} to your position in the {{L|Timebar|timeline}}. | ||
| + | * Find out which frame in the child layers that corresponds to the frame in the time loop layer where you want to break the loop. | ||
| + | Goto this frame in the child layer and add a {{L|Keyframe|keyframe}} here. Then goto the frame where you want to break the loop and duplicate the keyframe. | ||
| + | * Set the first time loop {{Literal|Duration}} waypoint to {{Literal|Constant}} and check {{Literal|Only For Positive Duration}}. Then at the breaking frame set {{Literal|Duration}} to 0. | ||
| + | * Continue animating the child layer(s) which are not looped anymore. | ||
| + | --> | ||
| + | |||
| + | == Visualized Example == | ||
| + | |||
| + | For example, suppose: | ||
| + | * Link Time is 5s | ||
| + | * Duration is 3s | ||
| + | * Local Time' is 4s | ||
| + | |||
| + | And suppose that the Time Loop layer is applied over an existing animation. The {{Literal|Link Time}} and {{Literal|Duration}} specify that the section from 5s to 8s in the children layers will be looped. The {{Literal|Local Time}} specifies that this loop will be at the beginning at 4s. (And so also therefore at 1s, 7s, 10s, etc). | ||
| + | |||
| + | This is how the mapping actually works: | ||
{| border="1" cellspacing="0" | {| border="1" cellspacing="0" | ||
| − | |'''real time'''||'''child time''' | + | |'''real time'''||'''child time<br/>(symmetrical = true)'''||'''child time<br/>(symmetrical = false)''' |
|- | |- | ||
| − | | 0 || | + | | 0 || 7 || 4 |
|- | |- | ||
| − | | 1 || | + | | 1 || 5 || 2 |
|- | |- | ||
| − | | 2 || | + | | 2 || 6 || 3 |
|- | |- | ||
| − | | 3 || | + | | 3 || 7 || 4 |
|- | |- | ||
| − | | 4 || | + | | 4 || 5 || 5 (local time = 4; link time = 5) |
|- | |- | ||
| − | | 5 || | + | | 5 || 6 || 6 |
|- | |- | ||
| − | | 6 || | + | | 6 || 7 || 7 |
|- | |- | ||
| − | | 7 || | + | | 7 || 5 || 5 (duration = 3, so loop repeats after 3 seconds) |
|- | |- | ||
| − | | 8 || | + | | 8 || 6 || 6 |
|- | |- | ||
| − | | 9 || | + | | 9 || 7 || 7 |
|- | |- | ||
| − | | 10 || | + | | 10 || 5 || 5 |
| − | | | + | |
| − | | | + | |
| − | + | ||
| − | + | ||
| − | + | ||
| − | + | ||
| − | + | ||
| − | + | ||
| − | + | ||
| − | + | ||
| − | + | ||
| − | + | ||
|} | |} | ||
| − | Specifying a huge number for the | + | Specifying a huge number for the Duration parameter effectively turns the Time Loop layer into a Time Shift layer. The Link Time and Local Time parameters controls which time in the children lines up with which time in the Time Loop layer, giving the amount of the timeshift, with both positive and negative differences working as expected. |
== Contrived Example == | == Contrived Example == | ||
| − | Download and examine this example file: | + | Download and examine this example file: {{l|Media:Time-loop-demo-0.2.sifz|Time-loop-demo-0.2.sifz}} |
It's a 10 second animation, and shows 2 circles. The top one moves linearly from the left to the right. Its position is marked by static text digits 0 through 10. | It's a 10 second animation, and shows 2 circles. The top one moves linearly from the left to the right. Its position is marked by static text digits 0 through 10. | ||
| − | The other circle is an identical copy of the first one, with the same waypoints, but it's inside an | + | The other circle is an identical copy of the first one, with the same waypoints, but it's inside an Group layer. The parameters are: |
| + | * Link Time: 5s | ||
| + | * Duration: 1.5s | ||
| + | * Local Time: 2s | ||
| + | * Symmetrical: true | ||
| + | |||
| + | So as time=2s, the top circle is at position 2 (local time) and the bottom circle is at position 5 (link time): | ||
| + | |||
| + | {{l|Image:Time-loop-demo-0.2-2s-0f.png}} | ||
| + | |||
| + | The loop is 1.5s long, so the bottom circle is also at position 5 every 1.5 seconds before and after this point in time, for example at t=3.5s and at t=8s: | ||
| + | |||
| + | {{l|Image:Time-loop-demo-0.2-3s-12f.png}} | ||
| + | {{l|Image:Time-loop-demo-0.2-8s-0f.png}} | ||
| − | The | + | The following two images show the positions at t=0s and t=3s. The loop starts at t=2s, so it's also at the start at t=0.5s. So at t=0s it's half a second before finishing the previous loop. And at t=3s the same is true, but 2 loops later on: |
| − | + | {{l|Image:Time-loop-demo-0.2-0s-0f.png}} | |
| + | {{l|Image:Time-loop-demo-0.2-3s-0f.png}} | ||
| − | There's a rendered copy of this example on [http://www.youtube.com/watch?v= | + | There's a rendered copy of this example on [http://www.youtube.com/watch?v=WyYLd7319Gw YouTube], and it's also available for download: {{l|Media:Time-loop-demo-0.2.avi|Time-loop-demo-0.2.avi}}. |
Latest revision as of 16:00, 7 April 2020
Contents
About Time Loop Layers
The "Time Loop layer" is used to repeat an animation over and over. It loops a section of the layers below and within the same canvas over and over.
See also the Time Loop ValueNode conversion, which can be used to loop the value of a single parameter, rather than an entire layer or group of layers.
Parameters of Time Loop Layers
These parameters, to prevent undesired modification, by default are statics.
The parameters of the time loop layers are:
| Name | Value | Type |
| 0.000000 | real | |
| 0f | time | |
| 0f | time | |
| 1s | time | |
|
|
bool | |
|
|
bool |
Link Time (time)
Start time of cycled material/child layers.
Local Time (time)
Start time of loop.
Duration (time)
Number of seconds or frames that are looped in the child layer.
Only For Positive Duration (bool)
- If checked and "Duration" is zero or negative, then the time loop layer is effectively disabled, and acts as if it wasn't there.
- If not checked and the Duration is zero, the Time Loop layer freezes the animation of the children layers at the value of "Link Time".
Symmetrical (bool)
If not checked, and the current time is less than "Local Time", then "Duration" is taken off the resulting time. This is to provide compatibility with version 0.1 of the time loop layer.
How to use the Time Loop Layer ?
The "Time Loop layer" repeatedly loops through the "Duration" seconds of its child layers, from "Link Time" to "Link Time" + "Duration".
"Local Time" is used to line up the offset of the time looping.
When the Time Loop layer is asked to set its time to "Local Time", it sets the time in its child layers to be "Link Time", ie. the start of the loop.
Breaking loop
- Be Sure you are not in Animation Mode
- In the layer's parameters of the time loop, you need to remove the 'green guy' (
 ), indicating that the parameter is "Static", from Duration Parameter. Just right-click on him and set "Allow animation". See Static Parameters for more informations.
 - On the timeline navigate to a place where you want to break the animation. And now enter the Animation Mode.
- In the time loop parameters, set 'Duration' to "EOT" (End-of-Time).
- Now you have three waypoints. One before the current, we left it as it is. One is current, we convert it to the "constant" (right-click on it -> Both -> Constant). And one after current, this one have to be removed (right-click on it -> Remove).
- Now test it. Pay attention, that loop will always break at the very first frame of you animation, so you need to break it in the right place.
Detailed explanation
'Green guy' (![]() ) - Static Parameters - is a guard that says "You shall not pass!" to the animation. So when you attempt to change such parameter in animation mode it just changes the usual way. It's done to prevent unnecessary parameters to be animated, e.g. Blend Method.
) - Static Parameters - is a guard that says "You shall not pass!" to the animation. So when you attempt to change such parameter in animation mode it just changes the usual way. It's done to prevent unnecessary parameters to be animated, e.g. Blend Method.
Setting "Duration" to "EOT". If you set it to 0f, then the whole animation will stop, because you try to play it from 0f ("local time") to 0f ("Duration"). And EOT means it'll continue to play your animation to the end of the time...
Removing waypoint after current one. If you skip this step, then at the next waypoint "Duration" parameter will be restored to the value before current waypoint. It's a standard Synfig's behavior, but there's a magical button somewhere that can change it.
Converting current waypoint to the constant. Without it, "Duration" will be smoothly interpolated from value you set to the EOT and the constant type will just set immediately at the waypoint. Interpolation can be a bit confusing sometimes, so you better read this about waypoints.
Visualized Example
For example, suppose:
- Link Time is 5s
- Duration is 3s
- Local Time' is 4s
And suppose that the Time Loop layer is applied over an existing animation. The "Link Time" and "Duration" specify that the section from 5s to 8s in the children layers will be looped. The "Local Time" specifies that this loop will be at the beginning at 4s. (And so also therefore at 1s, 7s, 10s, etc).
This is how the mapping actually works:
| real time | child time (symmetrical = true) |
child time (symmetrical = false) |
| 0 | 7 | 4 |
| 1 | 5 | 2 |
| 2 | 6 | 3 |
| 3 | 7 | 4 |
| 4 | 5 | 5 (local time = 4; link time = 5) |
| 5 | 6 | 6 |
| 6 | 7 | 7 |
| 7 | 5 | 5 (duration = 3, so loop repeats after 3 seconds) |
| 8 | 6 | 6 |
| 9 | 7 | 7 |
| 10 | 5 | 5 |
Specifying a huge number for the Duration parameter effectively turns the Time Loop layer into a Time Shift layer. The Link Time and Local Time parameters controls which time in the children lines up with which time in the Time Loop layer, giving the amount of the timeshift, with both positive and negative differences working as expected.
Contrived Example
Download and examine this example file: Time-loop-demo-0.2.sifz
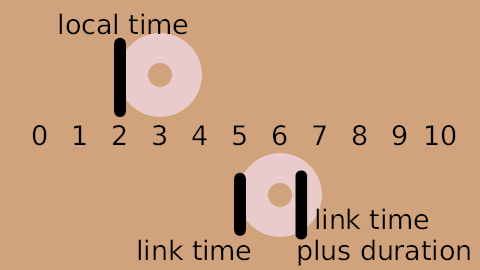
It's a 10 second animation, and shows 2 circles. The top one moves linearly from the left to the right. Its position is marked by static text digits 0 through 10.
The other circle is an identical copy of the first one, with the same waypoints, but it's inside an Group layer. The parameters are:
- Link Time: 5s
- Duration: 1.5s
- Local Time: 2s
- Symmetrical: true
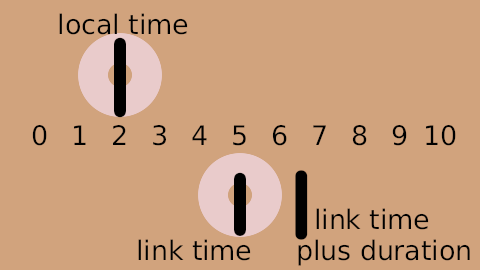
So as time=2s, the top circle is at position 2 (local time) and the bottom circle is at position 5 (link time):
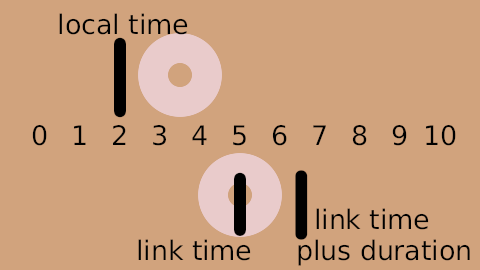
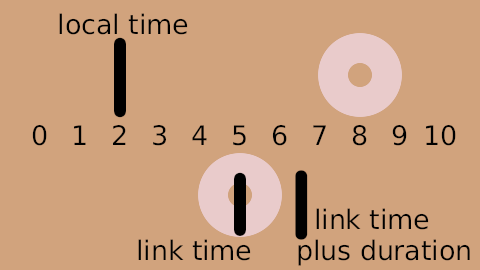
The loop is 1.5s long, so the bottom circle is also at position 5 every 1.5 seconds before and after this point in time, for example at t=3.5s and at t=8s:
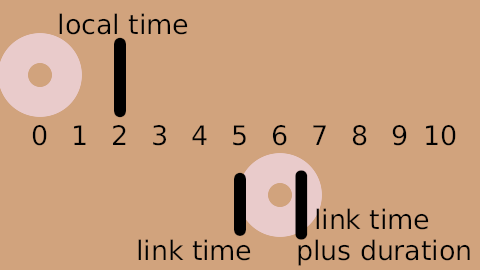
The following two images show the positions at t=0s and t=3s. The loop starts at t=2s, so it's also at the start at t=0.5s. So at t=0s it's half a second before finishing the previous loop. And at t=3s the same is true, but 2 loops later on:
There's a rendered copy of this example on YouTube, and it's also available for download: Time-loop-demo-0.2.avi.

