Slideshow Tutorial.fr
(Created page with '<!-- Page info --> {{Title|Slideshow Tutorial}} {{Category|Tutorials}} {{Category|Tutorials Intermediate}} <!-- Page info end --> Synfig propose plusieurs manières de créer un…') |
|||
| Line 1: | Line 1: | ||
<!-- Page info --> | <!-- Page info --> | ||
| − | {{Title|Slideshow Tutorial}} | + | {{Title|Slideshow Tutorial.fr}} |
{{Category|Tutorials}} | {{Category|Tutorials}} | ||
{{Category|Tutorials Intermediate}} | {{Category|Tutorials Intermediate}} | ||
Revision as of 22:13, 2 April 2010
Synfig propose plusieurs manières de créer un diaporama depuis une séries d'images. La plus imple est probablement d'utiliser List Importer pour importer une séries d'images. Cependant, cette méthode fonctionne pour des images matricielles et est incapable de générer des transitions. La technique expliquée ici est légérement plus complexe, mais elle permet de créer une présentation depuis une série de layer de Synfig, en fonction de la taille. Cette méthode produit uniquement des effets de disparition; un effet plus complexe nécessite un technique plus avancée.
Contents
Technical Description
Synfig animates with a series of layers, each of which exists throughout the entire timeline. Hence, our goal is to make only one of the layers visible at any given time. Though there are many ways to achieve this goal, this tutorial will assure that only one layer is seen by using the Blend and Amount parameters of each layer.
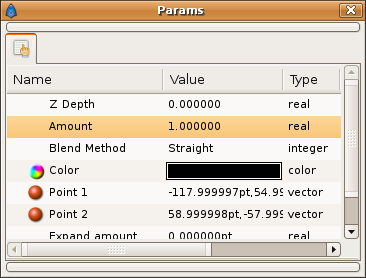
All graphical layers in Synfig have these two essential properties. The Blend Mode defines how the image should be layered on everything below it, and the Amount dictates to what extent the blending is done. In the default blend mode, Composite, objects are simply placed on top of everything below them. In this case, the Amount value determines the overall transparency of the layer: at a value of 1.0, the layer is fully visible; at 0.0, it is entirely transparent. In-between values constitute partial transparency, which will form the transitions. These properties can be used to display a series of pictures. Each is its own layer and at any given point in time, one layer's amount is set to 1.0 while all others equal 0. However, there is a more efficient way of accomplishing the task. This method requires switching all images to the Straight blend mode.
This blend mode has an advantage: all layers below the current one are hidden. Therefore it is no longer necessary for layers below the current one to have a an Amount of 0. Using the Amount for crossfade still works, but it now needs to be changed only once: all layers start with a value of 1, and then be made transparent from the highest to the lowest.
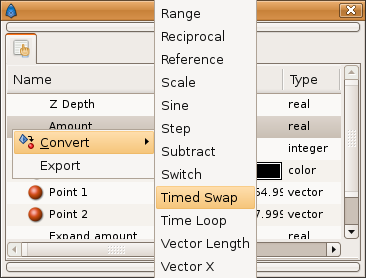
The effect could be animated with two waypoints per layer. However, Synfig offers an even simpler method that does not require using the animation mode. Instead, linking functionality can be used. The data type for Amount is currently set to be a real number. Instead, let's replace that with a special function by converting the layer to Timed Swap.
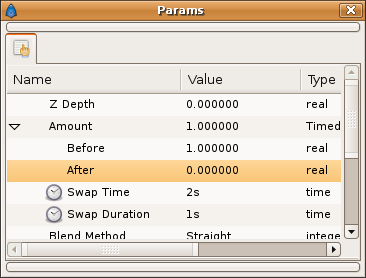
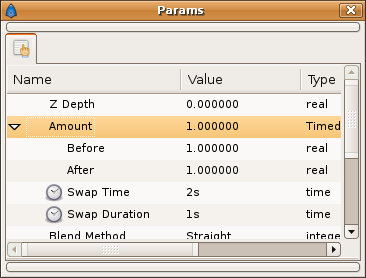
Now we examine the parameters of this new data type. The first is the initial value (1.0), the second is the final value (0.0), and the third is the time when the values will switch. If we want the image to display for two seconds, we can set the Swap Time to "2s". (Note: this assumes we are starting at 0s). Then the amount will be 1.0 for three seconds (image visible) and 0 for the remainder of the timeline (image hidden). The last value will be the duration of the crossfade transition. Note that the transition takes away from the time for which the image will be displayed. For example, a value of "1s" means that the image will be fully opaque for one second, fade in one second, and then remain faded for the remainder of the animation.
Applying successive times to layers from the top down will fade them one by one, creating the desired slideshow effect.
Step-by-Step Instructions
Here are step-by-step instructions for applying this principle to an animation.
Setting Up
Open a Synfig document and import any images, canvases, etc. Images can be imported using >File>Import (The first ">" signifies the Caret Menu). Note that importing links to the image using a relative path. Take care to maintain the relative positions of the files when moving them. If multiple layers represent a single image, encapsulate them into an Inline Canvas. Then arrange the images in the order they will be displayed, first image on top.
Blend Method
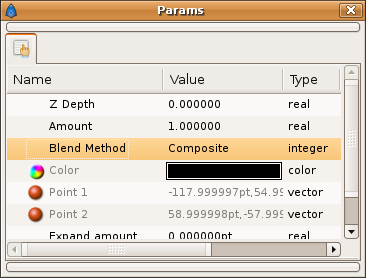
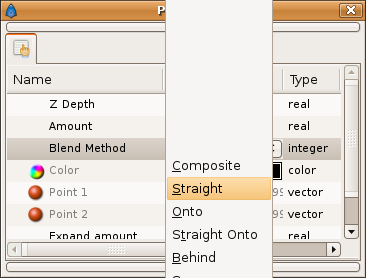
Select all layers in the layer panel. Then go to the parameters panel and set the Blend Method to Straight.
Timed Swap
Unlike Blend Mode, converting to Timed Swap must be done individually for each layer. Set "Before" to 1.0 and "After" to 0. Suppose you want the images to swap every 4 seconds, using 1 second transitions. Then set the "Duration" to "1s". Afterwards, set Time for the first layer to 4+1=5. Then increase the time for each successive layer (5,10,15,20,...). The Swap Time is the point where the image fully disappears. Configure these values to fit your needs.
Animation Length
Now that times have been configured, your file must be configured to render the full animation length. Go to >Edit>Properties and switch to the "Time" tab. Set the end time to equal the last of your time values. You can add a few seconds if you want a blank/black screen at the end, after the images have faded.
Extra: Background
You may have noticed that the Straight Blend Mode removes any backgrounds from the image. Here are two methods to add a background:
a) Encapsulate all image layers. Now the Straight blend mode only works within the inline canvas. Once this is done, add any backgrounds below the canvas, and any foreground above the canvas.
b) Add a background layer/canvas to the top of the layer list. Since it is above all other layers, the Straight layering mode doesn't affect it. However, it would normally shroud all the images. To make it appear below everything else, set the Blend Mode to Behind.
Endnotes
Congratulations! You have now finished reading the slideshow tutorial. Please leave me (nikitakit) a comment about your thoughts concerning this page.
GNU/Linux users may also be interested in AkhIL's imag2sif shell script. It imports images into Synfig and creates a rotate and translate layer for each.
The explanation of the "Straight" blend mode in this tutorial lacks a screenshot. Feel free to add one.

