Advanced Outline Layer
(create advanced layer page) |
(Initial draft. WIP) |
||
| Line 8: | Line 8: | ||
== About Advanced Outline Layers== | == About Advanced Outline Layers== | ||
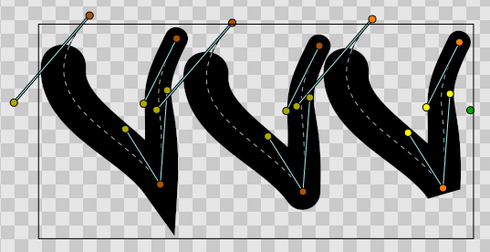
| − | + | The new Advanced Outline Layer comes from the need to specify the width of the outline at a different place than the {{l|blinepoint}}. Usually the user don't want to have a blinepoint where he wants to have the width and vice versa. This Advanced Outline makes the width become independent of the blinepoint position. | |
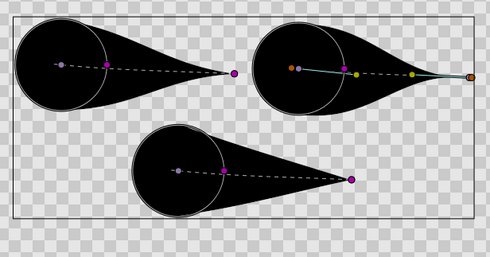
| + | Advanced Outline goes further than just define the width with independence from the blinepoints. It adds some new features to the regular outline. They are listed with examples below: | ||
| + | <gallery caption="New features" widths="490px" heights="300px" perrow="2"> | ||
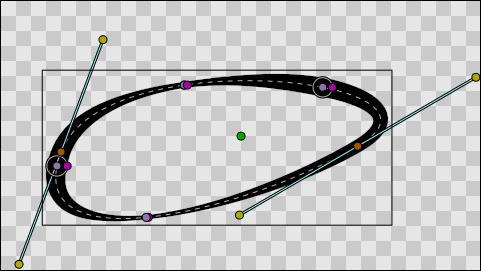
| + | File:Variable-width-without-blinepoints.png | Variable width without blinepoints | ||
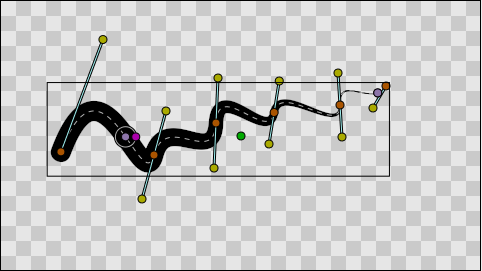
| + | File:Lots-of-blinepoints-width-just-two width-controls.png | Width controlled just by two points when the bline has many blinepoints | ||
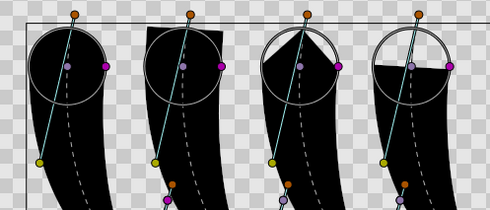
| + | File:Different-types of tips.png | Different types of tips | ||
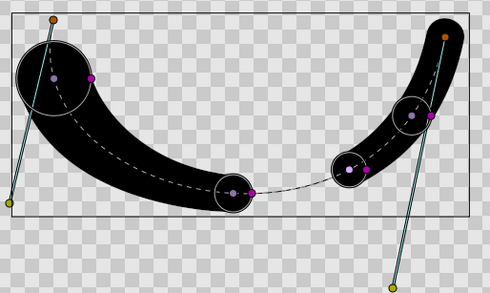
| + | File: Segments of outlines.png | Segments of outlines | ||
| + | File:Different cusps types.png | Three global cusps types | ||
| + | File:Smoothness control.png | Control of smoothness from linear (0.0) to smooth (1.0) | ||
| + | </gallery> | ||
==Parameters of Advanced Outline Layers== | ==Parameters of Advanced Outline Layers== | ||
| Line 117: | Line 126: | ||
|} | |} | ||
| + | |||
| + | |||
| + | |||
| + | |||
| + | |||
| + | |||
| + | |||
| + | |||
| + | |||
| + | |||
| + | |||
| + | |||
| + | |||
| + | |||
| + | |||
| + | |||
| + | |||
| + | |||
| + | |||
| + | |||
| + | |||
| + | |||
| + | |||
| + | |||
| + | |||
| + | |||
| + | |||
| + | |||
| + | |||
| + | |||
| + | |||
| + | |||
| + | |||
| + | |||
| + | |||
| + | |||
| + | |||
| + | |||
| + | |||
| + | ==Specific parameters for Advanced Outline Layer== | ||
| + | Notice that many of the parameters are the same than the regular Outline, so you can find the explanation of its usage just reading the wiki page of it. The new parameters are: | ||
| + | * Tip Type at start | ||
| + | * Tip Type at end | ||
| + | * Cusps type | ||
| + | * Smoothness | ||
| + | * Width Point List | ||
| + | |||
| + | === Width Point List === | ||
| + | Each advanced Outline has a list of parameters that represents the information for each control of width item. They are called Width Points and consists on four sub-parameters: | ||
| + | |||
| + | * Position (Real number): it represents the position of the width point along the bline. Although it is allowed to be any real number, its meaning is only from 0.0 to 1.0. 0.0 corresponds to the start of the bline (first blinepoint on the bline list) and 1.0 to the last blinepoint. In case of looped blines 0.0 and 1.0 are together. The position is represented by the light purple duck that always lies on the bline. | ||
| + | * Width (Real number): It is the width multiplicator of the width of the bline on the position given by the Position parameter. The final width is calculated multiplying the global Advanced Outline's Width by the Width of the widhtpoint and adding the Expand parameter. | ||
| + | * Tip Side Before/After: Those two sub-parameters controls how the width is interpolated before and after the current widthpoint. The sub-parameter can have four values: | ||
| + | ** Interpolate: Between the previous/posterior width point, the width is calculated by interpolation based on smoothness value. When smoothness is zero interpolation is lineal, when smoothness is 1.0 interpolation is given by a 5th degree smooth spline. | ||
| + | ** Rounded: There is a rounded tip that points to the width point before or after. If the previous/posterior width point is 'Interpolate' on its posterior/previous side it consider that the width of the width point in question is zero just before/after it. If the previous/posterior width point is other than 'Interpolate' then the segment between those two width points is empty. See examples to understand it fully. | ||
| + | ** Squared: Same as Rounded but using square tip. | ||
| + | ** Peak: Same as Rounded but using peak tip. | ||
| + | ** Flat: Same as Rounded but using flat tip. | ||
Revision as of 19:18, 16 June 2011
Contents
About Advanced Outline Layers
The new Advanced Outline Layer comes from the need to specify the width of the outline at a different place than the Blinepoint. Usually the user don't want to have a blinepoint where he wants to have the width and vice versa. This Advanced Outline makes the width become independent of the blinepoint position.
Advanced Outline goes further than just define the width with independence from the blinepoints. It adds some new features to the regular outline. They are listed with examples below:
- New features
Parameters of Advanced Outline Layers
The parameters of the Advanced Outline Layers are:
| Name | Value | Type |
| 0.000000 | real | |
| 1.000000 | real | |
| Composite | integer | |
|
|
color | |
| 0.000000u,0.000000u | vector | |
|
|
bool | |
|
|
bool | |
| 0.000000pt | real | |
| Fast Gaussian Blur | integer | |
| Non Zero | integer | |
| List | list (BLine) | |
| 2.000000pt | real | |
| 0.000000pt | real | |
| Rounded Stop | integer | |
| Rounded Stop | integer | |
| Sharp | integer | |
| 0.500000 | real | |
| List | list(WPList) |
Specific parameters for Advanced Outline Layer
Notice that many of the parameters are the same than the regular Outline, so you can find the explanation of its usage just reading the wiki page of it. The new parameters are:
- Tip Type at start
- Tip Type at end
- Cusps type
- Smoothness
- Width Point List
Width Point List
Each advanced Outline has a list of parameters that represents the information for each control of width item. They are called Width Points and consists on four sub-parameters:
- Position (Real number): it represents the position of the width point along the bline. Although it is allowed to be any real number, its meaning is only from 0.0 to 1.0. 0.0 corresponds to the start of the bline (first blinepoint on the bline list) and 1.0 to the last blinepoint. In case of looped blines 0.0 and 1.0 are together. The position is represented by the light purple duck that always lies on the bline.
- Width (Real number): It is the width multiplicator of the width of the bline on the position given by the Position parameter. The final width is calculated multiplying the global Advanced Outline's Width by the Width of the widhtpoint and adding the Expand parameter.
- Tip Side Before/After: Those two sub-parameters controls how the width is interpolated before and after the current widthpoint. The sub-parameter can have four values:
- Interpolate: Between the previous/posterior width point, the width is calculated by interpolation based on smoothness value. When smoothness is zero interpolation is lineal, when smoothness is 1.0 interpolation is given by a 5th degree smooth spline.
- Rounded: There is a rounded tip that points to the width point before or after. If the previous/posterior width point is 'Interpolate' on its posterior/previous side it consider that the width of the width point in question is zero just before/after it. If the previous/posterior width point is other than 'Interpolate' then the segment between those two width points is empty. See examples to understand it fully.
- Squared: Same as Rounded but using square tip.
- Peak: Same as Rounded but using peak tip.
- Flat: Same as Rounded but using flat tip.
