Multiplane_Camera
Somes of the screenshots needs to be updated with 0.64.0
Introduction
The term multiplane is from when real cameras were used to photograph animation.
http://en.wikipedia.org/wiki/Multiplane
It's a technique where you place different parts of the animation scene on glass plates at different height below the camera. When the camera (or the layers) are moved you get pans and tracks with depth and space. (3D)
The technique I'm demonstrating here uses layer Z Depth-values to position the layers in space. Higher values goes into space, lower out.
For the plates 0 puts them really close to the camera while 1 will put them away from the camera. Furthest limit is around 1.7 where the layers are too far away to move at all.
The camera starts at 0 and goes into the scene, closer to the plates at positive values and away from the scene at negative values. 1 gets really close while -3 is far away from the plates.
Synfig basic-setup and example files:
Multiplane_landscape_example_2.sifz
All circles are of the same size and all is centered in the canvas, not moving at all. The movement and depth is accomplished by moving the main or "camera" layer.
Basic layer setup
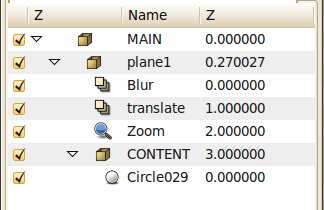
- First create a circle. Group this circle and name it CONTENT. You place all content of the plane in this group, this is what the circle represent.
- Group again the CONTENT-group and rename it to "PLANE_01". This is the first glass plate. We will later duplicate and alter this to add more plates.
- Group the plate and rename it to MAIN. This will be the simulated camera.
- Now, in the plate layer create three new layers, blur, translate and zoom.
Connecting it all.
- First export the "Z Depth" from Main. Name it Main_Z.
- Also export the "Origin" from Main as Main_Origin.
- Next we'll need an inverted version of this value to use in our calculations.
- For that create a temporary layer, say a circle.
- Choose a real value and convert it to a Scale value.
- Connect the Main_Z value to "Link" and set "Scalar" to -1.
- Select the value and export as Main_Z_Inverted. Delete the temporary circle layer.
- For that create a temporary layer, say a circle.
- We'll also want the Plane_01 "Z Depth" so export that as Plane_01_Z.
Now we'll want the planes to scale based on it's distance from the camera. We'll use "Z Depth" to decide where the layer is in space.
SCALE-LAYER
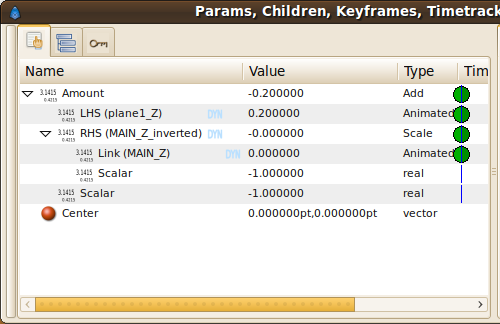
Select the Scale layer of the plane.
- Convert "Amount" to "Add"
- Connect "LHS" to Plane_01_Z
- Connect "RHS" to Main_Z_Inverted
- Set "Scalar" to -1.
Now the plane will zoom based on it's distance from the camera which is decided by the sum of plane and camera "Z Depth" value. We reverse the number by scalar so it scales in the right direction.
TRANSLATE-LAYER
We use a separate Translate layer rather than the Plane "Origin" so that we can still move the plane undependable from the camera move.
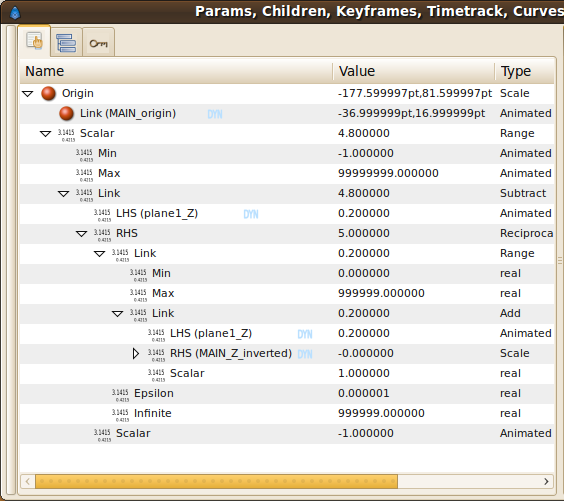
- Convert "Origin" to "Scale".
- Connect "Link" to Main_Origin. This is what we'll base the movement of the planes on.
- Convert "Scalar" to "Range" and set "Min" to -1 to to avoid the layer to start moving the wrong direction when tracking out from the scene. Set "Max" to 999999 since we really don't need an upper limit.
- Convert "Link" to "Subtract" and set "Scalar" in this new calculation to -1.
- In "Link" connect "LHS" to Plane_01_Z and convert "RHS" to "Reciprocal".
- Next convert the "RHS" "Link" to "Range" and set "Min" to 0 and "Max" to 999999 to avoid some strange movement when layers move too far off the canvas.
- Convert the "Link" to "Add" and connect "LHS" to Plane_01_Z and "RHS" to Main_Z_Inverted.
- In "Link" connect "LHS" to Plane_01_Z and convert "RHS" to "Reciprocal".
- Convert "Link" to "Subtract" and set "Scalar" in this new calculation to -1.
This whole calculation moves the layer more when it's closer to us and less when it's further away, thus creating illusion of depth.
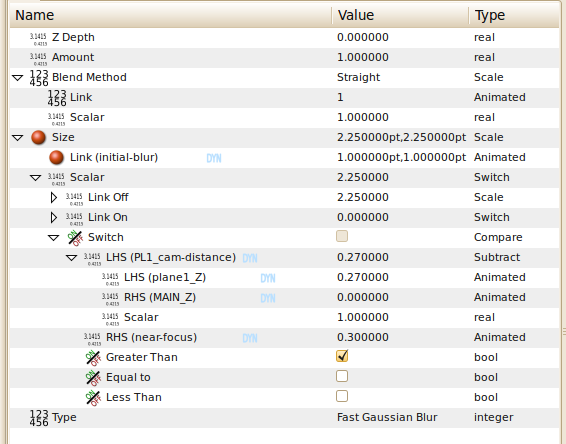
BLUR
- Select the Blur layer and select it's "Blend Method" to "Straight". (Due to a bug, convert blend method to scale and set link subparameter to 1)
- Create a temporary blur layer for exporting values.
- Export "Size" as Initial-Blur and set value to 1.00x1.00
- Export different real-values as Falloff, Near-Focus and Far-Focus (convert Amount to Add, you've got three 'new' real values)
- Convert a real value to subtract and set "LHS" to Plane_01_Z and "RHS" to Main_Z. Export this as Plane_01_CamDistance. This calculation and export needs to be done separately for every new layer that is added.
- Delete the temporary blur layer.
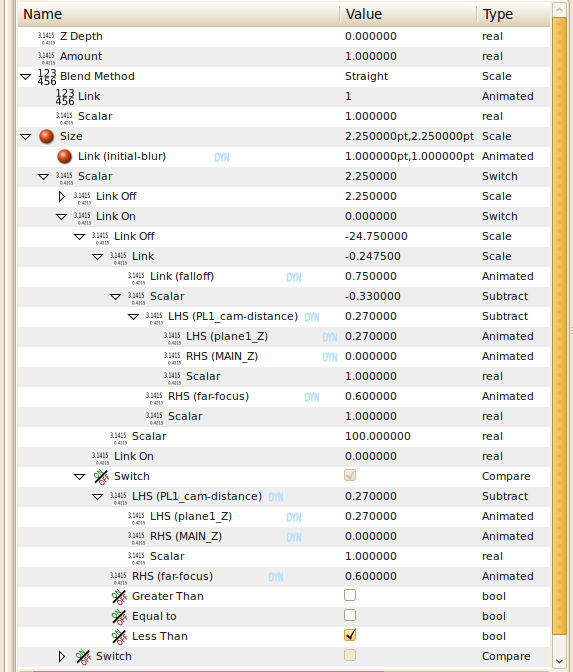
- In the Blur Layer, Convert "Size" to "Scale".
- Connect "Link" to Initial_Blur.
- Convert "Scalar" to "Switch".
- Convert "Switch" to "Compare"
- Connect "LHS" to Plane_01_CamDistance and "RHS" to Near_Focus, and check "Greater".
- Convert "Switch" to "Compare"
- Convert "Link Off" to "Scale",
- Set "Scalar" to 100
- Convert "Link" to "Scale"
- Connect "Link" to Falloff
- Convert "Scalar" to "Subtract"
- Connect "LHS" to Near-Focus, "RHS" to Plane_01_CamDistance
- Convert "Link Off" to "Scale",
- Convert "Link On" to "Switch",
- Convert "Switch" to "Compare"
- Connect "LHS" to Plane_01_CamDistance and "RHS" to Far_Focus, check "Less"
- Set "Link On" to 0.0
- Convert "Link Off" to "Scale",
- Set "Scalar" to 100
- Convert "Link" to "Scale"
- Connect "Link" to Falloff
- Convert "Scalar" to "Subtract"
- Connect "LHS" to Plane_01_CamDistance, "RHS" to Far_Focus
- Convert "Switch" to "Compare"
- Convert "Link On" to "Switch",
Adding more planes
- Duplicate PLANE_01 and rename it to PLANE_02.
- Select the layer Z Depth and disconnect it. Then export it as PLANE_02_Z.
- Open up the Zoom layer amount and connect LHS to PLANE_02_Z.
- Open Translate layer calculation and connect the two occurrences of LHS to PLANE_02_Z
- Create a temporary layer and convert real value to subtract.
- Connect LHS to PLANE_02_Z and RHS to MAIN_Z. Export this as PL2_cam-distance. Delete temporary layer.
- Open Blur layer and change the 4 PL1_cam-distance references to PL2_cam-distance.
Duplicate the plane as many times as you'd like and go through these steps again.
Usage:
• MAIN
- Move to simulate camera movement.
- Use Z-depth to track in/out with camera.
• PLANES
are moved, scaled and blurred in relation to the camera (MAIN layer) to simulate 3D plane space.
• Translate layer - This is used to move the layers in relation to the camera layer. Once setup you should not manually change anything here.
• Zoom layer - This is used to scale the layers to simulate distance from the camera. Should not be altered after setup.
• Blur layer - This layer blurs the layers in relation to their distance from the camera. It simulates depth of field from different types of lenses.
Here you can alter a few values:
• Near-focus and Far-focus. Objects within this range from the camera (MAIN_Z - plane_Z) is in focus. • falloff - This value sets how fast objects gets blurry when outside the focus range. With a higher value the objects quickly gets blurry when leaving the range and with a lower objects needs to be far away from the range before getting blurry.
