Slideshow Tutorial
|
Warning! This page contains outdated information. The release of Synfig Studio 0.64.0 introduced new terminology and this translated page needs to be updated according to original English text. You can help updating this page - see instructions here. Thank you! |
В Synfig есть много способов создать слайдшоу из нескольких изображений. Возможно самый простой из них это импорт файла .lst со списком изображений. Однако этот метод позволяет работать только с растровыми изображениями и к тому же не даёт возможности создавать переходы. Метод описанный в этой статье лишь немного сложнее но он даёт возможность создавать слайдшоу из нескольких слоёв Synfig изображений независимо от типа и размера. Этот метод позволяет создавать только плавный переход, создание чего то более сложного потребует и более сложной технологии.
Contents
Техническое описание
Метод предусматривает что анимаруються несколько слоёв каждый из которых существует на протяжении всего времени анимации, следовательно наша цель сделать так чтобы в определённый момент времени был виден только один определённый слой. Опять же есть несколько способов добиться этой цели, в этой статье мы будем использывать параметры Режим смешивания и Величина для каждого слоя.
Все графические слои в Synfig имеют эти два важных параметра. Режим смешивания определяет как изображение сочетается с со слоями лежащими под ним, а величина указывает до какой степени слой прозрачен. В стандартном методе смешивания Composite объект просто размещаются над нижними слоями. В этом случае "Величина" определяет общую прозрачность слоя, когда значение равно 1.0, слой полностью видимый, когда 0.0, слой полностью прозрачен. При средних значениях этого параметра мы имеем частичную прозрачность. Этот параметр можно использовать для достижения нужного эффекта, установив значение одного слоя в определённый момент времени на 1.0, а остальных на 0.0, однако есть более эффективный путь сделать это просто переключив метод смешивания на Straight.
Этот метод смешивания имеет одно преимущество: все слои под текущим будут скрыты, таким образом нет больше надобности выставлять значение "Величины" на 0.0 для каждого слоя, тем не менее мы всё же будем использовать "Величину" для создания плавного перехода между слоями, но это нужно сделать лишь раз для каждого слоя: каждый слой в начале имеет значение 1.0, а потом будет становится прозрачным начиная от верхнего и заканчивая нижним.
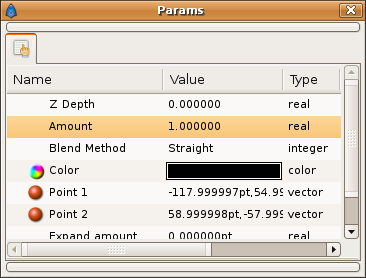
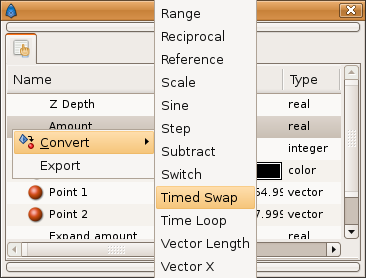
Это эффект можно реализовать с помощью двух фиксаторов фиксаторов для каждого слоя. Однако Synfig представляет возможность даже более простой метод, который даже не требует использования режима анимации. Вместо этого можно использовать функционал линковки, тип значения "Величина" изначально является реальным числом, мы вместо этого конвертируем его в специальную функцию Timed Swap.
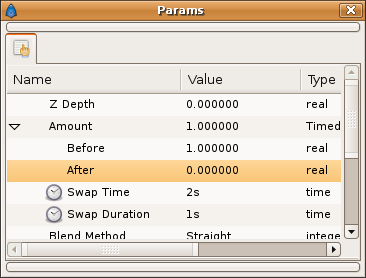
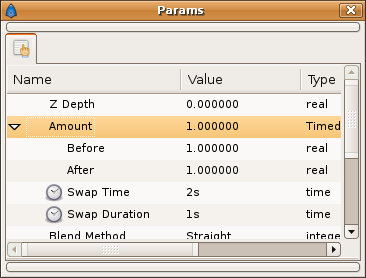
Теперь стоит разобраться с параметрами нового для нас типа данных
Now we examine the parameters of this new data type. The first is the initial value (1.0), the second is the final value (0.0), and the third is the time when the values will switch. If we want the image to display for two seconds, we can set the Swap Time to "2s". (Note: this assumes we are starting at 0s). Then the amount will be 1.0 for three seconds (image visible) and 0 for the remainder of the timeline (image hidden). The last value will be the duration of the crossfade transition. Note that the transition takes away from the time for which the image will be displayed. For example, a value of "1s" means that the image will be fully opaque for one second, fade in one second, and then remain faded for the remainder of the animation.
Applying successive times to layers from the top down will fade them one by one, creating the desired slideshow effect.
Step-by-Step Instructions
Here are step-by-step instructions for applying this principle to an animation.
Setting Up
Open a Synfig document and import any images, canvases, etc. Images can be imported using >File>Import (The first ">" signifies the Caret Menu). Note that importing links to the image using a relative path. Take care to maintain the relative positions of the files when moving them. If multiple layers represent a single image, encapsulate them into an Inline Canvas. Then arrange the images in the order they will be displayed, first image on top.
Blend Method
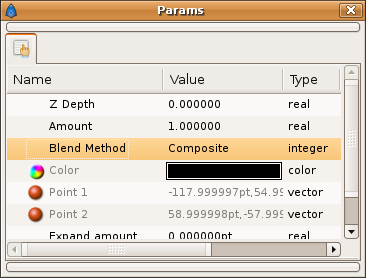
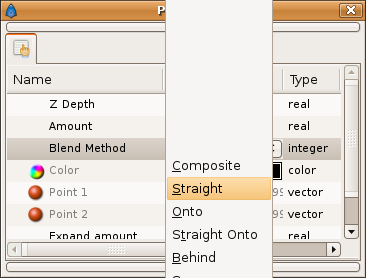
Select all layers in the layer panel. Then go to the parameters panel and set the Blend Method to Straight.
Timed Swap
Unlike Blend Mode, converting to Timed Swap must be done individually for each layer. Set "Before" to 1.0 and "After" to 0. Suppose you want the images to swap every 4 seconds, using 1 second transitions. Then set the "Duration" to "1s". Afterwards, set Time for the first layer to 4+1=5. Then increase the time for each successive layer (5,10,15,20,...). The Swap Time is the point where the image fully disappears. Configure these values to fit your needs.
Animation Length
Now that times have been configured, your file must be configured to render the full animation length. Go to >Edit>Properties and switch to the "Time" tab. Set the end time to equal the last of your time values. You can add a few seconds if you want a blank/black screen at the end, after the images have faded.
Extra: Background
You may have noticed that the Straight Blend Mode removes any backgrounds from the image. Here are two methods to add a background:
a) Encapsulate all image layers. Now the Straight blend mode only works within the inline canvas. Once this is done, add any backgrounds below the canvas, and any foreground above the canvas.
b) Add a background layer/canvas to the top of the layer list. Since it is above all other layers, the Straight layering mode doesn't affect it. However, it would normally shroud all the images. To make it appear below everything else, set the Blend Mode to Behind.
Endnotes
Congratulations! You have now finished reading the slideshow tutorial. Please leave me (nikitakit) a comment about your thoughts concerning this page.
GNU/Linux users may also be interested in AkhIL's imag2sif shell script. It imports images into Synfig and creates a rotate and translate layer for each.
The explanation of the "Straight" blend mode in this tutorial lacks a screenshot. Feel free to add one.

