Strumento BLinea
|
Warning! This page contains outdated information. The release of Synfig Studio 0.64.0 introduced new terminology and this translated page needs to be updated according to original English text. You can help updating this page - see instructions here. Thank you! |
Introduzione
Le Blinee sono l'oggetto più usato in qualsiasi normale animazione fatta con Synfig, e lo strumento BLinea ti permette di generarle.
Utilizzo
Il pulsante strumento BLinea ti pone in modalità genera BLinea. Per abbandonare questo stato clicca semplicemente su un altro strumento della casella strumenti.
L'utilizzo di questo strumento è semplice:
- Il click genera un nuovo vertice. Il valore tangente è impostato a (0,0) e i vertici diventano a spigolo vivo.
- Clicca e trascina genera nuovi vertici e permette la modifica dei valori tangentedi quel vertice. Estendendo la tangente si smussa lo spigolo.
- Ogni nuovo vertice è congiunto al precedente da una curva di Bezier definita dalla posizione dei vertici e le rispettive tangenti.
- La BLinea è generata sequenzialmente; Un vertice dopo l'altro..
- Il punto finale del precedente arco di Bezier guida il successivo sino alla sua chiusura. La BLinea generata dopo sarà independente dalla precedente.
- Puoi regolare i nuovi vertici generati cliccando sulle maniglie e trascinandole.
- Puoi anche cliccare col destro su una maniglia di un vertice o di una tangente e comparirà un menù contestuale:
- For tangent ducks:
- "Dividi tangenti" dividerà le tangenti sì da poter modificare indipendentemente l'arco di un punto finale di una curva di Bezier.
- "Unisci tangenti" unirà le tangenti indipendenti sì da poter allineare gli archi dei punti finali di due curve di Beizer .
- For vertex ducks: "Loop Bline" or "UnLoop Bline" (depending on if it is already looped or not) allows you to close or open the bline. "Delete vertex" allows you to delete the vertex.
- You can also right click in the middle of a beizer curve. "Insert vertex" allows insertion of a vertex (and set its tangents intelligently according to the neighboring vertices' values) where you clicked.
To finish the Bline:
- Select other tool.
- Or click on the gear button of the Tool Options panel.
To clear out the working Bline, press the "Esc" button.
Options
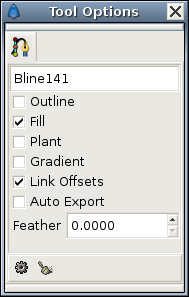
This tool has the following options:
- BLine layer name. The name of the Bline that you will create is set by the text input box. In this case it is "Bline141". This input text will parse the end of the string if any integer number is found, increasing that number for the next time you create other Bline. If not number is found it adds a three digit number for the next Bline created.
- Outline check box. If checked it creates an Livello Contorno.
- Fill check box. If checked it creates a Livello Regione.
- Plant check box. If checked it creates a Plant Layer.
- Gradient check box. If checked it creates a Curved Gradient.
- Link Offsets check box. If enabled it links the Offset Parameter for the Plant, Region or Outline if two of them (or all them) are checked.
- Auto Export check box. If checked it automatically exports the Vertices parameter (that's a BLine type parameter)
- Feather numerical input field. There you set the feather paramter of the Region Layer or Outline Layer created.
Other sources of information
See this video tutorial to see it in action.
Read Creating Shapes which talks a little about the BLine tool.
Read Bline Speed which explains about variations in the Amount parameter of BLines.
