Difference between revisions of "Category:Layer Menu"
From Synfig Studio :: Documentation
m (added screenshots of the 9 'new layer' sub menus) |
m (cat) |
||
| (13 intermediate revisions by 4 users not shown) | |||
| Line 1: | Line 1: | ||
| − | Layers Menu | + | <!-- Page info --> |
| + | {{Title|Layer Menu}} | ||
| + | {{Category|Main Menu}} | ||
| + | {{NewTerminology}} | ||
| + | <!-- End Page info --> | ||
| + | Layers Menu provides menu entries to operate on existing layers as well as a sub-menu that allows creation of any of the possible Layers in synfig. | ||
| − | [[ | + | [[File:LayerMenu 0.63.06.png|frame|none]] |
| − | You can obtain a Layer Menu either context-click on the | + | You can obtain a Layer Menu with either a context-click on the {{l|Layers Panel}} or using the {{l|Canvas Menu Caret}}. |
| − | The meaning of the entries of the Layer Menu are | + | The meaning of the entries of the Layer Menu are as follows: |
| − | * '''New Layer''': It provides a new | + | * '''New Layer''': It provides a new submenu that allows selection of any of the possible {{l|Layer|layers}} that exist in synfig. Just click on an option and the new Layer will be inserted. Remember that the layer will be inserted ''over'' the current selected layer. If no layer is selected then it is added at the beginning of the list of layers, i.e. above all other layers. |
| − | * '''Increase Amount and Decrease Amount''': | + | * '''Increase Amount and Decrease Amount''': These two commands modify the {{l|Amount Parameter}}, increasing or decreasing its value. It is the same as if you click on the parameter and click on the little up and down arrows to increase - decrease the value of the parameter. (Note: It could be a new feature that the increase or decrease value can be chosen in the Preferences menu and or can be different if you press CTRL or ALT when press the little arrow buttons.). There are {{l|Keyboard Shortcuts| keyboard shortcuts}} for those actions. <Control>-<Alt>-'(' and <Control>-<Alt>-')' |
| − | *'''Add/Remove Layers to/from a | + | *'''Add/Remove Layers to/from a Set''': This command operates on the selected layers. If they are in a Set they are removed when you press the "Remove" button. If they are already in a set and request to Add layer to a set then it would move the layer from one set to another. In any case it would ask you the new set to add the selected layers to. ''NOTE:(For the moment the feature is a little buggy. Please remove this comments when it were corrected)'' |
| − | *'''Duplicate Layer''': Create a copy of the | + | *'''Duplicate Layer''': Create a copy of the currently selected layer. It works also for multiple selected layers. Duplication includes the current layer definition and exported values (keyframes and waypoints). |
| − | *''' | + | *'''{{l|Group}}''': See its own page. See also {{l|Reuse Animations}} tutorial for other application of Group. |
| − | * ''' | + | *'''Make Advanced Outline''': Create an {{l|Advanced Outline Layer}} from an {{l|Outline Layer|Outline}} or {{l|Region Layer}} |
| − | * ''' | + | *'''Make Outline''': Create an {{l|Outline Layer}} from an {{l|Advanced Outline Layer|Advanced Outline}} or {{l|Region Layer}} |
| − | * ''' | + | *'''Make Region''': Create a {{l|Region Layer}} from an {{l|Advanced Outline Layer|Advanced Outline}} or {{l|Outline Layer}} |
| − | * '''Cut/Copy/Paste''': | + | * '''Remove Layer''': Delete the layer from the list of layers. There is a {{l|Keyboard Shortcuts|keyboard shortcut}} for that <Delete>. |
| + | |||
| + | * ''' Set Layer Description''': Allows to modify the current description of the selected layer to another one more meaningful to the user. It is not shown when more than one layers is selected. You can also modify the layer description by just clicking in its corresponding "Layer" column in the {{l|Layers Panel}} | ||
| + | |||
| + | * '''Disable/Enable Layer Rendering''': The layer is still displayed in the {{l|WorkArea}} but disabled in the final {{l|Render dialog|Render}}. For example, you can use this option when you create intermediate layer to control part of your animation (like the widgets used in {{l|Particles_V2.0|particle template}}) and the {{l|Skeleton Layer}} when created is natively disabled from rendering. | ||
| + | |||
| + | * '''Raise Layer / Lower Layer''': Moves the layer up or down in the layer list inside of its scope. If a layer is inside a {{l|Group Layer}} layer then it would only allow to be raised to the top of the scope of the Group layer and not higher If you need to put a layer outside of the scope of a Group layer then you should use ''drag and drop''. If multiple layers are selected the commands continue working but the commands are shown depending on whether all the layers can be raised or lower at the same time. | ||
| + | |||
| + | * '''Cut/Copy/Paste''': These commands do what they are supposed to do with the currently selected layers. If more than one layer is selected and one of them belongs to a Group layer then, if you select "Cut", the following message pop ups: ''layer_remove: This layer doesn't belong to this canvas anymore''. You can paste the cut layers but you cannot do {{l|Edit Menu#Undo|undo}} with those layers. | ||
== New Layer Menu == | == New Layer Menu == | ||
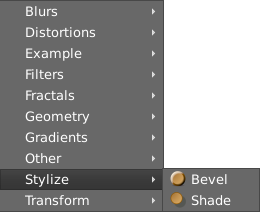
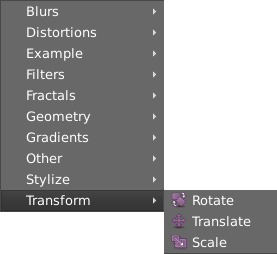
| − | There are | + | There are 10 categories of layers, as shown below: |
| + | |||
| + | [[File:Layers-blurs 0.63.06.png]] | ||
| + | [[File:Layers-distortions 0.63.06.png]] | ||
| + | [[File:Layers-example 0.63.06.png]] | ||
| − | [[ | + | [[File:Layers-filters 0.63.06.png]] |
| − | [[ | + | [[File:Layers-fractals 0.63.06.png]] |
| − | [[ | + | [[File:Layers-geometry 0.63.06.png]] |
| − | [[ | + | [[File:Layers-gradients 0.63.06.png]] |
| − | [[ | + | [[File:Layers-other 0.63.06.png]] |
| − | [[ | + | [[File:Layers-stylize 0.63.06.png]] |
| − | [[ | + | [[File:Layers-transform 0.63.06.png]] |
| − | + | ||
| − | + | ||
Latest revision as of 09:25, 30 September 2016
| Language: |
English |
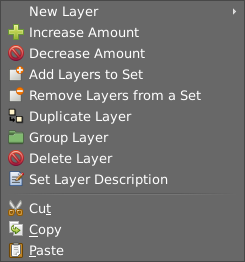
Layers Menu provides menu entries to operate on existing layers as well as a sub-menu that allows creation of any of the possible Layers in synfig.
You can obtain a Layer Menu with either a context-click on the Layers Panel or using the Canvas Menu Caret.
The meaning of the entries of the Layer Menu are as follows:
- New Layer: It provides a new submenu that allows selection of any of the possible layers that exist in synfig. Just click on an option and the new Layer will be inserted. Remember that the layer will be inserted over the current selected layer. If no layer is selected then it is added at the beginning of the list of layers, i.e. above all other layers.
- Increase Amount and Decrease Amount: These two commands modify the Amount, increasing or decreasing its value. It is the same as if you click on the parameter and click on the little up and down arrows to increase - decrease the value of the parameter. (Note: It could be a new feature that the increase or decrease value can be chosen in the Preferences menu and or can be different if you press CTRL or ALT when press the little arrow buttons.). There are keyboard shortcuts for those actions. <Control>-<Alt>-'(' and <Control>-<Alt>-')'
- Add/Remove Layers to/from a Set: This command operates on the selected layers. If they are in a Set they are removed when you press the "Remove" button. If they are already in a set and request to Add layer to a set then it would move the layer from one set to another. In any case it would ask you the new set to add the selected layers to. NOTE:(For the moment the feature is a little buggy. Please remove this comments when it were corrected)
- Duplicate Layer: Create a copy of the currently selected layer. It works also for multiple selected layers. Duplication includes the current layer definition and exported values (keyframes and waypoints).
- Group: See its own page. See also Reuse Animations tutorial for other application of Group.
- Make Advanced Outline: Create an Advanced Outline Layer from an Outline or Region Layer
- Make Outline: Create an Outline Layer from an Advanced Outline or Region Layer
- Make Region: Create a Region Layer from an Advanced Outline or Outline Layer
- Remove Layer: Delete the layer from the list of layers. There is a keyboard shortcut for that <Delete>.
- Set Layer Description: Allows to modify the current description of the selected layer to another one more meaningful to the user. It is not shown when more than one layers is selected. You can also modify the layer description by just clicking in its corresponding "Layer" column in the Layers Panel
- Disable/Enable Layer Rendering: The layer is still displayed in the WorkArea but disabled in the final Render. For example, you can use this option when you create intermediate layer to control part of your animation (like the widgets used in particle template) and the Skeleton Layer when created is natively disabled from rendering.
- Raise Layer / Lower Layer: Moves the layer up or down in the layer list inside of its scope. If a layer is inside a Group Layer layer then it would only allow to be raised to the top of the scope of the Group layer and not higher If you need to put a layer outside of the scope of a Group layer then you should use drag and drop. If multiple layers are selected the commands continue working but the commands are shown depending on whether all the layers can be raised or lower at the same time.
- Cut/Copy/Paste: These commands do what they are supposed to do with the currently selected layers. If more than one layer is selected and one of them belongs to a Group layer then, if you select "Cut", the following message pop ups: layer_remove: This layer doesn't belong to this canvas anymore. You can paste the cut layers but you cannot do undo with those layers.
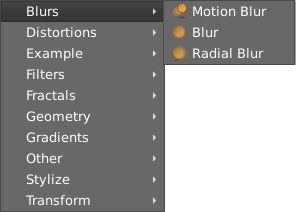
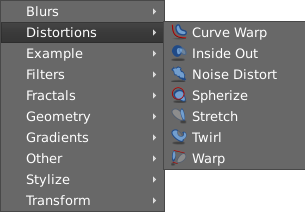
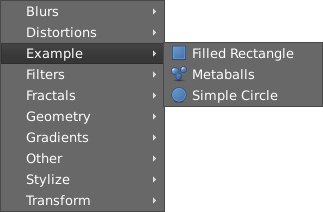
New Layer Menu
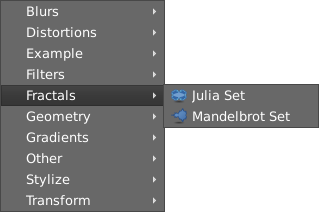
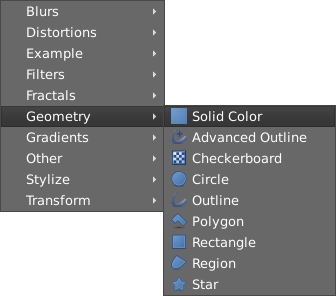
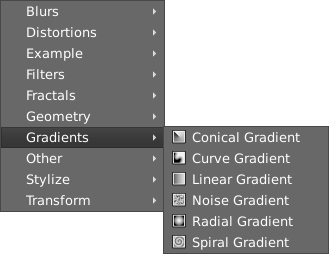
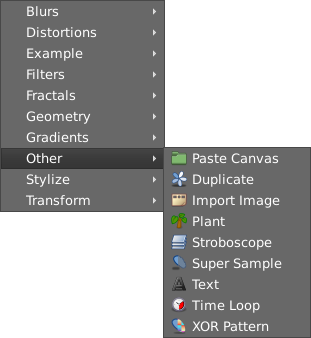
There are 10 categories of layers, as shown below:
| Language: |
English |
This category currently contains no pages or media.
