Difference between revisions of "Canvas Properties Dialog"
m (Minor stylistic changes) |
m (→Other tab: move section resize to template) |
||
| (33 intermediate revisions by 8 users not shown) | |||
| Line 1: | Line 1: | ||
| − | <!-- | + | <!-- Page info --> |
| − | + | {{Title|Canvas Properties Dialog}} | |
| + | {{Category|Dialogs}} | ||
| + | {{NewTerminology}} | ||
| + | <!-- Page info end --> | ||
| + | == Description == | ||
| + | This Canvas Properties dialog is used to establish the properties of the current main canvas. To change these parameters while working on a project, go to the {{l|Canvas_Menu_Caret|caret menu}}, select '{{l|Edit Menu|edit}}' and then 'properties'. Or you can alternatively use the {{l|Keyboard Shortcuts|keyboard shortcut}} F8. | ||
| − | + | This dialog is composed of a header (upper part) and three tabs : '''Image,''' '''Time''' and '''Other'''. | |
| − | + | {{Note|automatic display|If you have defined the SYNFIG_ENABLE_NEW_CANVAS_EDIT_PROPERTIES {{l|Environment Variables|environment variable}}, then this will automatically be displayed when you start a new project.}} | |
| − | + | In the upper part of main dialog you can set: | |
| − | + | [[File:Canvas_properties_Dialog_current.png|frame|center]] | |
| − | + | ||
| − | + | ||
| − | + | ||
| − | + | ||
| − | + | ||
| − | + | ||
| − | + | ||
| − | + | ||
| − | + | ||
| − | + | ||
| − | + | ||
| − | + | ||
| − | + | ||
| − | + | ||
| − | + | ||
| − | + | ||
| − | + | ||
| − | + | ||
| − | + | ||
| − | + | ||
| − | + | ||
| − | + | ||
| − | + | ||
| − | + | ||
| − | + | ||
| − | + | ||
| + | *'''Canvas Info''' | ||
| + | ** '''Name''' - Name of the project | ||
| + | ** '''Description''' - Short description, license , authors... | ||
| − | + | == Image tab == | |
| + | <!-- Use of Templace:PropertiesImageTab --> | ||
| + | {{PropertiesImageTab}} | ||
| + | |||
| + | === Changing Canvas origin === | ||
| + | |||
| + | Par default, the origin (the point with x = 0 and y = 0 coordinate) for new created {{l|Canvas}} is set visually to the center. | ||
| + | |||
| + | Adjusting the {{Literal|Top Left (X/Y)}} and {{Literal|Bottom Right (X/Y)}} coordinate without changing the difference between the two point (the vector), you can translate the Canvas origin. | ||
| + | |||
| + | [[File:Canvas properties image area current.png|frame|center]] | ||
| + | |||
| + | === Origin to Top Left Corner === | ||
| + | |||
| + | Starting from the upper Image Area example, if you want to set the origin to the top left corner, in {{l|Canvas_Properties_Dialog#Image tab}} set {{Literal|Image Area}} {{Literal|Top Left}} '''X''' and '''Y''' to '''0''' and {{Literal|Bottom Right}} '''X''' to '''8''' and '''Y''' '''4,5''' | ||
| + | * ''new_bottom_right_x = ABS(old_top_left_x) + old_bottom_right_x'' | ||
| + | * ''new_bottom_right_y = old_top_left_y + ABS(old_bottom_right_y)'' | ||
| + | |||
| + | == Time tab == | ||
| + | In the '''Time''' tab you can set: | ||
| + | <!-- USe of Templace:PropertiesTimeTab --> | ||
| + | {{PropertiesTimeTab}} | ||
| + | |||
| + | == Other tab == | ||
| + | In the '''Other''' tab you can set: | ||
| + | <!-- Use of Template:PropertiesOtherTab --> | ||
| + | {{PropertiesOtherTab}} | ||
Latest revision as of 15:23, 2 July 2015
Contents
Description
This Canvas Properties dialog is used to establish the properties of the current main canvas. To change these parameters while working on a project, go to the caret menu, select 'edit' and then 'properties'. Or you can alternatively use the keyboard shortcut F8.
This dialog is composed of a header (upper part) and three tabs : Image, Time and Other.
|
automatic display If you have defined the SYNFIG_ENABLE_NEW_CANVAS_EDIT_PROPERTIES environment variable, then this will automatically be displayed when you start a new project.
|
In the upper part of main dialog you can set:
- Canvas Info
- Name - Name of the project
- Description - Short description, license , authors...
Image tab
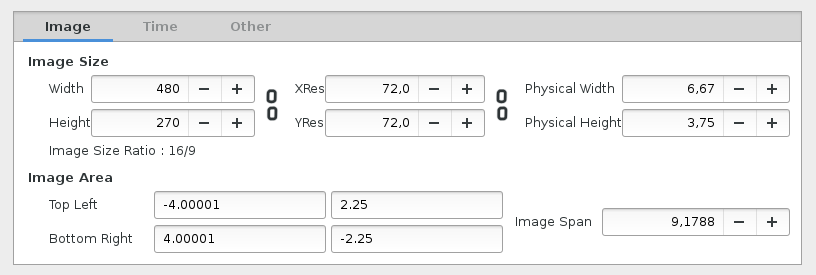
In the Image tab you can set:
- Image Size
- Width - set width of render in pixels.
- Height - set height of render in pixels.
-
 - Toggle button to fix pixel ratio.
 - XRes - set horizontal resolution to calculate the physical size (do not affect the size of the content).
- YRes - set vertical resolution to calculate the physical size (do not affect the size of the content).
-
 - Toggle button to fix resolution ratio.
 - Physical Width - set physical printing size of render. (Calculated from Width/XRes).
- Physical Height - set physical printing size of render. (Calculated from Height/YRes).
- Image Size Ratio - Label displaying the current image size ratio.
- Image Area - sets the portion of the workarea to be rendered.
- Top Left X/Y: - set where in the workarea top left of render starts.
- Bottom Right X/Y - set where in the workarea bottom right of render starts.
- Image Span - diagonal size of the portion of the workarea ("Top Left (X/Y)"² +"Bottom Right (X/Y)"² ="Image Span"² )
Changing Canvas origin
Par default, the origin (the point with x = 0 and y = 0 coordinate) for new created Canvas is set visually to the center.
Adjusting the "Top Left (X/Y)" and "Bottom Right (X/Y)" coordinate without changing the difference between the two point (the vector), you can translate the Canvas origin.
Origin to Top Left Corner
Starting from the upper Image Area example, if you want to set the origin to the top left corner, in Canvas Properties Dialog set "Image Area" "Top Left" X and Y to 0 and "Bottom Right" X to 8 and Y 4,5
- new_bottom_right_x = ABS(old_top_left_x) + old_bottom_right_x
- new_bottom_right_y = old_top_left_y + ABS(old_bottom_right_y)
Time tab
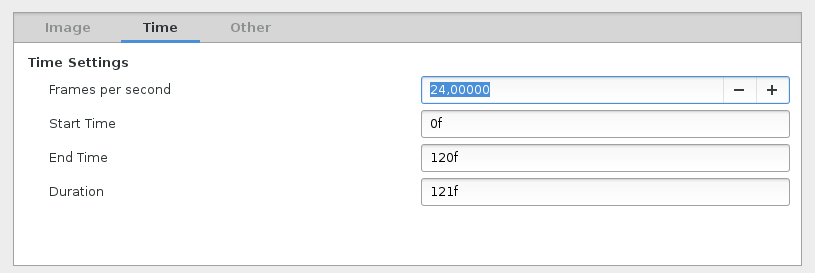
In the Time tab you can set:
- Time Settings
- Frames per second - set render framerate. Only applicable when rendering to movie-file, not image sequences.
- Start Time - set where in your timeline rendered sequence will start.
- End Time - set where in your timeline rendered sequence will end.
- Duration - set the duration of the animation.
Other tab
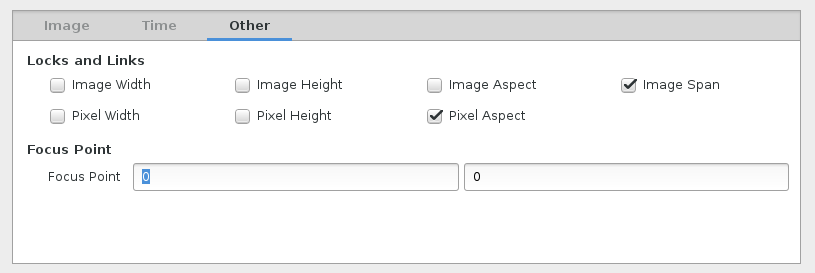
In the Other tab you can set:
TODO writeme (explain how to use "other tab" parameters and share info from Template:PropertiesOtherTab )
- Locks and Links
- Image Width
- Image Height
- Image Aspect
- Image Span
- Pixel Width
- Pixel Height
- Pixel Aspect
- Focus Point
- Focus Point X:/Y:
Resizing the Canvas
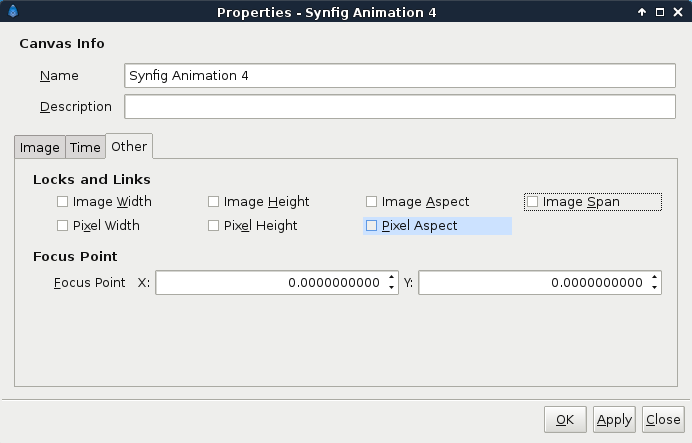
In the "Other" tab, uncheck all of the "Locks and Links":
Then edit Image "Width" and "Height". This will resize the canvas, stretching it's contents in the process.
Resizing the Canvas and keep aspect
In the "Other" tab, check "Image Aspect", "Image Span", "Pixel Aspect", in "Locks and Links".
Then edit Image "Width" and "Height". This will resize the canvas, adjusting it's contents keeping the aspect. That's mean that even if you change the "Image Size Ratio", a square before is a square after.
Expanding the Canvas
In the "Other" tab, check only "Pixel Aspect" in "Locks and Links":
Then edit Image "Width" and "Height". This will expand the canvas, keeping it's contents at the same size but adding extra space at the top/bottom and left/right.
Please note that since this dialog caused confusion, even among some very experienced people, here are some unofficial thoughts about image dimensions.
| Language: |
English • српски / srpski |


