Animating Shapes
m (→Adding the petals: origin 0,0) |
m (→Basic settings: formating) |
||
| Line 21: | Line 21: | ||
Now that the trace of the form is closed, you can generate the proper form by selecting another tool or by pressing the button with the gear icon at the bottom of the {{l|Tool Options Panel}}. | Now that the trace of the form is closed, you can generate the proper form by selecting another tool or by pressing the button with the gear icon at the bottom of the {{l|Tool Options Panel}}. | ||
| + | <br style="clear:both;"> | ||
[[File:FlowerTutorial 1 Canvas.png|center|frame]] | [[File:FlowerTutorial 1 Canvas.png|center|frame]] | ||
Latest revision as of 11:59, 10 October 2016
Basic settings
In the previous tutorial, you have learned to create shapes with the Spline Tool, in this tutorial we will learn how to create a simple animation of a growing flower using Splines.
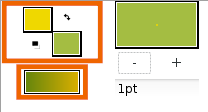
Start Synfig Studio — a new animation will be created. If you already have Synfig Studio started, select "File → New" in the toolbox.First, we need to create a gradient for a background. Click on the outline and fill colors in the Toolbox to select the colors our gradient will have. You can also directly edit the gradient by clicking the gradient line in the toolbox.
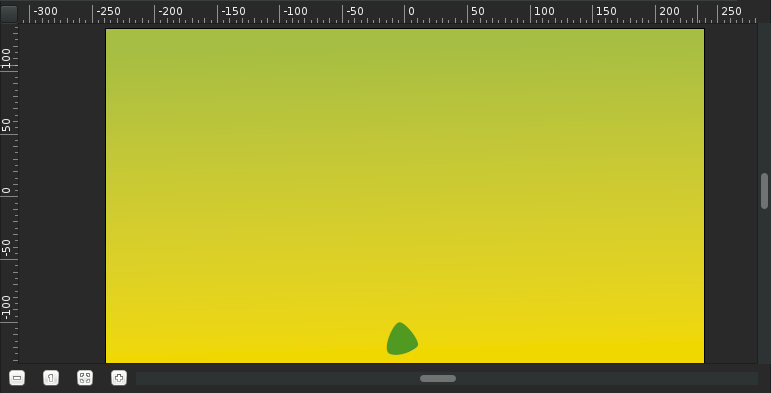
Select the Gradient Tool and drag your cursor vertically across the canvas to fill it with the gradient.
Next, select the Spline Tool and in the Tool Options Panel, make sure that only "Create Region Spline" is checked. In the toolbox, set the fill color to green. Draw a kind of triangle with the Spline tool. To close the shape after drawing the 3 vertices, right click on the first vertex and choose "Loop Spline".
Now that the trace of the form is closed, you can generate the proper form by selecting another tool or by pressing the button with the gear icon at the bottom of the Tool Options Panel.
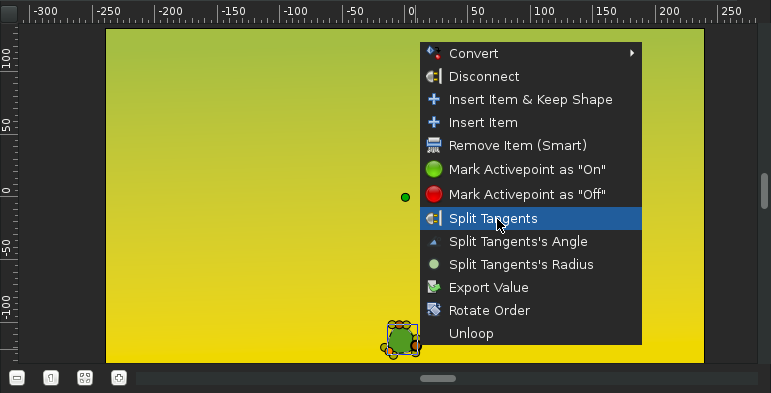
This will be the base of the stem. You can tweak the tangent handles (red dots) a bit to make a rounder triangle. With the Transform Tool, right-click on each vertex and select "Split Tangents", so the tangent handles of each vertex can be moved separately.
|
Shape Origin, transformation and link Be certain that the shape's origin is set to "0,0" ... this will save you from headhache in further steps.
|
We're done with the basic settings.
Animate the stem
In the Canvas Menu, select the caret menu icon in the upper left hand corner, where the rulers intersect, and then select "Edit → Properties". Go to the "Time" tab, set the "End time" to "6s" and click OK button.
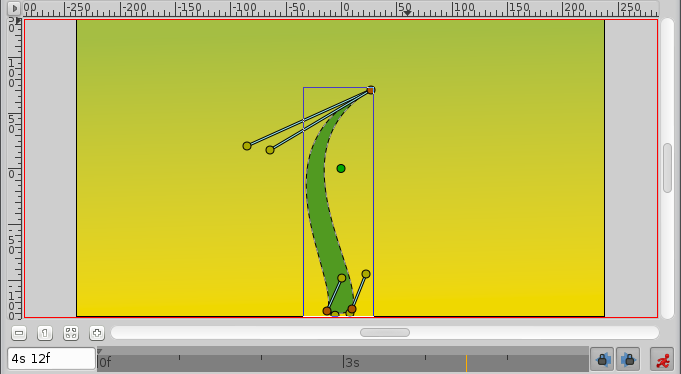
Click at the beginning of the timetrack ("0f"), then, in the Keyframes Panel (the one with a key icon) click the button with a "+" icon (add a new keyframe). Keyframes allow us to settle down the scene; i.e. on a keyframe, every element of the scene will have all its properties remembered. Click again on the timetrack, at "4s 12f" (ie 4.5s at 24 fps). Press the green man at the bottom right of the canvas (or whatever icon you have there, depending on your icon theme) to switch to the Animate Editing Mode (the man is now red).
With the Transform Tool, select the green sprout, and move the upper vertex up to make a stem. You can play with the vertex handles to bend the shape a bit if you want.
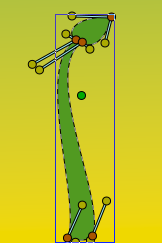
While you are still at "4s 12f", right-click on the stem border, close to the top, and choose "Insert Item (smart)". Do the same on the other side of the stem. Right click on those new points and choose "Split Tangents". Then try to make a shape that looks like the one on the image, to create the flower bud.
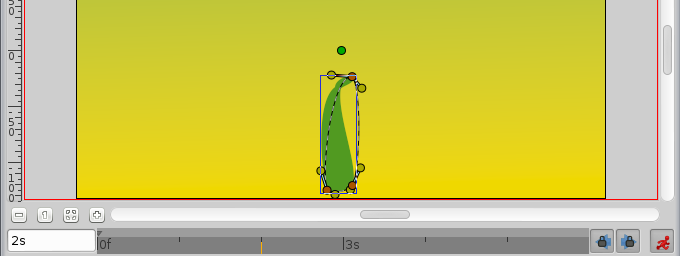
Now if you click on "2s" (for example), you'll see that the shape of the bud is slightly visible, even if the sprout is rather small, and even if the bud handles are invisible.
Let's say we want the bud to appear only at 3s 12f, and be full size at 4s 12f.
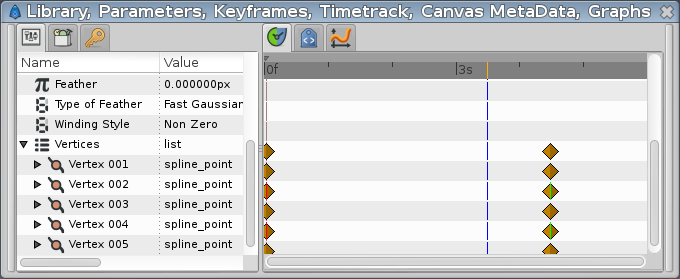
Click on "3s 12f" on the timetrack. Now take a look at the "Parameters" and "Timetrack" panels at the bottom. You'll see that each parameter in the Parameters Panel matches a row in the Time Track Panel. The last parameter is the vertices list. Click on the small arrow on the left to unfold the list. You should see something like this:
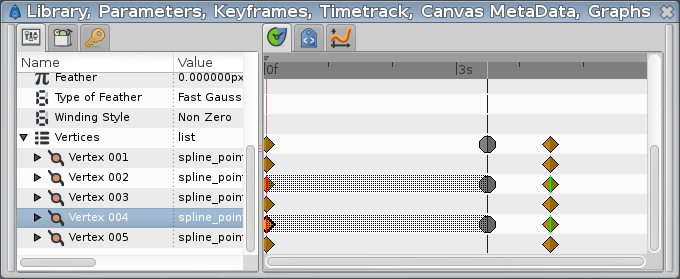
Each brown diamond (or waypoint) stands for a recorded value (here the vertices positions were recorded at 0f with the keyframe, and at 4s when we moved some vertices or vertices handles). The two vertices we added to make the bud are marked with green and red vertical line on their 0s and 4s waypoints. Right-click on them in the parameters list, and select "Mark Activepoint as Off".
The panel should now look like this, the grayed part being the part where the bud vertices have no effect on the stem.
For example if you click on "2s" or even "3s" now, the bud shape is not visible. It starts to appear only a little after 3s 12f.
However, the shape of the stem may not look very nice during its growth between 0 and 4s. Make sure you're still in Animate Edit Mode, and tweak the shape at various moments in time, to get something you like.
The animation of the stem is now finished, but it still lacks the petals. You can watch a preview of your animation: Go to "File → Preview", validate, wait for the preview to be generated, and watch.
|
Note Previews are often pixelated and blurry, but the final render will be clean-cut. Higher quality previews are obtainable by using higher values for 'Zoom' and 'Frames per second' in the preview dialog window.
|
Adding the petals
Now leave the "Animate Editing Mode" by clicking on the red circle at the right bottom of the canvas.
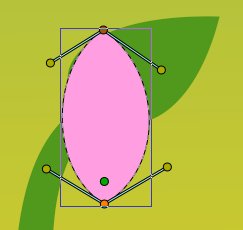
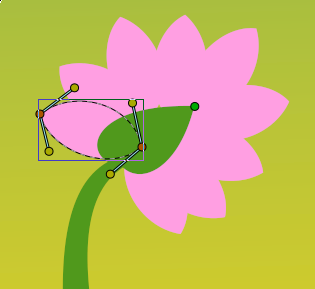
Change the fill color to pink, and create a petal with the Spline Tool. You'll notice that the green handle that allows easy movement of a shape is at the center (Origin : "0,0") of the canvas. Select all the vertices of the petal with CtrlA and move them close to the green handle (with the Transform Tool), as shown.
Then drag the green handle very close to the top of the bud. Hit CtrlA again to select all vertices of the petal and tweak it a bit with Rotate Tool. Also, in the Layers Panel select the petal layer and put it under the stem layer. Click on the petal to select it, then ctrl-click on the stem. Both objects should be selected.
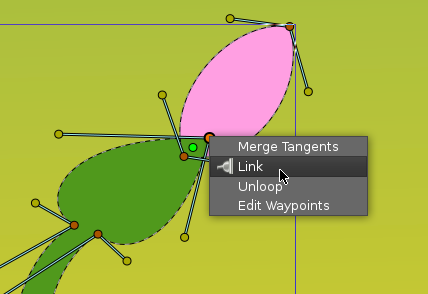
Now click on the vertex at the top of the stem and ctrl-click on the green handle of the petal (both should appear in a lighter color, as they are selected). Then right-click on the stem top vertex, and select "Link". The petal will move a bit as the green handle is snapped on the stem vertex.
Now that there's a link between the petal and the top of the stem, when the top of the stem moves, the petal will follow the move. (And if the green handle of the petal moves, the top of the stem will move, but we don't want to do that here.)
|
I'm going mad, can't link the stem and the petal! The problem is trivial. The ‘origin’ parameter of ‘Stem’ and ‘Petal’ layers is different. They should be same, because you’re linking origin of layer with some vertex that has its own layer’s origin.
Set both origins to the same values (0,0), then link.
|
On the Layers Panel, select the newly created Petal layer and duplicate it (with the third button, on the bottom of the Layers Panel). On the canvas, press CtrlA to select all the vertices of the duplicated petal, and move them a little, so the petals are no longer overlaid. (Don't move the green handle, just the orange ones). Repeat the process several time, to get something looking like this image.
Note that the duplicated petals are also linked to the stem. If you go back to the first keyframe, you'll see that the petals are visible. We don't want that. We want the petals to appear and bloom almost at the end of the growth.
Hiding the petals
Let's say we want the petals to appear a little after 4 seconds in the animation, and be full size at 5 seconds, instead of being visible and full size all the time.
Switch to "Animate Editing Mode" again by clicking on the green circle at the bottom right of the canvas. But if we will go to "4s" and modify them, then they also change at "5s". Because the shape/position of the petals is not fixated at this moment of time by any waypoints or keyframes. That means that we need a keyframe at "5s". On the timetrack, click to place the cursor at 5 seconds. On the Keyframes Panel, click on "+" to add a new keyframe.
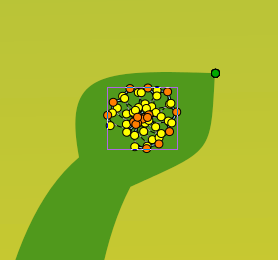
Now click on "4s", and on the Layers Panel, select all the petals layers (with ctrl+click), then press CtrlA to select all the petals vertices. Scale them down with the Scale Tool, and move them, so they are hidden by the stem, as shown.
From 4s to 5s, the petals will now appear and bloom. But notice that we have a keyframe at 0s which also remembers petals shape. That makes the problem — the petals are still visible from the first keyframe to the 4s keyframe. We could either make the petals tiny and hidden tweaking their size on every frame from 0s to 4s, or we could make them invisible on this interval.
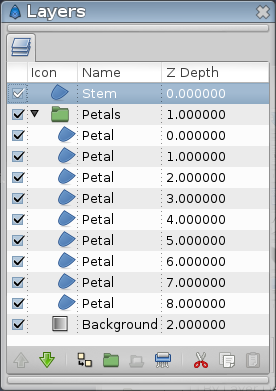
Let's choose the second solution. To make things easier, we are going to group the petal layers into an Group Layer. With all the petal layers selected, right-click on them on the Layers Panel and select "Group". You can rename the layers to make things more understandable.
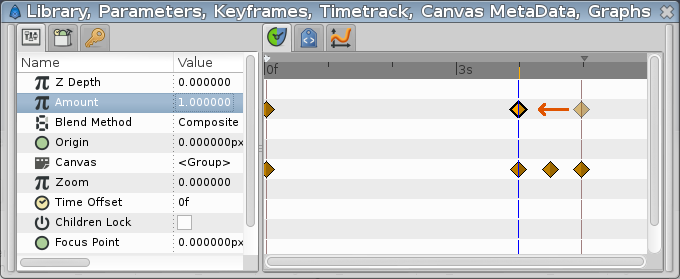
Select the "Petals" Group Layer and jump to the first keyframe. In the Parameters Panel, set the "Amount" value to "0". The petals are now invisible on that keyframe. Note that two waypoints were added in front of the "Amount" parameter, one at 0s and the other at 5s. Drag the 5s waypoint to 4s, so that the opacity of the petals will be 1 at 4s.
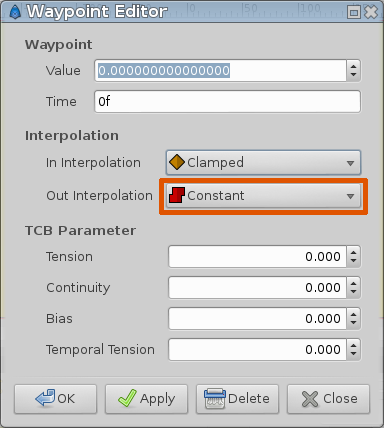
There is still one problem left: from 0s to 4s, the opacity of the petals slowly increases, making the petals visible when they shouldn't. To solve this, we will change the Amount interpolation method. Right click on the Amount waypoint at 0f, and select "Edit". A new dialog will appear, in which you can choose the In and Out interpolation. Set the Out Interpolation to "Constant".
|
Tip You can also change waypoint Out interpolation by right-clicking on it and selecting "Out → Constant".
|
This means that after that waypoint, the Amount value will remain constant, until another waypoint is encountered. So from 0f to 4s the Amount value will be equal to 0, and at 4s it will suddenly changed to 1, and make the petals visible, as expected. Alternatively, we could have achieved the same effect by setting the In Interpolation of the waypoint at 4s to "Constant".
Notice how (half of) the waypoint changes from a green circle (meaning smooth animation of the amount parameter) to a red step (meaning that the amount parameter is suddenly stepped).
Now you're done. The stem grows for 4.5 seconds and then stays still the last 1.5 seconds. The petals are hidden until 4 seconds, and then grow quickly between 4 and 5 seconds, and stay still the last 1 second too.
Click on "File → Render" to render your animation. Select any format you want, and ensure that "Use current frame" option is unchecked (otherwise, one frame only will be rendered).
You can download the project File:FlowerTutorial.sifz used for the screenshots.
What's next
Synfig Studio have a Skeleton animation system, in the next step you will learn how to setup a basic skeleton.
