Doc:Getting Started/fr
| Language: |
English • čeština • Deutsch • español • suomi • français • italiano • 日本語 • Nederlands • polski • português • română • русский • 中文(中国大陆) • 中文(台灣) |
        EN COURS DE TRADUCTION
           ... PATIENCE.
Introduction
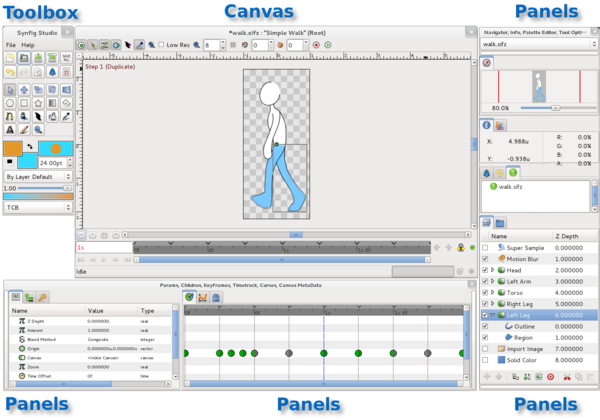
Lorsque vous démarrez Synfig Studio, les fenêtres suivantes apparaissent:
Les composants principaux sont:
- Toolbox — La boîte à outils (toolbox) est la fenêtre principale de Synfig Studio. Fermer cette fenêtre signifie quitter l'application. Elle présente le menu système, boutons, outils et autres trucs nécessaires à la création et à l'édition de votre travail graphique.
- Canevas — Le canevas (ou toile) où vos illustrations et animations vont apparaître.
- Panels — Les panneaux(panels) contiennent des outils et des informations sur certains éléments de votre projet. Quelques panneaux vous permettront même de modifier ces éléments.
|
Note Si votre interface de Synfig Studio est différente, l'arrangement montré dans la copie d'écran est heureusement assez facile à retrouver. Dans le menu "Fichier" de la boîte à outils, sélectionnez "Panneaux → Rétablir la disposition d'origine des fenêtres".
|
La fenêtre au centre est appelée Fenêtre de Canevas. Chaque fois que vous démarrez Synfig Studio, une nouvelle fenêtre de canevas est ouverte. Cette fenêtre représente le Canevas principal, ça ne vous en dit pas plus pour l'instant mais c'est normal — J'essaye juste de vous présenter les choses. Dans le coin en haut à gauche de la Fenêtre de Canevas, vous devriez voir un bouton and un chevron (>). Si vous cliquez sur ce bouton, le menu de la fenêtre de canevas va apparaître. (De la même façon, if vous faites un clic droit sur la zone de canevas et qu'il n'y a pas de calque sous la position de la souris, ce menu apparaîtra également.) A présent, vous savez où se trouve le menu dans la Fenêtre de Canevas. Parfait.
The other two windows (one on the bottom, and one to the right) are customizable dock dialogs. Each dock dialog contains a set of panels, arranged horizontally or vertically. Some panels sharing the same space inside of the dock dialog and you can switch between them by clicking on their tabs. You can rearrange the contents of dock dialogs as you wish by simply dragging the panel tab to where you want it. You can even create a new dock dialog by dragging a tab out of the dock dialog it was inside of.
If you ever accidentally close a panel (by dragging it out of the dock dialog, and closing the new dock dialog that gets created), no worries. Simply go to the toolbox, go to "File → Panels" in toolbox menu and then click on the name of the panel you need.
There are a lot of panels in Synfig Studio. If you have no idea what a panel does, simply hold your mouse over its tab icon and a tooltip will pop up describing the name of the panel.
Here are some of the most important ones:
- Panneau Calques — This panel shows you the layer hierarchy for the currently selected canvas. It also allows you to manipulate these layers.
- Params Panel/fr — This panel will show you the parameters of the currently selected layer, (OR, if multiple layers are selected, it shows you only the parameters that the selected layers have in common).
- Tool Options Panel — This panel shows you any options specific to the currently selected tool.
- Navigator — This shows a thumbnail image of what the currently selected canvas looks like. You can also zoom in and move the focus around with this panel.
- Panneau Historique — This shows you the history stack for the current composition. You can also edit the actions in history.

