Doc:Getting Started/ru
| Language: |
English • čeština • Deutsch • español • suomi • français • italiano • 日本語 • Nederlands • polski • português • română • русский • 中文(中国大陆) • 中文(台灣) |
|
Warning! This page contains outdated information. The release of Synfig Studio 0.64.0 introduced new terminology and this translated page needs to be updated according to original English text. You can help updating this page - see instructions here. Thank you! |

Введение
Synfig, как и большинство других программ, размещает всё содержимое вашего рисунка на слоях. Тем не менее, эти слои отличаются от тех, с которыми, возможно, некоторые привыкли иметь дело в других программах Этих основных отличий два:
Каждый слой имеет набор параметров, определяющих его поведение. Когда вы щёлкаете на слое (в окне с рисунком или на панели слоёв), эти параметры отображаются на панели параметров. |
|
Synfig Studio имеет функцию автовосстановления. Если она "вылетает", то даже если текущий файл не был сохранён, вы не потеряете более пяти минут работы. При следующем запуске программа автоматически предложит восстановить несохранённый файл. К сожалению, история отмен при этом не восстанавливается.
Одна вещь, которая может броситься вам в глаза это ЧРЕЗВЫЧАЙНАЯ медлительность программы. Программа настолько тормозная, что работа с ней на компьютерах 3-4 летней давности практически невозможна. Основная причина в том, что все цветовые операции выполняются с плавающей точкой -- Synfig Studio изначально разрабатывалась с учётом возможной реализации поддержки High-Dynamic-Range Imaging.
Тем не менее, такая ситуация с быстродействием не будет длиться вечно. darco предлагает несколько определённо эффективных реимплементаций и оптимизаций, которые должны существенно улучшить производительность. Причём результатом обещает быть не 200% увеличение, а 2000% увеличение быстродействия. Эти оптимизации также должны открыть дорогу к использованию аппаратного ускорения современных графических процессоров которые дадут дальнейший прирост производительности.
Интерфейс
|
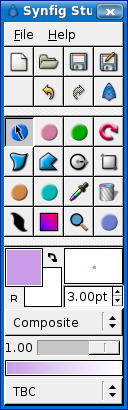
При запуске Synfig Studio отображает экран загрузке и затем на экране появляются три окна. Окно в левом верхнем углу представляет из себя Панель иснтрументов. С помощью неё вы можете открывать файлы, выбирать инструменты, менять цвета и т.п. Однако при запуске большинство кнопок неактивно - так как нет открытого файла. Остальные два окна (одно снизу и одно справа) содержат различные панели и являются настраиваемыми. Вы можете перетаскивать панели с одного места на другое за их [[Заголовок панели|заголовки]. Вы даже можете создавать новые окна, просто перетащив [[Заголовок панели|заголовок панели] за пределы окна, внутри которого он был. Не беспокойтесь, если вы случайно закрыли панель (перетащив её за пределы окна и закрыв вновь созданное в результате окно). Просто выберите "File->Dialogs" из меню панели инструментов и в открывшемся меню щёлкните на имя той панели, которую вы хотите вновь отобразить. There are a lot of dock tabs. If you have no idea what a dock tab does, simply hold your mouse over its icon and a tooltip will pop up describing the name of the tab. |
Here are some of the more important ones:
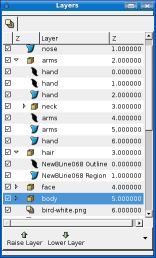
- Layers Dialog - This tab shows you the layer hierarchy for the currently selected canvas. It also allows you to manipulate these layers.
- Params Dialog - This tab will show you the parameters of the currently selected layer, (OR, if multiple layers are selected, it shows you only the parameters that the selected layers have in common)
- Tool Options Dialog - Shows you any options specific to the currently selected tool
- Navigator - Shows you a thumbnail of what the currently selected Canvas looks like. You can also zoom in and move the focus around with this tab.
- History Dialog - Shows you the history stack for the current composition. You can also edit the actions in history.
If you click the "new composition" button in the toolbox, a new composition will be opened and the canvas properties dialog will appear.
The canvas properties dialog is a mess, I know. I'll have it re-designed into something much more comprehendible in the next few days. For now, ignore the "Image Area" and "Locks and Links" sections.
If you click OK, the canvas properties dialog will disappear and you will see the Canvas window. This window represents the Root Canvas, not that that means much to you at the moment, but that's OK--I'm just trying to show you around.
In the upper left corner of the Canvas Window, you'll see a button with a caret If you click on this button, the canvas window menu will pop up. (As an aside, if you right click in the canvas area and there is not a layer under the mouse position, this menu will also appear) So now you know where the menu is in the Canvas Window. Good. Everything else should be pretty self-explanatory in the Canvas Window. (Explanations on the menu stuff is to come in a sec)
First steps
Let's create something so that we can tweak with it. Now that you have a new composition open and the properties dialog is out of the way, go over to the toolbox and click on the circle tool. (If you don't know which one it is, just mouse over them until you find the one with the tooltip that says "circle").
The second you click on the circle tool, you should notice that the Tool Options Dialog changed. But we'll get to that later.
- Note: Some laptop users might experience trouble where click-drag on the canvas when using the circle tool doesn't seem to do anything or produce insanely huge circles. The problem is that Synfig has detected the touchpad and enabled that device (incorrectly!) To fix this: click File->Input devices... In the resulting dialog window, select 'Disabled' for your touchpad device. After this change, your external mouse and the touchpad will work as expected.
With the circle tool selected, you can now create circles in the Work Area. This pretty much works exactly as you might expect it to. Go ahead and create two (or more, if you fancy) circles. If by accident you just clicked on the canvas instead of clicking and dragging (with mouse button pressed) to draw the circle, you end up creating a circle with 0 radius and it is effectively invisible! No need to worry, you can easily fix this. In the Params dialog, you can change the parameters of the selected object. If you just made a 0 radius circle, it should be the current selected object. you can change its radius to some value other than 0, say 10, and manipulate it to your liking with the canvas ducks later.
Now go back to the toolbox and click on the normal tool (the blue circle with the arrow on it). After you do this, click on one of your circles. You will then see a bounding box(which is kinda useless at this point in time, but I digress), a green dot at the center, and a cyan dot on the radius. Those dots are called ducks. If you want to modify the circle, grab a duck and drag it around. Easy!
So you can select a layer by clicking on it. If you want to select more than one layer, hold down CONTROL while you are clicking -- this works in both the Work Area and the Layer Dialog. Try it!
You can also select multiple ducks. You can do this in several ways. First, you can hold down CONTROL and individually click the ducks that you want selected, but this can be tedious. However, there is a much faster method -- just create a selection box by clicking the mouse and dragging it over the area of ducks that you want selected.
Go ahead and select two circles, and select all of their ducks. With several ducks selected, moving one duck will move all of the ducks. This behavior is dependent on the normal tool. Thus, a more descriptive name for this tool might have been the "move" or "translate" tool.
The rotate and scale tools work much like the normal tool, except in the case where you have multiple ducks selected. It is much easier to just try it than read about it. Select a few circles, select all of their ducks, and try using the rotate and scale tools.
Note that, unlike the normal tool, the other duck manipulation tools DO have options associated with them. If a particular tool isn't doing what you want, take a look in the Tool Options Dialog to see if it is set up like you want it.
Linking
Now let's try linking. Let's say we always want these two circles to be the same size. Select two circles, and then select both of their Radius ducks(the cyan dot). Then right click on either duck and a menu will pop up. Click on "Link". Boom. The parameters are linked together. You can prove it to yourself by selecting just one of the circles and changing its radius -- the other one will change as well. Neat stuff, eh?
Linking is a fundamental concept in Synfig. You can create links not only between ducks, but also between parameters as well by selecting multiple layers, right clicking on the parameter in the param tab, and selecting "Link".
DIGRESSION: This is how outlines are attached to their regions—but I'm getting ahead of myself. At the moment, the fundamental power and flexibility of linking in Synfig Core is beyond what Synfig Studio currently allows for. This will change in the future. Anyway, back on track...
Let's say you want one of the circles to be a different color. If you look in the toolbox below the tools, you'll see the foreground/background color selector, the outline width selector, and some other stuff like the default blend method and gradient. The foreground/background color widget works exactly as you might expect -- you can click on the foreground color, and a modest color chooser will appear. Now to can change the color pretty easily.
But sometimes you just want to click on a color and go. This is where the palette editor tab comes in. Its functionality isn't quite 100% yet (ie: saving and loading custom palettes hasn't been implemented yet), but the default palette is pretty decent. Click on the Palette editor tab and have a look -- it's the one with the palette-ish looking icon. Clicking on colors in here will immediately change the default foreground color.
That's all great, but we still haven't changed the color of the circle. There are two ways to do this. The first way is that you select the circle layer you want to modify, goto the params tab and double click on the color parameter--a color selector dialog shows up and you just tweak away. But let's say you already got the color you wanted selected as the default foreground color. Easy. Just click on the "Fill tool" from the toolbox, and then click on the circle in the canvas window. Boom. Circle changes color. This works with more than just circles, but we'll get to that in a sec.
Try playing around with the circles for a bit. Muck around with the parameters, and see what happens. To get you started, play around with feather a bit.
Digging deeper
Of course, so far you just found out how to use the basic features of Synfig Studio but not how you animate a drawing. This is covered in the next tutorial.