Snowflake with the Duplicate Layer
(→Adding the Rotate and Duplicate Layers) |
(→Connecting everything together) |
||
| Line 27: | Line 27: | ||
http://i209.photobucket.com/albums/bb207/rore4wiki/Synfig/snow_step2.png | http://i209.photobucket.com/albums/bb207/rore4wiki/Synfig/snow_step2.png | ||
| − | == | + | == Conectarea tuturor straturilor == |
| − | + | Selectati stratul Duplicat si alegeti caseta {{l|Params Panel}}. Acolo se afla o valoare "Index" care este exportata automat. Numele acesteia este "Index 1". (Este afisata ca "Index(Index 1)" in caseta). <br/> | |
| − | + | Aceasta valoare este realizata din 3 subparametri : ''From'', ''To'' si ''Step''. | |
| − | + | Acesti parametri indica de cate ori este duplicat un obiect. | |
| − | <!--- |((From - To)/Step)|+1 = | + | <!--- |((From - To)/Step)|+1 = Numarul de duplicate. ---> |
| − | + | Avem nevoie de 6 ramuri, deci setati parametrul '''To''' la '''6''' (pastrati ''From'' si ''Step'' la 1). | |
http://i209.photobucket.com/albums/bb207/rore4wiki/Synfig/snow_step3.png | http://i209.photobucket.com/albums/bb207/rore4wiki/Synfig/snow_step3.png | ||
| − | + | Acum mutati caseta {{l|Children Panel}}, si selectati valoarea "Index 1". (Extindeti ValueBase Node daca este necesar). | |
| − | + | Pentru a avea 6 ramuri rotite, avem nevoie sa legam impreuna duplicarea si rotirea. | |
| − | + | Selectati stratul rotire - Rotate, si reveniti la caseta Params. <br/> | |
| − | + | Stratul Rotate are 2 parametri: ''Origin'' si ''Amount''. Cel mai important este ''Amount'', care indica unghiul rotirii. | |
| − | + | Dati click-buton-dreapta pe '''Amount''' si selectati '''Convert > Scale'''. <br/> | |
| − | + | Acum Amount este compus din doi subparametri, ''Link'' (un unghi) si ''Scalar'' (numar real), intreaga rotire fiind egala cu Link * Scalar. | |
| − | + | Setati subparametrul '''Link''' la 60 (that's the angle between the snowflake branches). | |
Right click on the '''Scalar''' parameter and select '''Connect'''. It will connect the previously selected "Index 1" value (in the Children panel) to the Scalar parameter. | Right click on the '''Scalar''' parameter and select '''Connect'''. It will connect the previously selected "Index 1" value (in the Children panel) to the Scalar parameter. | ||
| Line 57: | Line 57: | ||
http://i209.photobucket.com/albums/bb207/rore4wiki/Synfig/snow_step5.png | http://i209.photobucket.com/albums/bb207/rore4wiki/Synfig/snow_step5.png | ||
| − | |||
== What happened? == | == What happened? == | ||
Revision as of 13:44, 27 April 2012
|
Warning! This page contains outdated information. The release of Synfig Studio 0.64.0 introduced new terminology and this translated page needs to be updated according to original English text. You can help updating this page - see instructions here. Thank you! |
Aceasta lectie va da un exemplu simplu de folosire a stratului duplicat - Duplicate Layer, pentru a crea un fulg de nea.
Contents
Prima ramura a fulgului de nea
Prima parte este foarte simpla: vom realiza o ramura a fulgului de nea folosind instrumentul BLine Tool/ro (sau Polygon Tool).
Selectati instrumentul Bline si asigurati-va ca in optiunile instrumentelor este selectat doar Create Region Bline. (Daca folositi instrumentul polygon, selectati fie Create Polygon Layer, fie Create Region Layer, dupa cum doriti).
Desenati ramura in partea de mijloc-sus a imaginii. Dupa desenare, selectati noul strat creat (aici il vom numi "stratul Ramura") si asigurati-va ca partea de jos a ramurii se afla aproximativ in acelasi loc cu punctul verde care indica centrul imaginii. Puteti muta ramura prin selectarea tuturor punctelor (Ctrl-A) si folosind instrumentul Normal Tool.

Adaugarea rotirii si duplicarea straturilor
Pentru a realiza toate cele 6 ramuri ale fulgului de nea, avem nevoie de mai multe copii ale ramurii, pe care ulterior le vom roti.
Mai intai, avem nevoie de un strat de rotire - Rotation layer. Dati click-buton-dreapta pe imagine si selectati Layer > New Layer > Transform > Rotate. Ar trebui sa obtineti un strat de rotire deasupra stratului Ramura.
Apoi, vom folosi stratul duplicat. Dati click-buton-dreapta pe imagine si selectati Layer > New Layer > Other > Duplicate.
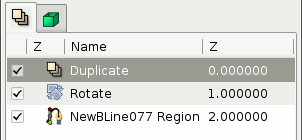
Acum nu este vizibila nici o modificare in imagine :). In caseta Layers Panel, asigurati-va ca straturile se afla in urmatoarea ordine: stratul Duplicat deasupra, stratul Rotire la mijloc si stratul "Ramura" dedesubt.
Conectarea tuturor straturilor
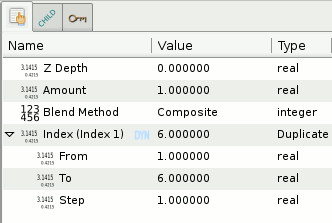
Selectati stratul Duplicat si alegeti caseta Params Panel/ro. Acolo se afla o valoare "Index" care este exportata automat. Numele acesteia este "Index 1". (Este afisata ca "Index(Index 1)" in caseta).
Aceasta valoare este realizata din 3 subparametri : From, To si Step.
Acesti parametri indica de cate ori este duplicat un obiect.
Avem nevoie de 6 ramuri, deci setati parametrul To la 6 (pastrati From si Step la 1).
Acum mutati caseta Children Panel, si selectati valoarea "Index 1". (Extindeti ValueBase Node daca este necesar).
Pentru a avea 6 ramuri rotite, avem nevoie sa legam impreuna duplicarea si rotirea.
Selectati stratul rotire - Rotate, si reveniti la caseta Params.
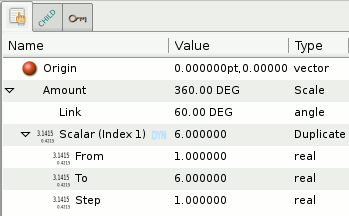
Stratul Rotate are 2 parametri: Origin si Amount. Cel mai important este Amount, care indica unghiul rotirii.
Dati click-buton-dreapta pe Amount si selectati Convert > Scale.
Acum Amount este compus din doi subparametri, Link (un unghi) si Scalar (numar real), intreaga rotire fiind egala cu Link * Scalar.
Setati subparametrul Link la 60 (that's the angle between the snowflake branches).
Right click on the Scalar parameter and select Connect. It will connect the previously selected "Index 1" value (in the Children panel) to the Scalar parameter.
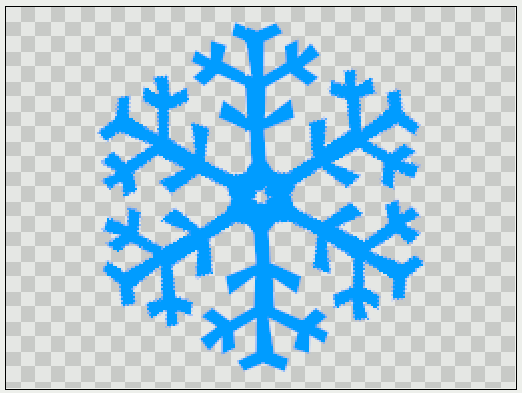
How it looks after the connection:
You should now have a complete snowflake, yay!
What happened?
We linked the "Scalar" value of the rotation to the duplicate layer:
Thanks to the Duplicate, the Scalar parameter was set to values between 1 and 6 (From and To), by steps of 1 - instead of being set to a single value.
So we had 5 rotations in addition to the original branche : One of 60° (Scalar * Link = 1 * 60°), another of 120° ( 2 * 60°), another of 180°, etc. And all of these rotations were displayed together.
You can think of the Duplicate Layer as something allowing you to have a list of values, that you can link to a (real) parameter in the same way you could link a single value to a parameter.