Difference between revisions of "Render dialog"
m (moved Doc:Render Dialog to Render dialog over redirect: Not Manual or Tutorial namespace. It belongs to Reference) |
m (Fixed some typos and cleaned a bit the first paragraph) |
||
| (30 intermediate revisions by 4 users not shown) | |||
| Line 1: | Line 1: | ||
<!-- Page info --> | <!-- Page info --> | ||
{{Title|Render Dialog}} | {{Title|Render Dialog}} | ||
| − | {{ | + | {{Category|Dialogs}} |
| + | {{Category|Render}} | ||
| + | {{TOCright}} | ||
| + | {{NewTerminology}} | ||
<!-- Page info end --> | <!-- Page info end --> | ||
| − | The Render | + | |
| − | It can be reached through the | + | {{Note|What rendering involve?|If you want to have a quick summary of what rendering an animation involve take a look to the {{l|Doc:Rendering_Walk_Through}} page}} |
| − | Let's have an in-depth look at it. | + | |
| − | + | The {{literal|Render Dialog}} lets you render your animation. | |
| − | *Target | + | It can be reached through the {{L|Canvas_Menu_Caret}} {{c|<File>|Render}}. |
| − | **Filename - Here you can set desired output filename and also a custom path to the | + | == Let's have an in-depth look at it.== |
| − | **Target - Set your output format. | + | |
| − | *Settings | + | ===Global information=== |
| − | **Quality - Set the quality of the | + | [[File:Render_settings_Dialog_current.png|frame|center]] |
| − | **Anti-Aliasing - Set the amount of anti-aliasing. Accepts values between 1 and 31 | + | |
| − | ** | + | *'''Target''' |
| − | Then there are three tabs, we're starting with; | + | **'''Filename''' - Here you can set the desired output filename and also a custom path to the rendered output. |
| − | + | **'''Target''' - Set your {{l|Render options|output format}}. Selecting {{Literal|Auto}} the format is decided by the filename suffix. If none is present png-format is default. | |
| − | + | *'''Settings''' | |
| − | + | **'''Quality''' - Set the quality of the rendering. Quality changes behavior of some layers, not all of them. For example Motion Blur layer renders more subsamples based on quality values in intervals. Quality '''3''' and '''1''' are mostly the same in all cases, so if '''3''' is enough, then leave it as '''3'''. | |
| − | + | ***Default quality is '''3'''. | |
| − | + | ***'''1''' is the highest quality but with the longest rendering time. | |
| − | + | ***'''9''' is the lowest quality but renders faster. | |
| − | + | ***'''0''' is even lower than '''9''' and seems to disable alpha channels as well. | |
| − | + | **'''Anti-Aliasing''' - Set the amount of anti-aliasing. Accepts values between '''1''' and '''31''', although values above '''3''' is very subtle improvements and hard to notice it's also '''hugely increases''' the rendering time. | |
| − | + | ***'''31''' is the highest anti-aliasing amout but with the longest rendering time. | |
| − | + | ***'''1''' is the lowest anti-aliasing amout but renders faster. | |
| − | + | **'''Render current frame only''' - With this ticked only one frame is rendered; the current one. | |
| − | + | ** {{RenderOptionExtractAlpha}} <!-- Use of Templace:RenderOptionExtractAlpha --> | |
| − | + | Then there are three tabs, we're starting with; | |
| − | {{ | + | |
| − | + | ===Image tab=== | |
| − | + | <!-- Use of Templace:PropertiesImageTab --> | |
| − | + | {{PropertiesImageTab}} | |
| − | + | ||
| − | + | ===Time tab=== | |
| − | {{l| | + | <!-- USe of Templace:PropertiesTimeTab --> |
| − | * | + | {{PropertiesTimeTab}} |
| − | + | ||
| − | + | ===Other tab=== | |
| − | + | <!-- Use of Template:PropertiesOtherTab --> | |
| − | + | {{PropertiesOtherTab}} | |
| − | + | ||
| − | + | == See Also== | |
| − | + | * Quick summary of what rendering involve : {{l|Doc:Rendering Walk Through}} | |
| − | + | * {{literal|How Do I}} section : {{l|Doc:How_Do_I#Render|How Do I:Render}} | |
| − | + | ||
Latest revision as of 20:03, 10 December 2019
|
What rendering involve? If you want to have a quick summary of what rendering an animation involve take a look to the Rendering Walk Through page
|
The "Render Dialog" lets you render your animation.
It can be reached through the Canvas Menu Caret "<File> → Render".
Let's have an in-depth look at it.
Global information
- Target
- Filename - Here you can set the desired output filename and also a custom path to the rendered output.
- Target - Set your output format. Selecting "Auto" the format is decided by the filename suffix. If none is present png-format is default.
- Settings
- Quality - Set the quality of the rendering. Quality changes behavior of some layers, not all of them. For example Motion Blur layer renders more subsamples based on quality values in intervals. Quality 3 and 1 are mostly the same in all cases, so if 3 is enough, then leave it as 3.
- Default quality is 3.
- 1 is the highest quality but with the longest rendering time.
- 9 is the lowest quality but renders faster.
- 0 is even lower than 9 and seems to disable alpha channels as well.
- Anti-Aliasing - Set the amount of anti-aliasing. Accepts values between 1 and 31, although values above 3 is very subtle improvements and hard to notice it's also hugely increases the rendering time.
- 31 is the highest anti-aliasing amout but with the longest rendering time.
- 1 is the lowest anti-aliasing amout but renders faster.
- Render current frame only - With this ticked only one frame is rendered; the current one.
- Extract Alpha - When checked, two videos files are rendered. The normal output file(s) indicated by Filename plus another(s) you can easily identify by the alpha suffix. This file(s) will contains the transparency data of your project that you can use as a mask when compositing.
- Quality - Set the quality of the rendering. Quality changes behavior of some layers, not all of them. For example Motion Blur layer renders more subsamples based on quality values in intervals. Quality 3 and 1 are mostly the same in all cases, so if 3 is enough, then leave it as 3.
Then there are three tabs, we're starting with;
Image tab
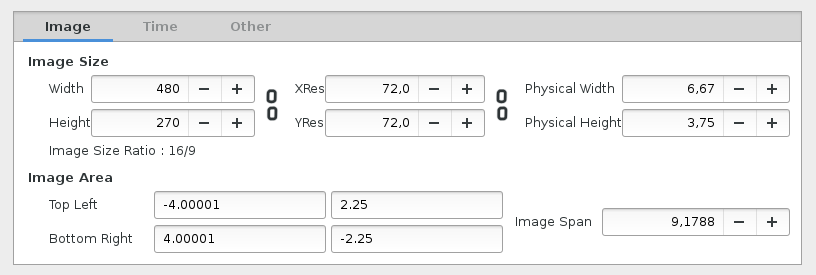
In the Image tab you can set:
- Image Size
- Width - set width of render in pixels.
- Height - set height of render in pixels.
-
 - Toggle button to fix pixel ratio.
 - XRes - set horizontal resolution to calculate the physical size (do not affect the size of the content).
- YRes - set vertical resolution to calculate the physical size (do not affect the size of the content).
-
 - Toggle button to fix resolution ratio.
 - Physical Width - set physical printing size of render. (Calculated from Width/XRes).
- Physical Height - set physical printing size of render. (Calculated from Height/YRes).
- Image Size Ratio - Label displaying the current image size ratio.
- Image Area - sets the portion of the workarea to be rendered.
- Top Left X/Y: - set where in the workarea top left of render starts.
- Bottom Right X/Y - set where in the workarea bottom right of render starts.
- Image Span - diagonal size of the portion of the workarea ("Top Left (X/Y)"² +"Bottom Right (X/Y)"² ="Image Span"² )
Time tab
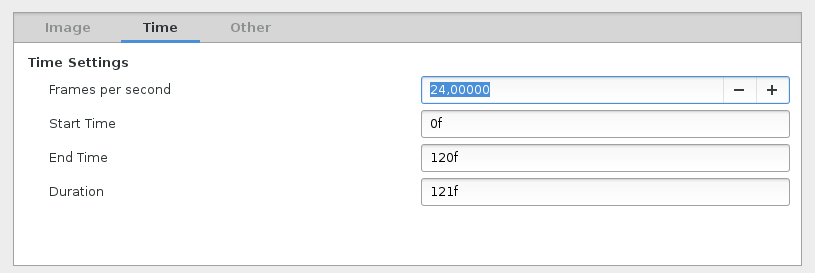
- Time Settings
- Frames per second - set render framerate. Only applicable when rendering to movie-file, not image sequences.
- Start Time - set where in your timeline rendered sequence will start.
- End Time - set where in your timeline rendered sequence will end.
- Duration - set the duration of the animation.
Other tab
TODO writeme (explain how to use "other tab" parameters and share info from Template:PropertiesOtherTab )
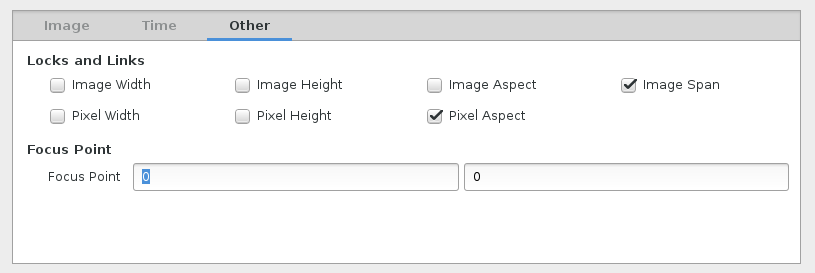
- Locks and Links
- Image Width
- Image Height
- Image Aspect
- Image Span
- Pixel Width
- Pixel Height
- Pixel Aspect
- Focus Point
- Focus Point X:/Y:
Resizing the Canvas
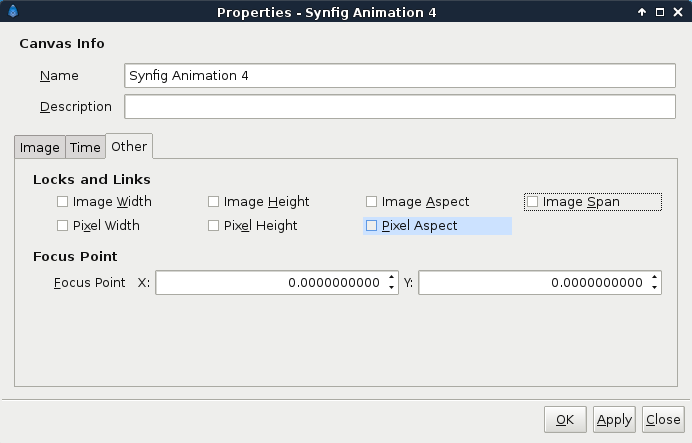
In the "Other" tab, uncheck all of the "Locks and Links":
Then edit Image "Width" and "Height". This will resize the canvas, stretching it's contents in the process.
Resizing the Canvas and keep aspect
In the "Other" tab, check "Image Aspect", "Image Span", "Pixel Aspect", in "Locks and Links".
Then edit Image "Width" and "Height". This will resize the canvas, adjusting it's contents keeping the aspect. That's mean that even if you change the "Image Size Ratio", a square before is a square after.
Expanding the Canvas
In the "Other" tab, check only "Pixel Aspect" in "Locks and Links":
Then edit Image "Width" and "Height". This will expand the canvas, keeping it's contents at the same size but adding extra space at the top/bottom and left/right.
Please note that since this dialog caused confusion, even among some very experienced people, here are some unofficial thoughts about image dimensions.
See Also
- Quick summary of what rendering involve : Rendering Walk Through
- "How Do I" section : How Do I:Render


