Creating Shapes
m |
m (update link) |
||
| (98 intermediate revisions by 18 users not shown) | |||
| Line 1: | Line 1: | ||
| − | + | <!-- Page info --> | |
| + | {{Title|Creating Shapes}} | ||
| + | {{Navigation|Category:Manual|Doc:Flower Animation}} | ||
| + | {{TOCright}} | ||
| + | {{Category|Manual}} | ||
| + | {{Category|Tutorials}} | ||
| + | {{Category|Tutorials Basic}} | ||
| + | {{Category|Updated}} | ||
| + | {{NewTerminology}} | ||
| + | <!-- Page info end --> | ||
| + | == Introduction == | ||
| − | + | Basic {{l|Primitive_Layer|primitives}} such as {{l|Circle Layer|circles}} or {{l|Rectangle Layer|rectangles}}, that we have learn to work with {{l|Doc:Adding_Layers|previously}}, are all great but they are pretty much geometrically inflexible. What about creating more complex shapes? To do this, we use the {{l|Spline Tool}}. | |
| − | + | == Spline Tool == | |
| − | + | In Synfig, the construct for describing shapes is called a Spline. This is roughly analogous to a "path" in other programs, except that it is strictly a [https://en.wikipedia.org/wiki/Cubic_Hermite_spline cubic hermite spline]. | |
| − | + | [[File:Toolbox Reset Colors Button_1_0.png|right|frame|Reset Colors button in the Toolbox]] Before we start with the Spline tutorial, let's look at some additional notes on how Synfig works. When you click on the {{l|Spline Tool}}, you will see that the handles from your currently selected object (if there was one) will disappear, but the layer(s) will still remain selected in the {{l|Layers Panel}}. This is normal. Anything you create with the Spline Tool will be inserted above the currently selected layer. Keep in mind that if you want to insert a shape somewhere, you should select where you want to insert it before you go into the Spline Tool — changing the selection afterward will automatically swap you back to the Transform Tool. | |
| − | + | Now, go ahead and click on the {{Literal|Reset Colors}} button in the lower left corner of the FG/BG color widget in the {{l|Toolbox|toolbox}}. This will reset us back to the default black and white. Also, set the {{l|Spline Tool#Options|line width}} to something nice and thick — 10pt should do the trick. | |
| + | |||
| + | After you switched to Spline Tool, take a look at the {{l|Tool Options Panel|Tool Options Panel}}. Make sure that only {{Literal|Create Region}}, {{Literal|Create Outline}} and {{Literal|Link Origins}} are checked. | ||
| + | |||
| + | Clicking with your mouse in the canvas will place vertices. While you are placing a vertex, you can drag out its tangent by dragging the mouse. Do this over and over, and you construct a Spline. | ||
| + | |||
| + | Keep in mind, however, that during this construction, there is nothing stopping you from just moving it if you don't like where you placed a vertex or a tangent. Honest! If you want to remove a vertex, right click on it and select {{Literal|Delete Vertex}}. Want to split the tangents? Right click on the tangent and hit {{Literal|Split Tangents}}. Want to loop the Spline? Right click on the first vertex and select {{Literal|Loop Spline}}. | ||
| + | |||
| + | [[Image:Creating-shapes-2-bline-construction.png|center|frame]] | ||
| + | |||
| + | When you are finished placing vertices, you must exit construction mode in order to actually create the Spline layer(s); there are 2 ways to do this: | ||
| + | #Switch to another tool. | ||
| + | #Press the {{Literal|Create}} button at the bottom of the Tool Options Panel (it's the icon that looks like a gear). | ||
| + | For now, just go ahead and switch to the {{l|Transform Tool}}, because we are done with the Spline Tool. | ||
| + | |||
| + | [[Image:Creating-shapes-3-bline-region-outline.png|center|frame]] | ||
| + | |||
| + | == Editing Splines == | ||
| + | |||
| + | Ok, we now have a nice pretty white region with a thick black outline. Since we checked {{Literal|Create Region}} and {{Literal|Create Outline}} in previous steps, you'll notice that there are two layers that we have created — the {{l|Outline Layer|Outline}} and the {{l|Region Layer|Region}} in the Layers Panel. Despite the fact that they are two separate layers, their vertices parameter has already been {{l|Linking|linked}} — so you can select either one and move its handles around and the other one will also change. | ||
| + | |||
| + | If you want to manipulate the vertices ''after'' you have created the layers, it is very easy to do so. Just click on one of the layers and have at it. If you want to remove a vertex, right click on it and hit {{Literal|Remove Item (smart)}}. Want to insert a point somewhere? Right click on the segment where you want to insert something and hit {{Literal|Insert item (smart)}}. | ||
| + | |||
| + | This may appear to be leading to a mess of layers. And yes, if you aren't using the software properly, that is exactly what you will get. But there is a way to make this more sane. As mentioned in the {{l|Doc:Adding Layers|previous tutorial}}, you can {{l|group|group}} layers into hierarchy. | ||
| + | |||
| + | One quick thing to mention before I finish up. You can change the width of an outline at each vertex. You do this by selecting the outline layer (NOTE: you must select the Outline Layer, the Region Layer has no width data) and tweaking with the width handles. By default, these are masked. To show them, press {{Shortcut|alt|5}} or click {{Literal|Toggle width handles}} button at the top of the canvas window (the fifth one from the left). Repeat to hide them again. You can also see other things to mask via the {{l|Canvas Menu Caret}}: {{c|View|Show/Hide Handles}}. | ||
| + | |||
| + | == Using tablet to draw shapes == | ||
| + | |||
| + | If you have a [http://en.wikipedia.org/wiki/Graphics_tablet graphic tablet] you can use Draw Tool to create Splines. | ||
| + | |||
| + | Synfig Studio supports pressure sensitivity, but you need to configure it first. Go to {{c|File|Input Devices...}} from toolbox menu. In the {{Literal|Input}} dialog find your tablet's stylus device and set its {{Literal|Mode}} to {{Literal|Screen}}. Click {{Literal|Save}} and then {{Literal|Close}}. | ||
| + | |||
| + | Now grab your stylus, create a new file and click on the Draw Tool button in the toolbox. Set the default line width value to be big enough — say, 15pt — otherwise you will not notice any pressure sensitivity effect. Choose brown as the {{l|New_Layer_Defaults#Brush_Colors|default fill color}}. | ||
| + | |||
| + | {{Note|Note|Steps above should be done with the stylus of your tablet, not the mouse. Synfig Studio remembers settings for each input device independently. That's why if you set those options with your mouse device they will not have any effect when you switch to stylus.}} | ||
| + | In the Tool Options Panel, make sure that you have the same options as shown on the screenshot below. | ||
| + | |||
| + | [[File:DrawToolOptions.png|center|frame]] | ||
| + | |||
| + | Now let's draw some thing like a curvy mountain background. Start drawing a line from the left border to the middle of the canvas. Try to vary your stylus pressure while you are drawing. Stop near the center of the canvas. This is your first line. Notice the new outline layer created in the Layers Panel. | ||
| + | |||
| + | [[Image:Creating-shapes-4-draw.png|center|frame]] | ||
| + | |||
| + | Point your stylus at the last handle of your new Spline and continue drawing to the right border of the canvas. When you finish, look at the Layers Panel again. There's still only one outline layer. Synfig Studio is smart enough to figure out that you don't need a new outline layer and properly extends the last one. You can extend the Spline from both ends, but if you start drawing from any other place of the canvas a new outline layer will be created. Though your first line will remain selected and nothing stops you from extending it later. | ||
| + | |||
| + | Back to our artwork. In the Tool Panel hit the button with the bucket icon to fill the outline we just created. A region layer will appear at the top of the layer we are working with. Select the outline layer and press the {{Literal|Raise Layer}} button in the layers panel to put the outline layer on top of the region. | ||
| + | |||
| + | [[Image:Creating-shapes-5-draw.png|center|frame]] | ||
| + | |||
| + | Extend a line from both sides down to the corners of the canvas to make the fill appear at the bottom. Great. | ||
| + | |||
| + | [[Image:Creating-shapes-6-draw.png|center|frame]] | ||
| + | |||
| + | Go ahead and add a few more lines on top of the filled area to give it a mountain-like look. If brown handles are in your way, you can hide them by clicking the {{Literal|Toggle vertex handles}} button at the top of the canvas window (the second one from the left). | ||
| + | |||
| + | [[Image:Creating-shapes-7-draw.png|center|frame]] | ||
| + | |||
| + | Draw tool is great for drawing complex shapes, but you end up with a bunch of handles, which are hard to manipulate with the Transform Tool in the way we described above. There are two solutions here. | ||
| + | |||
| + | First, you can increase the {{Literal|Smooth}} value in the Tool Options Dialog while using Draw Tool. That will reduce the count of vertices produced at drawing time, but will make your shape less detailed. | ||
| + | |||
| + | Second, you can use Smooth Move Tool to deform an existing shape. Go for it and click the Smooth Move Tool button in the toolbox. The trick about this tool is that it affects ''selected handles only''. Press and hold your left mouse button in an empty place of the canvas. Drag to create a selection box. Release the mouse button when you are done. Or just hit {{Shortcut|Ctrl|a}} to select all handles. Now you can deform the selected segments of Spline. You can change the size of the influence area by tweaking {{Literal|Radius}} in the Tool Options Panel. | ||
| + | |||
| + | What about outline width? There is a Width Tool for that purpose. It is designed for increasing or decreasing the width of a line much like you would with a pencil on paper. Click the Width Tool button in the toolbox, move your stylus over the line you want to change, press and move the cursor back and forth along the line, like you are scratching something. The width of the outline will be increased at the places where you moved the cursor. If you want to decrease the width, just hold "Ctrl" while scratching. Easy! | ||
| + | |||
| + | If you don't want width handles to be displayed, during usage of the Width Tool, just turn them off by pressing the {{Literal|Toggle width handles}} button at the top of the canvas window. | ||
| + | |||
| + | == Other ways to create Splines == | ||
| + | |||
| + | Is that all? Not yet. You can use Circle, Rectangle, Star and Polygon tools to create Splines too. Just check the {{Literal|Create Outline}} and {{Literal|Create Region}} options in the Tool Options Panel when using those tools. | ||
| + | |||
| + | Creating geometric primitive as Spline gives you a better control over it's shape and look. For example, if you want a deformed star, then you can use the Star Tool to create it as outline and region Splines and then use the Transform Tool to deform it. | ||
| + | |||
| + | Now you are ready for the {{L|Doc:Flower Animation|last tutorial}} in this section. Hang on! | ||
| + | |||
| + | == Links == | ||
| + | |||
| + | A video on this subject is available [https://youtu.be/FBnBE9t3Jd8 here] | ||
| + | |||
| + | |||
| + | {{Navigation|Category:Manual|Doc:Flower Animation}} | ||
Latest revision as of 18:08, 31 July 2019
Introduction
Basic primitives such as circles or rectangles, that we have learn to work with previously, are all great but they are pretty much geometrically inflexible. What about creating more complex shapes? To do this, we use the Spline Tool.
Spline Tool
In Synfig, the construct for describing shapes is called a Spline. This is roughly analogous to a "path" in other programs, except that it is strictly a cubic hermite spline.
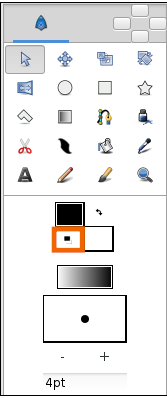
Before we start with the Spline tutorial, let's look at some additional notes on how Synfig works. When you click on the Spline Tool, you will see that the handles from your currently selected object (if there was one) will disappear, but the layer(s) will still remain selected in the Layers Panel. This is normal. Anything you create with the Spline Tool will be inserted above the currently selected layer. Keep in mind that if you want to insert a shape somewhere, you should select where you want to insert it before you go into the Spline Tool — changing the selection afterward will automatically swap you back to the Transform Tool.Now, go ahead and click on the "Reset Colors" button in the lower left corner of the FG/BG color widget in the toolbox. This will reset us back to the default black and white. Also, set the line width to something nice and thick — 10pt should do the trick.
After you switched to Spline Tool, take a look at the Tool Options Panel. Make sure that only "Create Region", "Create Outline" and "Link Origins" are checked.
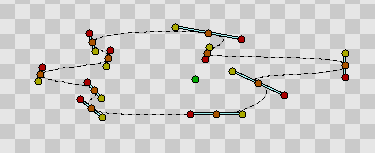
Clicking with your mouse in the canvas will place vertices. While you are placing a vertex, you can drag out its tangent by dragging the mouse. Do this over and over, and you construct a Spline.
Keep in mind, however, that during this construction, there is nothing stopping you from just moving it if you don't like where you placed a vertex or a tangent. Honest! If you want to remove a vertex, right click on it and select "Delete Vertex". Want to split the tangents? Right click on the tangent and hit "Split Tangents". Want to loop the Spline? Right click on the first vertex and select "Loop Spline".
When you are finished placing vertices, you must exit construction mode in order to actually create the Spline layer(s); there are 2 ways to do this:
- Switch to another tool.
- Press the "Create" button at the bottom of the Tool Options Panel (it's the icon that looks like a gear).
For now, just go ahead and switch to the Transform Tool, because we are done with the Spline Tool.
Editing Splines
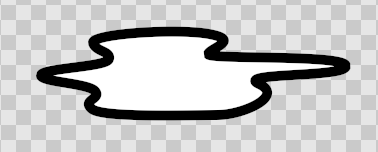
Ok, we now have a nice pretty white region with a thick black outline. Since we checked "Create Region" and "Create Outline" in previous steps, you'll notice that there are two layers that we have created — the Outline and the Region in the Layers Panel. Despite the fact that they are two separate layers, their vertices parameter has already been linked — so you can select either one and move its handles around and the other one will also change.
If you want to manipulate the vertices after you have created the layers, it is very easy to do so. Just click on one of the layers and have at it. If you want to remove a vertex, right click on it and hit "Remove Item (smart)". Want to insert a point somewhere? Right click on the segment where you want to insert something and hit "Insert item (smart)".
This may appear to be leading to a mess of layers. And yes, if you aren't using the software properly, that is exactly what you will get. But there is a way to make this more sane. As mentioned in the previous tutorial, you can group layers into hierarchy.
One quick thing to mention before I finish up. You can change the width of an outline at each vertex. You do this by selecting the outline layer (NOTE: you must select the Outline Layer, the Region Layer has no width data) and tweaking with the width handles. By default, these are masked. To show them, press Alt5 or click "Toggle width handles" button at the top of the canvas window (the fifth one from the left). Repeat to hide them again. You can also see other things to mask via the Canvas Menu Caret: "View → Show/Hide Handles".
Using tablet to draw shapes
If you have a graphic tablet you can use Draw Tool to create Splines.
Synfig Studio supports pressure sensitivity, but you need to configure it first. Go to "File → Input Devices..." from toolbox menu. In the "Input" dialog find your tablet's stylus device and set its "Mode" to "Screen". Click "Save" and then "Close".
Now grab your stylus, create a new file and click on the Draw Tool button in the toolbox. Set the default line width value to be big enough — say, 15pt — otherwise you will not notice any pressure sensitivity effect. Choose brown as the default fill color.
|
Note Steps above should be done with the stylus of your tablet, not the mouse. Synfig Studio remembers settings for each input device independently. That's why if you set those options with your mouse device they will not have any effect when you switch to stylus.
|
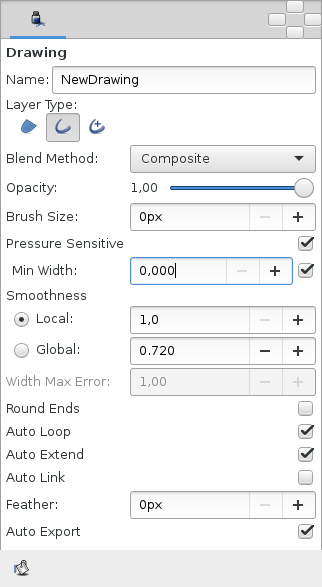
In the Tool Options Panel, make sure that you have the same options as shown on the screenshot below.
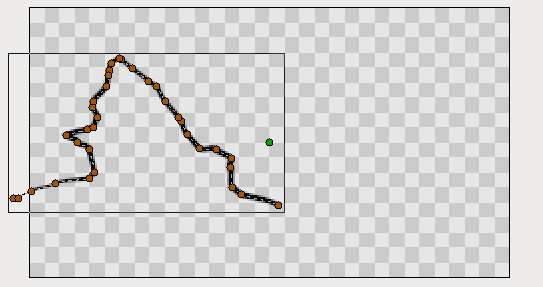
Now let's draw some thing like a curvy mountain background. Start drawing a line from the left border to the middle of the canvas. Try to vary your stylus pressure while you are drawing. Stop near the center of the canvas. This is your first line. Notice the new outline layer created in the Layers Panel.
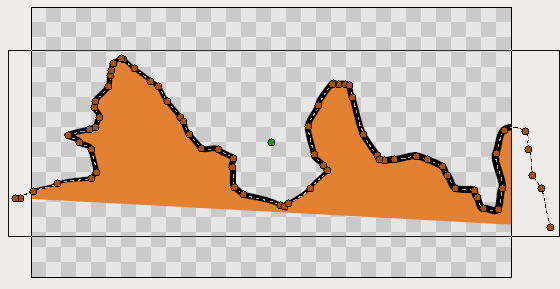
Point your stylus at the last handle of your new Spline and continue drawing to the right border of the canvas. When you finish, look at the Layers Panel again. There's still only one outline layer. Synfig Studio is smart enough to figure out that you don't need a new outline layer and properly extends the last one. You can extend the Spline from both ends, but if you start drawing from any other place of the canvas a new outline layer will be created. Though your first line will remain selected and nothing stops you from extending it later.
Back to our artwork. In the Tool Panel hit the button with the bucket icon to fill the outline we just created. A region layer will appear at the top of the layer we are working with. Select the outline layer and press the "Raise Layer" button in the layers panel to put the outline layer on top of the region.
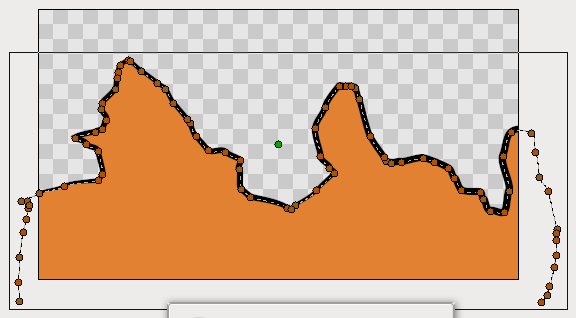
Extend a line from both sides down to the corners of the canvas to make the fill appear at the bottom. Great.
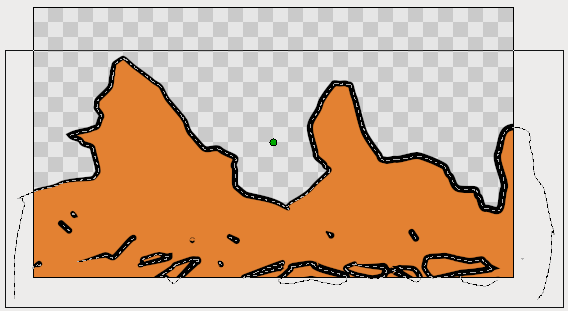
Go ahead and add a few more lines on top of the filled area to give it a mountain-like look. If brown handles are in your way, you can hide them by clicking the "Toggle vertex handles" button at the top of the canvas window (the second one from the left).
Draw tool is great for drawing complex shapes, but you end up with a bunch of handles, which are hard to manipulate with the Transform Tool in the way we described above. There are two solutions here.
First, you can increase the "Smooth" value in the Tool Options Dialog while using Draw Tool. That will reduce the count of vertices produced at drawing time, but will make your shape less detailed.
Second, you can use Smooth Move Tool to deform an existing shape. Go for it and click the Smooth Move Tool button in the toolbox. The trick about this tool is that it affects selected handles only. Press and hold your left mouse button in an empty place of the canvas. Drag to create a selection box. Release the mouse button when you are done. Or just hit CtrlA to select all handles. Now you can deform the selected segments of Spline. You can change the size of the influence area by tweaking "Radius" in the Tool Options Panel.
What about outline width? There is a Width Tool for that purpose. It is designed for increasing or decreasing the width of a line much like you would with a pencil on paper. Click the Width Tool button in the toolbox, move your stylus over the line you want to change, press and move the cursor back and forth along the line, like you are scratching something. The width of the outline will be increased at the places where you moved the cursor. If you want to decrease the width, just hold "Ctrl" while scratching. Easy!
If you don't want width handles to be displayed, during usage of the Width Tool, just turn them off by pressing the "Toggle width handles" button at the top of the canvas window.
Other ways to create Splines
Is that all? Not yet. You can use Circle, Rectangle, Star and Polygon tools to create Splines too. Just check the "Create Outline" and "Create Region" options in the Tool Options Panel when using those tools.
Creating geometric primitive as Spline gives you a better control over it's shape and look. For example, if you want a deformed star, then you can use the Star Tool to create it as outline and region Splines and then use the Transform Tool to deform it.
Now you are ready for the last tutorial in this section. Hang on!
Links
A video on this subject is available here
