Повторное использование анимации
|
Warning! This page contains outdated information. The release of Synfig Studio 0.64.0 introduced new terminology and this translated page needs to be updated according to original English text. You can help updating this page - see instructions here. Thank you! |
Введение
Одна из целей любого аниматора (особенно таково ленивого как я) это иметь возможность использовать участки анимации вновь. Это позволяет сохранить много времени ведь вы можете вставить уже готовые куски анимации в любом другом месте где это может понадобится.
Особенно такая возможность актуальна для создания говорящего персонажа, ведь нужно создавать повторяющиеся положения рта для каждого соответствующего звука.
Вновь использовать анимацию можно используя вместе Ключевые кадры keyframes и экспорт холста.
Ключевые кадры
Наша цель записать какую либо анимацию и использовать её потом. Это может быть сделано с помощью ключевых кадров. Если вы создаёте ключевые кадры в начале анимации вы можете использовать "позиции" сохранённые в них на другом участке времени, просто скопировав их и вставив там где это нужно. Для этого нужно сделать следующее:
- Создайте Ключевой кадр на нужном месте (все ваши ключевые кадры должны быть созданы рядом друг с другом чтобы захватывать небольшой участок времени, мы должны записать "позицию", а не переход).
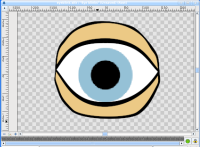
- Измените ваши объекты как вам нужно (например "закройте" нарисованный глаз просто переместив точки на веке).
- Дайте Ключевому кадру название кликнув на строчку "Описание".
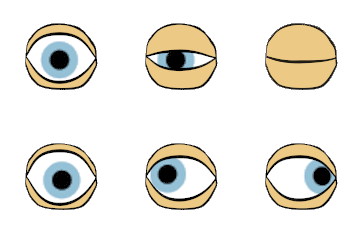
- Повторите эти шаги столько раз сколько нужно чтобы создать новую "позицию". Скажем вы создали ключевой кадр на кадре номер 2 (Глаз открыт) и номер 4 (Глаз закрыт).
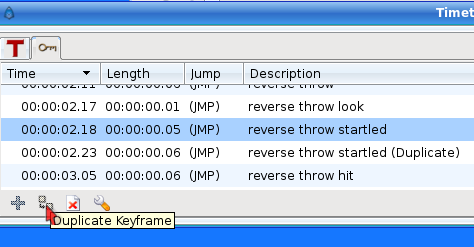
- Сделав это переместитесь на другой кадр с помощью Шкалы Времени time cursor, выделите Ключевой кадр который хотите вставить и нажмите кнопку "Создать копию ключевого кадра" (Duplicate keyframe). Теперь у вас есть копия выделенного Ключевого кадра на текущей позиции шкалы времени time cursor.
There is a problem with this technique. You are making copies of the entire animation poses that you have stored in the first keyframes of the time (frames 2 and 4 of the sample) and therefore you have made copies of all the other objects existing in the scene (following the example, the eyeball).
If you already have an eyeball animation recorded and you overlap an eyeblink (open and closed) set of keyframes in the middle, then the eyeball animation would be broken by the insertion of the copies of the eyelid movement keyframes.
Exporting the Canvas Parameter
Every time you encapsulate a group of layers you obtain a Paste Canvas layer called "Inline Canvas" that is a special layer that holds other layers inside and prevents the composition of the inner layers over the other layers outside of it, that are outside of its scope.
One of the parameters of the encapsulate layer is the Canvas. The canvas is like a workspace that represents all the layers that are held by the encapsulation layer.
To avoid the problem described in the previous section (the keyframes affecting all the objects in the scene) you can do following:
- Before creating the keyframe poses of the eyelids, encapsulate all the layers that form the eyelids inside a Paste Canvas layer.
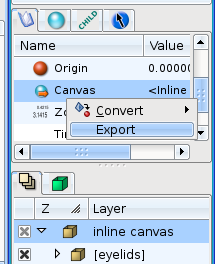
- Then select the encapsulated layer and select the Canvas parameter in the Parameter Dialog.
- Right click the Canvas parameter, export it, and give it a name (in the sample this will be "eyelids").
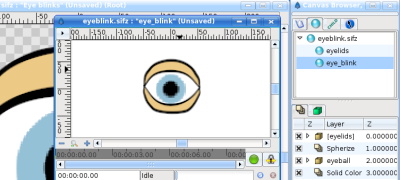
Once exported you can go to the Canvas Browser Panel and select the just exported canvas.
Double click it and a new workarea window will open with just the layers that were encapsulated on the step 1 - the "eyelids" canvas in the sample.
Now you can create all the keyframes you need to store your "poses". Once done you can go to the proper frame and insert a copy of the pose keyframe. It will produce a keyframe in the "eyelids" canvas, but will not produce any keyframe on the other layers (for example the eyeball). This allows you independently animate of a portion of your model, separate from the rest of it. Be sure that the exported canvas must be as longer as the animation.
Now once you have stored the eye blinks (open and closed) at the desired position you can go to the main window (just close the "eyelids" canvas workarea). You'll see that all the modifications have been transmitted to the main animation but they haven't created any keyframes in the main workarea. Even the layers that are inside the "eyelids" encapsulated layer don't have any keyframes (you can see an indication that there are keyframes in the exported canvas - dashed vertical lines - but no keyframe is displayed in the keyframe dialog). Anyway, you can see the waypoints created by the keyframes and tweak them, but not the keyframes themselves. To modify the keyframes you should edit the exported canvas again in its own workarea. If you modify the encapsulated layers from the main workarea, waypoints will be created according to the main workarea's keyframes, not the exported canvas' workarea, so you will get different effects depending upon which workarea you use to modify the encapsulated layers.
Now, once you have created your animation of the eyelids you can go to the eyeball and modify it to your taste, inserting keyframes or waypoints with no worries about interfering with the eyelid animation. Also you can animate the eyeball before and make the animation of the eyelids later. They won't interfere with each other.
It would be a great improvement if you could connect the time cursors of the main workarea and the exported paste canvas' workarea to show both windows at the same current time. This would give feedback on where to insert the 'pose' keyframes in your local animation.
A sample
Here you can find a sample animation of a blinking eye (the closed and open positions are copies of the keyframes "Open" and "Closed", while the eyeball moves independently in its own animation.
I have stored the poses "Open" and "Closed" at frames 0 and 2. The animation is defined to start at frame 6.
All comments are welcome.

