Doc:Reuse Animations/es
|
Warning! This page contains outdated information. The release of Synfig Studio 0.64.0 introduced new terminology and this translated page needs to be updated according to original English text. You can help updating this page - see instructions here. Thank you! |
Introducción
Uno de los deseos de todo animador (especialmente los vagos como yo) es contar con la posibilidad de reutilizar trozos de animación. Esto ahorra mucho tiempo al poder usar porciones de animación previamente grabadas en otro momento, sin tenerlas que definir nuevamente.
Es especialmente útil para hacer que tus personajes hablen, ya que debes mover su boca en ciertas posiciones definidas dependiendo de los fonemas que describe mientras habla.
Todo esto puede hacerse fácilmente usando una combinación de "keyframes" (fotogramas clave) y "exported canvases". (lienzos exportados)
Keyframes
Lo que queremos hacer es grabar alguna animación y volverla a usar luego. Esto puede hacerse mediante el uso de keyframes. Si creas algunos de estos al comienzo de tu trabajo, puedes volver a usar esos "gestos" o "posturas" en otro punto de la línea de tiempo, sólo copiando los keyframes en otra posición temporal. Puedes hacerlo siguiendo estos pasos:
- Crea un Keyframe (todos los keyframes deberían ser creados muy cerca entre sí para usar solo un pequeño intervalo de tiempo. Recuerda que solo queremos grabar gestos y no transiciones.)
- Modifica los objetos a su voluntad (por ejemplo, para cerrar un ojo, solo mueva los puntos del párpado.)
- Nombra al Keyframe, haciendo click en su correspondiente campo de descripción.
- Repite los pasos anteriores cuanto sea necesario para crear todos los "gestos" o "posturas". Supongamos que hayas creado Keyframes en los fotogramas 2 (ojo abierto) y 4 (ojo cerrado)
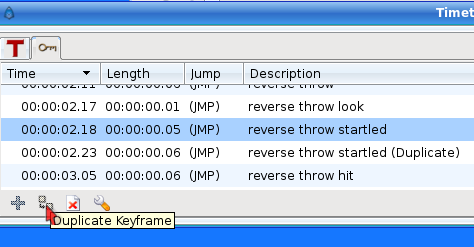
- Una vez hecho todo, muévase a otro fotograma con el time cursor (cursor de tiempo), selecciona el keyframe que quieras introducir y presione el botón "duplicate keyframe" (Duplicar Keyframe). Obtendrás una copia de el keyframe seleccionado en la posición en la que se encuentre el cursor de tiempo.
There is a problem with this technique. You are making copies of the entire animation poses that you have stored in the first keyframes of the time (frames 2 and 4 of the sample) and therefore you have made copies of all the other objects existing in the scene (following the example, the eyeball).
If you already have an eyeball animation recorded and you overlap an eyeblink (open and closed) set of keyframes in the middle, then the eyeball animation would be broken by the insertion of the copies of the eyelid movement keyframes.
Exporting the Canvas Parameter
Every time you encapsulate a group of layers you obtain a Paste Canvas layer called "Inline Canvas" that is a special layer that holds other layers inside and prevents the composition of the inner layers over the other layers outside of it, that are outside of its scope.
One of the parameters of the encapsulate layer is the Canvas. The canvas is like a workspace that represents all the layers that are held by the encapsulation layer.
To avoid the problem described in the previous section (the keyframes affecting all the objects in the scene) you can do following:
- Before creating the keyframe poses of the eyelids, encapsulate all the layers that form the eyelids inside a Paste Canvas layer.
- Then select the encapsulated layer and select the Canvas parameter in the Parameter Dialog.
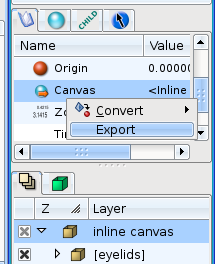
- Right click the Canvas parameter, export it, and give it a name (in the sample this will be "eyelids").
Once exported you can go to the Canvas Browser Panel and select the just exported canvas.
Double click it and you a new workarea window will open with just the layers that were encapsulated on the step 1 - the "eyelids" canvas in the sample.
Now you can create all the keyframes you need to store your "poses". Once done you can go to the proper frame and insert a copy of the pose keyframe. It will produce a keyframe in the "eyelids" canvas, but will not produce any keyframe on the other layers (for example the eyeball). This allows you independently animate of a portion of your model, separate from the rest of it.
Now once you have stored the eye blinks (open and closed) at the desired position you can go to the main window (just close the "eyelids" canvas workarea). You'll see that all the modifications have been transmitted to the main animation but they haven't created any keyframes in the main workarea. Even the layers that are inside the "eyelids" encapsulated layer don't have any keyframes (you can see an indication that there are keyframes in the exported canvas - dashed vertical lines - but no keyframe is displayed in the keyframe dialog). Anyway, you can see the waypoints created by the keyframes and tweak them, but not the keyframes themselves. To modify the keyframes you should edit the exported canvas again in its own workarea. If you modify the encapsulated layers from the main workarea, waypoints will be created according to the main workarea's keyframes, not the exported canvas' workarea, so you will get different effects depending upon which workarea you use to modify the encapsulated layers.
Now, once you have created your animation of the eyelids you can go to the eyeball and modify it to your taste, inserting keyframes or waypoints with no worries about interfering with the eyelid animation. Also you can animate the eyeball before and make the animation of the eyelids later. They won't interfere with each other.
It would be a great improvement if you could connect the time cursors of the main workarea and the exported paste canvas' workarea to show both windows at the same current time. This would give feedback on where to insert the 'pose' keyframes in your local animation.
A sample
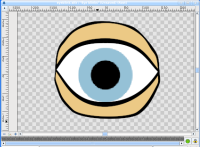
Here you can find a sample animation of a blinking eye (the closed and open positions are copies of the keyframes "Open" and "Closed", while the eyeball moves independently in its own animation.
I have stored the poses "Open" and "Closed" at frames 0 and 2. The animation is defined to start at frame 6.

All comments are welcome.


