Image clé
Cette page est en cours de traduction - Soyez patient et/ou participez !
Contents
Une image clé, c'est quoi?
Une image clé c'est basiquement une "repère" dans l'axe de temps. Ce repère permet à l'utilisateur de signaler à Synfig de se souvenir de l'état de l'animation à ce point précis (image). Cela signifie que l'image clé est comme une étiquette qui indique à Synfig que cette image doit être prise en compte lors de la création des points de passages. Cela indique aussi que cette image qui à été repérée est une image spéciale dans laquelle les informations de tout les paramètres de chaque calque sont enregistrés dans le but de les utiliser ultérieurement.
Chaque image clé est associé avec sa propre image est un image peut avoir uniquement une seul image clé.
A quoi ressemble une image clé?
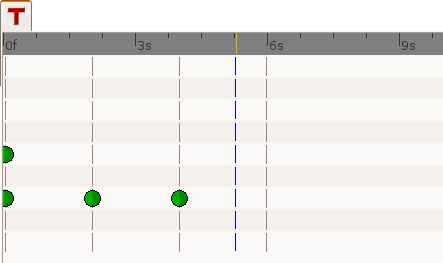
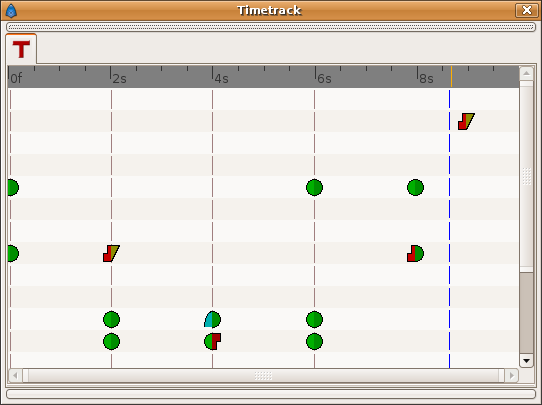
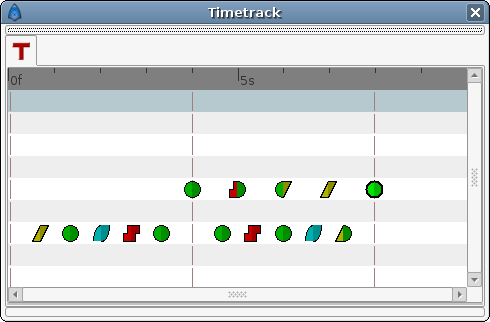
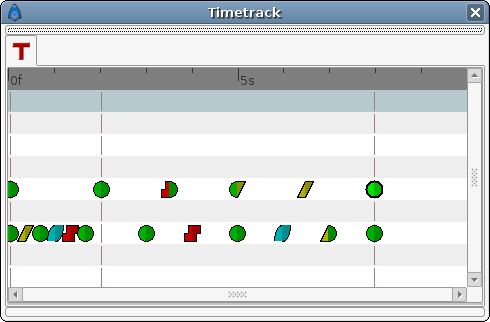
Une image clé ressemble, dans le Time Track Panel, à une ligne verticale pointillé de couleur marron clair situé à l'image correspondante. Vous pouvez la différencier du curseur de temps par sa couleur (le curseur de temps est bleu).
Les points vert que l'on voit dans l'image sont des points de passage.
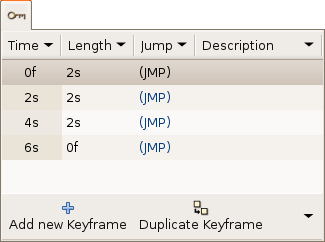
Les images clés apparaissent également dans une liste dans le Keyframes Panel (dialogue keyframe a revoir afin de mieux expliquer les colonnes de la boite de dialogue)
Images clés et points de passages
Une image clé n'implique pas nécessairement un point de passage, et inversement (un point de passage n'implique pas forcement une image clé) .
Un image clé peut vivre sa vie sans aucun point de passage, elle enregistre toutes les valeurs des paramètres de cette image spécifique. Si il y a un point de passage à cette endroit, alors l'information (uniquement la valeur paramètre) du point de passage est aussi enregistré. Si aucun point de passage n'est présent à l'endroit de l'image clé alors les valeurs "stocké" sont le résultat des points de passages environnants, valeurs des paramètres et valeurs d'interpolation que les points de passage possèdent. Cela signifie qu'une image clé se souvient de la valeurs des paramètres a l'endroit de l'image mais ne les conserve pas statiquement. Pour maintenir statique une valeur de paramètre dans une certaine image, vous devez utiliser un point de passage.
La création d'un point de passage peut provoquer la création de nouveau points de passages dans l'image clé voisine suivant la valeur de la condition Editing Lock Keyframes. Ainsi, possiblement, la création d'un point de passage (en modifiant un paramètre, en collant ou déplaçant un point de passage ou même en dupliquant une image clé) peut entrainer la création d'un point de passage dans la l'image clé qui est immédiatement avant ou après l'image possédant le point de passage. Les points de passages crées dans le voisinage d'images clés le sont en accord avec les valeurs d'interpolation par défaut de la fenêtre d'outils.
Voir les [[1]] afin de comprendre comment cela fonctionne.
Ajouter, dupliquer et supprimer des images clés
Ajouter une image clé
Positionnez le curseur de temps sur une image dans laquelle aucune image clé n'existe. Ensuite, appuyer sur le bouton "Add new Keyframe". Si vous positionnez le curseur de temps sur une image dans laquelle une image clé existe, alors le bouton "Add new Keyframe" est désactivé. Une fois que vous avez pressé le bouton, une nouvelle entré est ajouté dans la liste des images clé et un ligne pointillé vertical est ajouté dans l'axe de temps.
Dupliquer une image clé
Select a keyframe in the keyframe list of the Keyframes Panel and place the cursor at a frame where there isn't currently any keyframe. Then press the Duplicate Keyframe button. This would have two separated effects:
- If there is a waypoint at the original keyframe then the waypoint is duplicated. Its duplication includes the parameter value and its interpolation types.
- If there is no waypoint in the original keyframe for any particular parameter then two things could happen:
- There is no waypoint for that parameter at ANY frame in the time line: Then NO waypoint is created.
- If there is a waypoint in the time line for that parameter, but not in the keyframe that is going to be duplicated, then in the duplicated keyframe is created a new waypoint with a value for the parameter of the result of the current value at the original keyframe and a TCB Smooth interpolation type for both "In" and "Out".
Of course, duplicate a keyframe will produce a new keyframe at the place pointed by the time cursor and will add a new one to the keyframe list in the proper place. In the keyframe list, the new added keyframe have the same description than the original, plus a "(Duplicate)" at the end.
Remove a keyframe
Just select a keyframe from the keyframe list and press the Remove keyframe button. It will remove the keyframe and all the waypoints for all parameters for all layers that are currently there.
NOTE: If you move a keyframe by modifying its time in the keyframe list dialog and immediately press the Remove Keyframe button then the waypoints are not deleted. It seems to be a bug but also can be considered a feature if you really want to keep the waypoints and not the keyframe.
Editing keyframes: time, length & description
You can see in the Keyframe list dialog that there are four headers on it:
- Time
- Length
- Jump
- Description
The Jump column is only a shourt cut to place the time cursor at the keyframe where you make a click in the (JMP) label.
Time
You can modify the time (frame) where the keyframe is placed just making a click in the corresponding Time cell. It will allow modify the time forward or backward the amount that you want. If you try to set the time of a certain keyframe to be the same time of another existing keyframe then the program gives you this message:
keyframe_set: Cannot change keyframe time because another keyframe already exists with that time.
Modifying the Time of a keyframe has the following effects:
- The existing waypoints in the keyframe will move to the new position.
- If any parameter have a a waypoint in the time line, then the moved keyframe will have a new waypoint set to TCB Smooth on those paramter(s).
- According to the default interpolation method and the Lock Keyframes status and to the parameters that have any waypoint in the time line, new waypoints will be created on the neighbouring keyframes of the destiny time (frame). The original neighbouring keyframes will be untouched if don't coincide with the destiny neighbouring keyframes.
- If a keyframe is displaced and doesn't "jump" over other existing keyframe then the waypoints that are surrounding the original position of the moved keyframe are compressed and / or expanded in the timeline depending on the displacement of the keyframe. See the examples. This is a recent discovered behaviour
See the example to see how that works.
Length
Length parameter sets the time the keyframe is exposed in the timeline until next keyframe. Changing the parameter shifts all following keyframes and waypoints forward or backwards.
Description
This cell allow the user insert a short description of the meaning of the keyframe. Just make click on it and change the text.
Editing Keyframe Properties
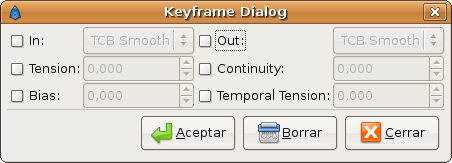
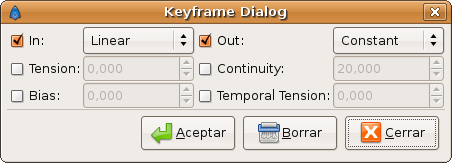
The Keyframe Properties dialog allows change the interpolation method for all the waypoints on the keyframe at the same time. Even if, for a certain parameter, there is no waypoint on the keyframe but the parameter have other waypoints in the time line, then when you apply the Keyframe Properties you will add a waypoint at that keyframe were there aren't currently any waypoint. The added waypoints have the interpolation methods stated by the dialog. It means that the Keyframe Properties dialog will modify the interpolation methods for all the parameters that have any waypoint in the time line.
The dialog have the following parameters:
- In: Checking this value you can change the interpolation method of the left part of the waypoints of the current selected keyframe of all the layers of the canvas to the selected interpolation method in the drop down menu.
- Out: Same but for the right part of the waypoint.
- Tension: See TCB
- Bias: See TCB
- Continuity: See TCB
- Temporal Tension: See TCB
You can check only one of both "In" or "Out" check boxes to only affect the change to the left or right part of the waypoints. The non checked part would not be modified. Same comment applies for the Manual interpolation method parameters (Tension, Bias, Continuity and Temporal Tension)
This dialog would not affect what's the interpolation method for a new waypoint created by the user, automatically created by the keyframe duplication or by the lock keyframe state. The interpolation methods for new waypoints created in those cases will be both the same (In and Out or Left and Right) and depend only on the Default interpolation method of the Tool Box window.
See the examples to understand better how it works.
Exemples
Duplicate a keyframe with no waypoint on it
For example, imagine that you have following set of keyframes and waypoints and the corresponding parameter of the radius of a circle:
| Frame | Keyframe | Waypoint | Radius | Interpolation |
|---|---|---|---|---|
| 0s | yes | yes | 20.0 | TCB Smooth |
| 2s | yes | no | 25.0 | n/a |
| 4s | yes | no | 30.0 | n/a |
| 8s | no | yes | 40.0 | TCB Smooth |
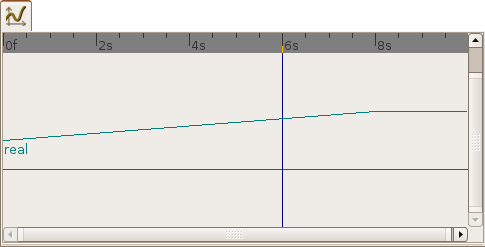
notice that although the interpolation between 0s and 8s is TCB Smooth the real result
is linear due that they are the only two waypoints of the animation for that parameter.
If you select the keyframe at 2s, place the time cursor at 6s (where there isn't a keyframe), set the default interpolation to TCB Smooth, and have the lock keyframe status to All keyframes locked and press the duplicate keyframe button, then the result is the following:
| Frame | Keyframe | Waypoint | Radius | Interpolation |
|---|---|---|---|---|
| 0s | yes | yes | 20.0 | TCB Smooth |
| 2s | yes | no | 25,78125 | n/a |
| 4s | yes | yes | 30.0 | TCB Smooth |
| 6s | yes | yes | 25.0 | TCB Smooth |
| 8s | no | yes | 40.0 | TCB Smooth |
You can see that:
- At 0s none has changed. Not affected by the insertion of the keyframe. It is two keyframes away from 6s and also have a waypoint.
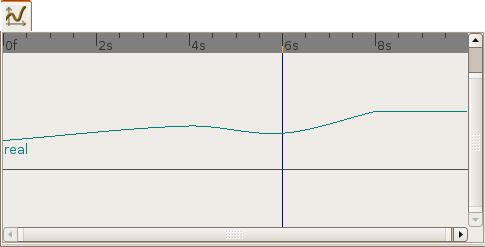
- At 2s there was a keyframe and stills there. But previous to the creation of the keyframe at 6s the current interpolated value of the radius was 25.0. After the creation of the keyframe at 6s the radius is the result of the interpolation between 0s and 4s frames waypoints with its radius values and its interpolation methods. That is 25.78125. This keyframe is more than one keyframe away from the new 6s keyframe so no waypoint is created.
- At 4s there was a keyframe and still being there. But in this case the 4s keyframe is a neighbor of the new 6s keyframe. As well as the lock keyframe state was set to All keyframes locked then the keyframe at 4s has been locked adding a waypoint on it. The radius value hasn't changed (still being 30.0) because it was locked adding a waypoint with its current value). The Interpolation mode of the waypoint was set to TCB Smooth as stated by its default value.
- At 6s there is a new keyframe with a new waypoint with the old value of the interpolated value of the keyframe at 2s. That is a radius of 25.0.
- At 8s nothing has changed. There wasn't any keyframe and there was a waypoint so nothing is expected to change.
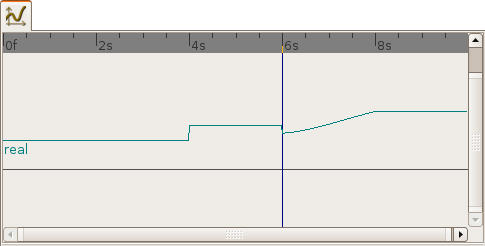
Imagine now that you repeat the same operations but you choose the default interpolation set to Constant. Then the result is the following:
| Frame | Keyframe | Waypoint | Radius | Interpolation |
|---|---|---|---|---|
| 0s | yes | yes | 20.0 | TCB Smooth |
| 2s | yes | no | 20.0 | n/a |
| 4s | yes | yes | 30.0 | Constant |
| 6s | yes | yes | 25.0 | TCB Smooth |
| 8s | no | yes | 40.0 | TCB Smooth |
Now you can see that the keyframe at 2s doesn't hold the value of the parameter by itself. It only remember the value if a waypoint is created on it, by the result of the insertion of a neighbour waypoint, or if a keyframe is duplicated and the lock keyframe status affects that keyframe. In this example the value at 2s has changed drastically due to the different interpolation method for the created waypoint on 4s. If in this situation you duplicate again the keyframe at 2s to other frame (ej. 10s) then it would copy a keyframe with a waypoint on it with a radius's value of 20.0, what is the current value of the parameter in that keyframe before duplicate it.
Editing Keyframe Properties
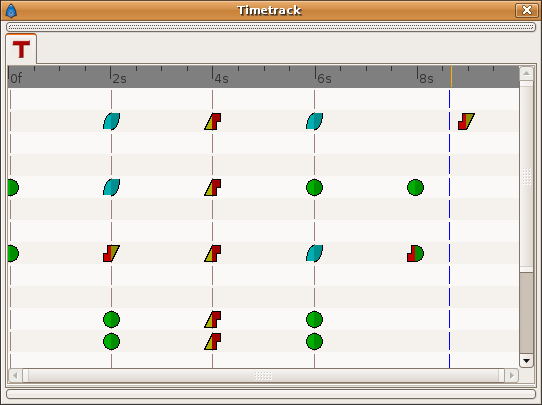
Consider this situation for a certain layer:
In the sample the animation duration is 10 seconds so the image shows all the existing waypoints and keyframes. The time cursor isn't over any keyframe.
Now consider that you have the following default values:
- Default Interpolation method set to "Ease in/out"
- Lock Keyframes status set to "All Keyframes Locked"
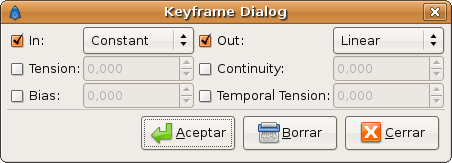
Now select the keyframe at frame 4s in the keyframe list. Press the Keyframe Properties button and set the following interpolation method:
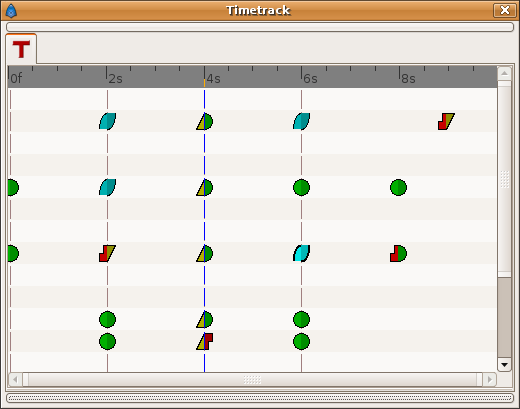
and press Apply button. The result will be this:
You can see the following effects:
- The existing waypoints at 4s keyframe have changed its interpolation methods according to the Keyframe Properties dialog.
- There are new added waypoints at 4s keyframe. The waypoints are added to the paramters that have almost one waypoint in the time line (for example the one that have only a waypoint at 9s). The added waypoints at 4s keyframe have the interpolation settings that was stated by the Keyframe Properties dialog.
- New waypoints have been created for the neighbouring keyframes to 4s (2s and 6s) fo all the parameters that have any waypoint in the time line. The waypoints are created in the neighbouring keyframes according to the Lock Keyframes status. Also the created waypoints interpolation method responds to the default interpolation method you have set.
If in the Keyframe Properties dialog you were checked off the Out or the In check boxes then it would have happened two things:
- The existing waypoints at 4s would only change its interpolation method on the side the check box was checked on. The other side will be untouched.
- The new added waypoints will have the interpolation method set to TCB Smooth method where the check box is off and the interpolation method set by the keyframe properties dialog where the check box is on.
In this sample it was only checked on the "In" check box.
Change Keyframe Time
Without waypoints between keyframes
Consider again this situation for a certain layer:
Now consider that you have the following default values:
- Default Interpolation method set to "Ease in/out"
- Lock Keyframes status set to "All Keyframes Locked"
Now select the keyframe at frame 4s in the keyframe list. Make a click in the Time cell and modify the time to be 3s. The result will be this:
With waypoints between keyframes
Consider now this situation for a certain layer:
Now consider that you have the following default values:
- Default Interpolation method set to "Ease in/out"
- Lock Keyframes status set to "All Keyframes Locked"
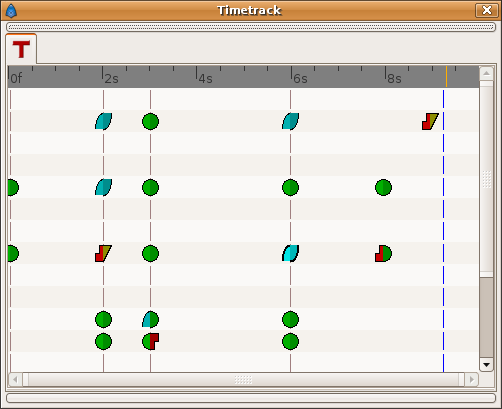
Now select the keyframe at 4s in the keyframe list. Make a click in the Time cell and modify the time to be 2s. The result is this:
You can see how the waypoints at right and left of the moved keyframe have been compressed and expanded in the time line. Also notice that any waypoint has been formed in the moved keyframe at the paramter at the bottom of the list but yes in the static keyframes. It seems to be a bug (?).
Trying to understand this behaviour I see that also the keyframes keep the waypoints between two adjacent keyframes although you move them, keeping the distribution of the waypoints in the portion of time line between keyframes. This behaviour doesn't happen if the moved keyframe "jumps" over other keyframe when moved. Please add here as much information you can discover about keyframes behaviour. It seems that there are some bugs and any information is welcome
Advanced uses of keyframes
Reusing keyframes
If you want to learn more about advanced uses of keyframes see this tutorial about reusing animations. Keyframes can be like stored "poses" that can be reused several time in the animation. Very useful for lip sync.
Usage of Onionskin
To properly use the onion skin feature (ALT-O or File>View>Toggle Onion Skin) you should consider the frame where the keyframes are set. Onion skin will show you the before and after keyframes images with a 50% opaque copy of the current view. Also the current view is 50% opaque.
See Onion Skin for more detail.

